background image

24

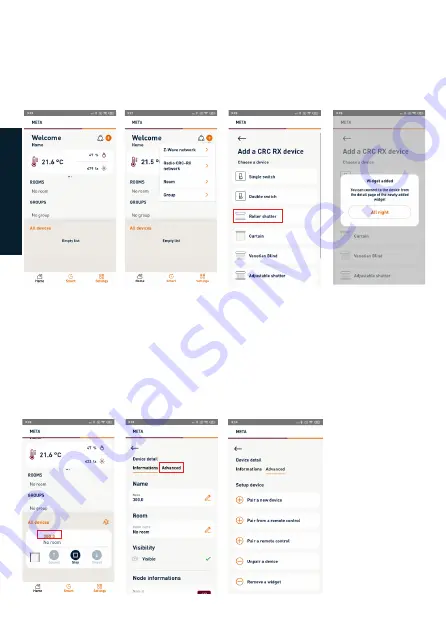
On the main screen (fig. 26), clicking on the + icon will bring up the drop-down menu for 
including new devices (fig. 27). Select the CRC RX radio network and in the next screen, 
click on the type of device you wish to pair with the Gateway (fig. 28). 

Once you have clicked on the device type, you must return to the main screen to display 
the selected device’s widget (control panel) (fig. 29). In the example shown, the device 
chosen is a roller shutter.  
Once the widget has been created, it is necessary to pair the device to be controlled. 
Clicking on the ID number of the widget (fig. 30) takes you to the configuration menu. 
By clicking on Advanced (fig. 31), a list of actions to be carried out as required appears 
(fig. 32). 

PAIRING AND UNPAIRING A DEVICE FROM THE 433 RADIO 
NETWORK

Fig. 26

Fig. 30

Fig. 27

Fig. 31

Fig. 28

Fig. 29

Fig. 32

IT

ALIANO

E

NG

L

IS

H

Summary of Contents for METAHome

Page 1: ...METAHome ISTRUZIONI INSTRUCTIONS EINSTELLANLEITUNGEN INSTRUCTIONS INSTRUCCIONES Gateway doppia radio Gateway radio double Gateway radio dual IT EN DE FR ES Dual radio Gateway Doppelfunk Gateway ...

Page 2: ......

Page 3: ...reen p 21 Inclusion of a Z Wave device p 22 Exclusion of a Z Wave device p 23 Pairing and Unpairing a Device from the 433 Radio Network p 24 Smart Management p 26 USB update procedure p 26 Factory reset p 26 EU declaration of conformity p 63 15 TECHNICAL SPECIFICATIONS Power supply 5 VDC System temperature limit 105 C Working temperature 10 to 40 C Z Wave radio frequency 868 4 MHz Europe Safety sy...

Page 4: ...e control of Cherubini radio tubular motors The METAHome Gateway will enable the control of various products for domestic use such as lights power loads blinds etc which communicate via Z Wave or 433 radio protocol 16 DEVICE DESCRIPTION E N G L I S H LED indicator pairing BUTTON LAN RESET button wall attachment USB USB PWR power ...

Page 5: ...eway will switch on The status LED indicates Gateway start up phases GATEWAY CONNECTION The system includes an RGB LED that shows the status of the device during installation Intense YELLOW system starting up LIGHT GREEN completion of start up Blinking GREEN system started and usable GREEN BLUE sequence Z Wave Inclusion procedure in progress RED BLUE sequence Z Wave Exclusion procedure in progress...

Page 6: ...tarted up and it is possible to connect to the Gateway through the App Press and hold the ON OFF button on the Gateway for approximately 4 seconds until the RED LED lights up SWITCHING ON GATEWAY GATEWAY SHUTDOWN Once the App has been downloaded it is necessary to log in for the first time using a smartphone or tablet connected to the same LAN network to which the Gateway is connected The default ...

Page 7: ...shing BLUE quickly and then GREEN quickly as soon as the connection is confirmed It will then flash GREEN again every 5 seconds If the connection is not established within 60 seconds the LED will quickly flash RED and return to flashing GREEN every 5 seconds At this point you will be asked to register your data fig 5 and change your password fig 6 and then you will be taken directly to the main sc...

Page 8: ...Gateway IP will be that of the WS2G Gateway device among the devices connected to the router When registering for the first time or logging in later you can save your profile by ticking the Save Profile checkbox An additional field will then appear in which to enter the name of the profile fig 12 At subsequent logins the name of the profile created will appear in the Quick Access screen fig 13 Use...

Page 9: ...21 DESCRIPTION OF THE MAIN SCREEN Under the GROUPS section you will find the list of all devices included in the Gateway Home page Integrated temperature humidity and brightness sensors E N G L I S H ...

Page 10: ...ally done by pressing a button on the device and then follow the instructions on the next screens fig 17 18 and 19 until fig 20 When the procedure is completed the screen for inclusion exclusion of Z Wave devices will be displayed again fig 15 and it is possible to add new devices Otherwise it will return to the main control screen where the added device will appear fig 21 INCLUSION OF A Z WAVE DE...

Page 11: ...earch and put the device to be excluded into Learning Mode which is typically done by pressing a button on the device and then wait for the procedure to complete fig 24 and 25 When the procedure is complete the Z Wave device inclusion exclusion screen Fig 22 is displayed where you can remove other devices Otherwise you will return to the main screen EXCLUSION OF A Z WAVE DEVICE Fig 22 Fig 23 Fig 2...

Page 12: ...to display the selected device s widget control panel fig 29 In the example shown the device chosen is a roller shutter Once the widget has been created it is necessary to pair the device to be controlled Clicking on the ID number of the widget fig 30 takes you to the configuration menu By clicking on Advanced fig 31 a list of actions to be carried out as required appears fig 32 PAIRING AND UNPAIR...

Page 13: ...edure 2 for details of remote control use Unpair device Use when you want to unpair a device from the META app Perform this action and check that the device no longer responds to the META app before performing the next action to remove the widget Remove Widget After unpairing the device from META use this action to remove the device from those displayed on the main screen PROCEDURE 1 To execute th...

Page 14: ... is complete the Gateway will restart Switch off the Gateway Connect the USB stick containing the update file provided by the manufacturer and restart the Gateway by pressing the power button The LED will start flashing GREEN RED as soon as the Gateway detects the update file on the USB stick To proceed with the update leave the USB stick inserted in the Gateway Otherwise remove it within 10 secon...

Page 15: ... relevant Union harmonisation legislation Directive 2014 53 EU Directive 2011 65 EU The full text of the EU declaration of conformity is available upon request at the following website www cherubini it Failure to comply with these instructions annuls CHERUBINI s responsibilities and guarantee GB EU konformitätserklärung CHERUBINI S p A erklärt der produkt erfüllt die einschlägigen Harmonisierungsr...

Page 16: ...as Barbet 165 Impasse Ampère 30600 Vauvert France Tél 33 0 466 77 88 58 Fax 33 0 466 77 92 32 info cherubini fr www cherubini fr CHERUBINI Iberia S L Avda Unión Europea 11 H Apdo 283 P I El Castillo 03630 Sax Alicante Spain Tel 34 0 966 967 504 Fax 34 0 966 967 505 info cherubini es www cherubini es CHERUBINI S p A Via Adige 55 25081 Bedizzole BS Italy Tel 39 030 6872 039 Fax 39 030 6872 040 info ...

Reviews: