Cherry CyBo@rd Plus M 83-13900 Quick Start Instructions Download Page 13

13

7 Connecting the devices

7.1 Connecting the receiver to the PC via 

the PS/2 connection

1 Switch off the PC.
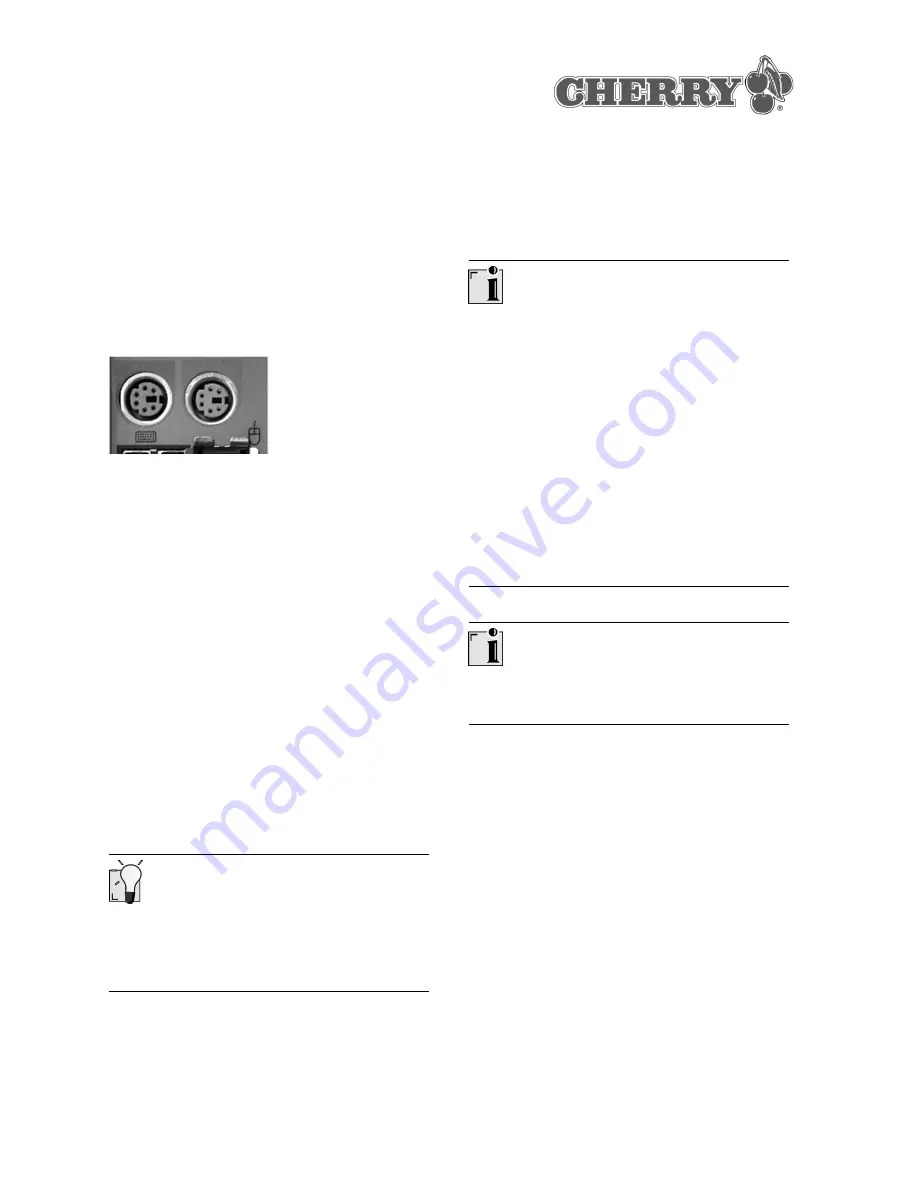
2 Locate the two round 6-pin PS/2 connections for 

the keyboard and mouse on the back of the PC.

3 Insert the purple plug of the receiver into the 

purple PS/2 connection for the keyboard.

4 Insert the green plug of the receiver into the 

green PS/2 connection for the mouse.

5 Switch on the PC.

7.2 Inserting the batteries into the 

keyboard

1 Open the battery compartment on the under-

side of the wireless keyboard.

2 Insert both accompanying AA (LR6) batteries.
3 Close the battery compartment.

7.3 Inserting the batteries into the mouse

1 Open the battery compartment on the under-

side of the wireless mouse.

2 Insert both accompanying rechargeable alkaline 

AA (LR6) batteries.

Charge level of alkaline batteries

The alkaline batteries are ready for operation right 
away and do not need to be charged before the ini-
tial use.

3 Close the battery compartment.

8 Using the charging function of 

the mouse

Usable battery type

The charging electronics only function with 
rechargeable alkaline batteries (example: AccuCell 
AC 1800). Rechargeable NiMH and NiCd batteries 
are not charged in the mouse.
Rechargeable alkaline batteries have the following 
advantages:
• high capacity (1800 mAh)
• minimal self-discharge
• can be recharged at any time without the mem-

ory effect

• rechargeable several hundred times
• high output voltage (1.5 V)
• environmentally friendly due to less waste

Charging cable

Use only the accompanying charging cable.

1 Remove the keyboard PS/2 connector from the 

PS/2 socket on the PC.

2 Insert the keyboard PS/2 connector into the 

PS/2 socket of the charging cable.

3 Insert the charging cable PS/2 connector into 

the PS/2 socket on the PC.

4 Insert the hollow connector of the charging cable 

into the socket on the front of the mouse.
The mouse is charged as long as the PC is 
switched on.

Summary of Contents for CyBo@rd Plus M 83-13900

Page 1: ...uch und leisten einen Beitrag zum Umweltschutz 2 Vorteile des CyBo rd Plus Das CyBo rd Plus besteht aus der Tastatur der Maus und dem Funk Empfänger für beide Geräte Es sind keine störenden Kabel im Weg Sie bedie nen Ihren PC je nach örtlichen Gegebenheiten bis ca 5 m vom Empfänger entfernt 2 1 Die Tastatur Die Tastatur bietet Ihnen neben den Funktionen einer Standard Tastatur folgende zusätzliche...

Page 2: ... bis 60 C Betriebstemperatur 0 C bis 50 C Abmessungen L x B x H 458 x 184 x 40 mm mit Handballenauf lage 458 x 244 x 40 mm 4 Funk Maus M 7000 5 Funk Empfänger R 3000 Bezeichnung Wert Maustyp 3 Tasten Wheel Mouse Auflösung 800 dpi Spannungsversorgung 2 wieder aufladbare Alkali Batterien Typ LR6 AA Lebensdauer der Batterien 3 Monate bei typ Benutzung im Office Bereich Versorgungsspannung 2 2 bis 3 3...

Page 3: ...en der Schalter 5 bis 8 ergeben 16 mögliche ID Codes Prinzipiell muss die Stellung der Schalter bei allen 3 Geräten eines PCs Tastatur Maus Empfänger identisch sein Einstellungen der Frequenzkanäle Lagertemperatur 20 C bis 60 C Betriebstemperatur 0 C bis 50 C DIP Schalter Fre quenz Kanal 1 2 3 4 Nr on on on on 1 off on on on 2 on off on on 3 off off on on 4 on on off on 5 Bezeichnung Wert Einstell...

Page 4: ...Schalter 5 bis 8 verändern 4 Schließen Sie die Abdeckung off on off off 13 on off off off 14 off off off off 15 DIP Schalter ID Codes 5 6 7 8 Nr Frequenz Kanal ID Code an der Tastatur ändern 1 Öffnen Sie das Batteriefach an der Unterseite der Funk Tastatur 2 Entnehmen Sie die Batterien Die alte Einstellung ist gelöscht 3 Bringen Sie die DIP Schalter 1 bis 8 mit einem spitzen Gegenstand in die glei...

Page 5: ...ali Batterien Die Alkali Batterien sind sofort betriebsbereit und müssen vor der ersten Benutzung nicht geladen werden 3 Schließen Sie das Batteriefach 8 Ladefunktion der Maus verwenden Verwendbarer Batterietyp Die Ladeelektronik funktioniert nur mit wieder auf ladbaren Alkali Batterien Beispiel AccuCell AC 1800 Wieder aufladbare NiMH und NiCd Bat terien werden in der Maus nicht geladen Wieder auf...

Page 6: ...wird deaktiviert wenn Sie die Batterien der Maus entnehmen Deshalb muss die Energiesparfunktion nach jeder Entnahme der Batterien erneut aktiviert werden 9 2 Maus im Energiesparmodus aktivieren Wenn die Maus länger als 15 Minuten nicht bewegt wurde müssen Sie sie manuell einschalten Drücken Sie eine beliebige Taste Die Maus ist aktiviert Sleep Modus bei inaktiver Energiesparfunktion Bei inaktiver ...

Page 7: ...riften bzw Normen zu erfüllen Davon abwei chende Anforderungen können durch gegenseitige Zusammenarbeit erfüllt werden Unsachgemäße Behandlung Lagerung und äußere Einflüsse kön nen zu Störungen und Schäden im Einsatz führen Wir übernehmen keinerlei Gewährleistung falls unser Produkt anwenderseitig verändert wird und haften nicht im Falle unbefugter Veränderungen Alle Reparaturen müssen durch Cherr...

Page 8: ...d by turning the equipment off and on the user is encouraged to try to correct the interference by one or more of the following mea sures Reorientate or relocate the receiving antenna Increase the separation between the equip ment and receiver Connect the equipment into an outlet on a cir cuit different from that to which the receiver is connected Consult the dealer or an experienced radio TV tech...

Page 9: ...making our contribution towards environmental protection 2 Advantages of the CyBo rd Plus The CyBo rd Plus consists of the keyboard the mouse and the wireless receiver for both devices There are no annoying cables in the way Depend ing on your workplace conditions you can operate your PC up to approx 5 m away from the receiver 2 1 The keyboard In addition to the functions of a standard key board t...

Page 10: ... 0 C to 50 C Dimensions L x W x H 458 x 184 x 40 mm with palm rest 458 x 244 x 40 mm 4 Wireless mouse M 7000 5 Wireless receiver R 3000 Designation Value Mouse type 3 key wheel mouse Resolution 800 dpi Power supply 2 rechargeable alka line batteries of type AA LR6 Battery life 3 months of normal use in an office setting Supply voltage 2 2 to 3 3 V SELV Transmit frequency 2400 5 to 2483 5 MHz Numbe...

Page 11: ...hes 5 to 8 allow 16 different ID code selec tions In principle the switch settings must be identical on all three devices of a PC keyboard mouse receiver Frequency channel settings Operating tempera ture range 0 C to 50 C DIP switches Fre quency chan nel 1 2 3 4 No on on on on 1 off on on on 2 on off on on 3 off off on on 4 on on off on 5 Designation Value ID code settings off on off on 6 on off o...

Page 12: ...P switches 5 to 8 to change the ID code 4 Close the cover on on off off 12 off on off off 13 on off off off 14 off off off off 15 DIP switches ID codes 5 6 7 8 No Changing the frequency channel ID code at the keyboard 1 Open the battery compartment on the under side of the wireless keyboard 2 Remove the batteries The old setting is deleted 3 Set DIP switches 1 to 8 to match the receiver using a po...

Page 13: ...eady for operation right away and do not need to be charged before the ini tial use 3 Close the battery compartment 8 Using the charging function of the mouse Usable battery type The charging electronics only function with rechargeable alkaline batteries example AccuCell AC 1800 Rechargeable NiMH and NiCd batteries are not charged in the mouse Rechargeable alkaline batteries have the following adv...

Page 14: ... save function is deactivated when you remove the batteries from the mouse For this rea son the power save function must be reactivated each time after the batteries are removed 9 2 Activating the mouse in power save mode If the mouse has not been moved for longer than 15 minutes you must switch it on manually Press any key The mouse is activated Sleep mode with inactive power save function When t...

Page 15: ... in order to fulfill the internationally recognized regulations and stand ards Any deviating requirements can be fulfilled by mutual cooperation Improper handling storage and external influences can lead to faults and dam age in use We do not accept any guarantee if our product is modified by the user and are not liable for any unauthorized modifications All the repairs have to be carried out by C...

Page 16: ... turning the equipment off and on the user is encouraged to try to correct the interference by one or more of the following mea sures Reorientate or relocate the receiving antenna Increase the separation between the equip ment and receiver Connect the equipment into an outlet on a cir cuit different from that to which the receiver is connected Consult the dealer or an experienced radio TV technici...

Page 17: ...ons la consom mation de feuilles et contribuons à la protection de l environnement 2 Avantages du produit CyBo rd Plus L ensemble CyBo rd Plus se compose du cla vier de la souris et du récepteur RF pour les deux appareils Il n y a pas de câbles gênants dans le chemin Vous commandez votre PC selon les données locales jusqu à une distance d env 5 m du récepteur 2 1 Le clavier En plus de toutes les f...

Page 18: ...uence réglables 16 Nombre de codes ID réglables 16 Portée de transmis sion 5 m typ Température de stoc kage 20 C à 60 C Température de fonc tionnement 0 C à 50 C 4 Souris RF M 7000 5 Récepteur RF R 3000 Dimensions L x l x H 458 x 184 x 40 mm avec appui pour les paumes 458 x 244 x 40 mm Désignation Valeur Description Souris à 3 boutons avec roulette Résolution 800 ppp Tension d alimentation 2 piles...

Page 19: ... DIP 5 à 8 permet tent la sélection de 16 codes ID différents Par principe le réglage des commutateurs DIP doit être le même pour les trois appareils d un PC cla vier souris récepteur Fréquence de récep tion 2400 5 à 2483 5 MHz Nombre de canaux de fréquence réglables 16 Nombre de codes ID réglables 16 Portée de transmis sion 5 m typ Température de stoc kage 20 C à 60 C Température de fonc tionneme...

Page 20: ...DIP Codes ID 5 6 7 8 N 3 Si toutes les possibilités de fréquence des canaux ont déjà été utilisées voir tableau utili sez les commutateurs DIP 5 à 8 pour changer le code ID 4 Fermez le couvercle Modifier le canal de fréquence le code ID sur le clavier 1 Ouvrez le compartiment à piles situé sous le cla vier R F 2 Enlevez les piles L ancien réglage est effacé 3 A l aide d un objet pointu placez les ...

Page 21: ...t pas être chargées avant la première utilisation 3 Fermez le compartiment à piles 8 Utiliser la fonction de chargement de la souris Type de pile utilisable L électronique de chargement fonctionne unique ment avec des piles alcalines rechargeables exemple AccuCell AC 1800 Les piles rechar geables NiMH et NiCd ne se chargent pas dans la souris Les piles alcalines rechargeables offrent les avan tage...

Page 22: ...vous enlevez les piles de la souris Pour cette raison la fonction d économie d énergie doit être réactivée chaque fois que vous enlevez les piles 9 2 Activer la souris dans le mode d économie d énergie Si la souris n a pas été déplacée pendant plus de 15 minutes vous devez l enclencher manuelle ment Appuyez sur une touche quelconque La souris est activée Mode Sleep lorsque la fonction d économie d...

Page 23: ...ons et normes internationalement recon nues Les exigences qui s en écartent peuvent être réalisées par collaboration mutuelle La manipula tion ou le stockage inappropriés ainsi que des influences extérieures peuvent conduire à des dérangements et dommages lors de l utilisation Nous déclinons toutes prestations de garantie si notre produit est modifié par l utilisateur et nous déclinons toute respo...

Page 24: ...on which can be determined by turning the equipment off and on the user is encouraged to try to correct the interference by one or more of the following mea sures Reorientate or relocate the receiving antenna Increase the separation between the equip ment and receiver Connect the equipment into an outlet on a cir cuit different from that to which the receiver is connected Consult the dealer or an ...

Reviews: