background image

Section 6 

Operating instructions 

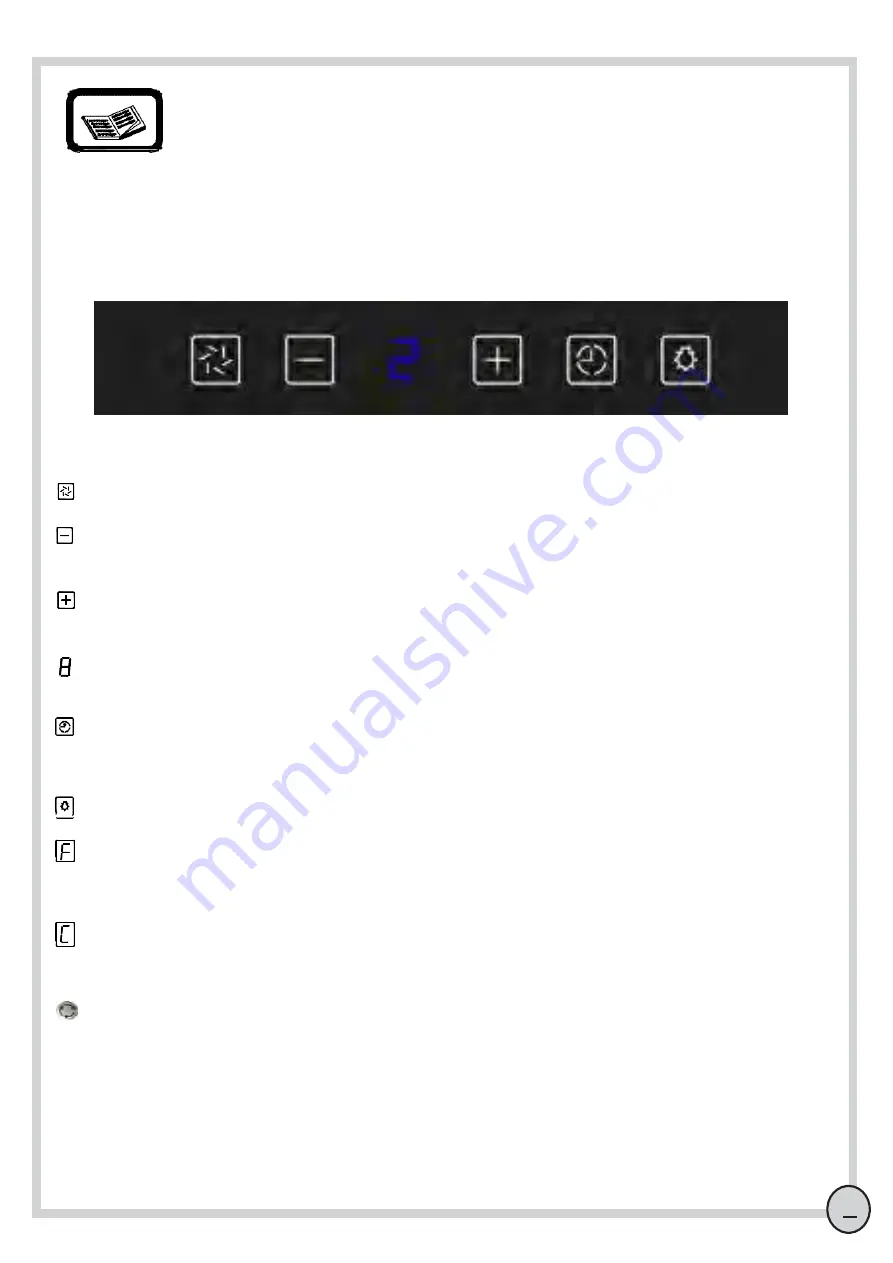
Touch control operating instructions 

M.On/Of button:

 Starts and stops the motor. Motor starts-up at Speed 2. 

(minus button):

It is used to reduce the motor speed down to speed 1. The speeds are reduced one after the other 

when the button is pressed continuously. The speed is reduced one by one if the button is pressed intermittently.  

(plus button):

It is used to increase the motor speed up to speed 4. The speeds are increased one after the other 

when the button is pressed continuously. The speed is increased one by one if the button is pressed intermittently. 

Display:

 It displays the speed of the motor, replacement/cleaning warning for the aluminium filter and carbon filter, 

functioning of the timer and on/off positions of the lamp.  

Timer button:

 If the timer button is pressed when the motor is active, the number of that speed starts flashing on 

the display.  Motor stops and, if it is on, the lamp turns off after flashing for 15 minutes. If the timer button is 
pressed again, the flashing stops and the timer setting is cancelled.  

Lamp button:

 It is used to turn the lamp on and off. A point segment is displayed when the lamp is on. 

Aluminium filter warning:

 At the end of 30-hour motor operating period, 'f" is displayed as the aluminium filter 

replacement/cleaning warning. If the (-) minus button is pressed for 5 seconds after cleaning the filter, 'e' is 
displayed and the aluminium filter timer is reset.  

Carbon filter warning:

 At the end of 300-hour motor operating period, 'f" is displayed as the carbon filter 

replacement/cleaning warning. If the (+) minus button is pressed for 5 seconds after cleaning the filter, 'e' is 
displayed and the carbon filter timer is reset. 

Air filtering function:

 If the timer button is pressed for 2 seconds when the fan is turning, the air filtering 

function is activated.  The fan turns at low speed for 10 minutes and stops for 50 minutes when the air filtering 
function is on.  This cycle is repeated for 24 hours.  The fan effect is not displayed, instead, "0" is displayed when 
this function is activated.  

Air filtering function is cancelled by pressing the time button for 2 seconds (the fan continues normal operation at 

speed 1) or by pressing on-off button to stop the motor.  

9


Summary of Contents for NARSIS 90

Page 1: ...NARSIS 90 Range Hood User Manual Compliant to EEE Directive Please read this user manual carefully before installing or using your equipment Please keep this user manual in a safe place for future use...

Page 2: ......

Page 3: ...e read carefully before attempting to install the equipment Points to consider before use 2 Section 1 Technical specifications 3 Section 2 Technical dimensions 4 Section 3 Wiring diagrams 5 Section 4...

Page 4: ...orks In contrary there is a risk of electrical mechanical problems for the equipment in addition electrical or mechanical accidents may take place 8 Range hood is designed for use above the stoves in...

Page 5: ...5 Control icons 6 Main glass panel 7 Connection plate 3 7 Range hood technical specifications Length 898 Motor Power 115W Width 380 Total Power 155W Height Min 705 Max 985 Air Outlet Pipe Diameter 120...

Page 6: ...4 Technical dimensions Section 3 10 20 30 40 50 60 70 80 90 100 2 21 Figure A2 260 260 898 455 Min 705 Max 985 380...

Page 7: ...n sfor Wiring diagrams Section 4 Touch control wiring diagram Button card Data cable entry Lamp Max 200W 380W Max 220 230V 50Hz Power input Data cable entry Figure A3 5 4 Speed N 3 Speed 2 Speed 1 Spe...

Page 8: ...ting instructions Figure A4 Oven Stove 14 190 CEILING drill with 7 drill bit Flue connection apparatus Mounting plate 190 1105 Min 65 cm drill with 8 drill bit 320 drill with 8 drill bit Range hood mo...

Page 9: ...nd 2x 7 threaded inserts into the wall 3 Drive 2x50 rysb screws 2 into the threaded insert making sure that the spacing between the wall and the screw head is 2 4 mm 4 Lift the product slide the screw...

Page 10: ...ws 5 Flue Top 6 Lower Flue Panel 7 Motor connection wall mounting plate 8 3 9x9 5 pan head screw Flue assembly 1 Insert lower flue panel into the flue top 2 Screw the lower flue panel to the range by...

Page 11: ...lashing stops and the timer setting is cancelled Lamp button It is used to turn the lamp on and off A point segment is displayed when the lamp is on Aluminium filter warning At the end of 30 hour moto...

Page 12: ...We do not recommend you to clean your aluminium filter in dishwasher If the aluminium filter cannot be cleaned you can buy a new one from the authorized technical service Aluminium filter removal Fig...

Page 13: ...ling to the side as shown in Figure A11 Carbon filter placement Turn the carbon filter in the clockwise direction by pressing on the side as shown in Figure A12 Cleaning Use a wet cloth with liquid de...

Page 14: ...f the product has flue connection check the connection and make sure the flue outlet is not blocked Check whether the aluminium filter and carbon filter are clean The range hood vibrates Make sure tha...

Page 15: ......

Page 16: ......

Reviews: