


11
12
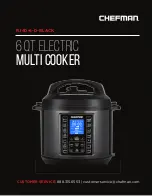
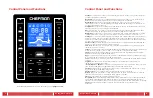
MODEL: RJ40-6-D-BLACK
MODEL: RJ40-6-D-BLACK
Operating Instructions
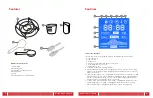
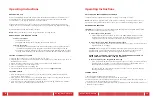
ADJUSTING THE PRESSURE REGULATOR KNOB
1. Turn the pressure regulator knob to the “Sealing” or “Venting” position.
NOTE:
The pressure regulator knob is removable for cleaning; pull it up to remove. Never
attempt to remove it while the Multi Cooker is in use or while the floating valve is lifted.
RELEASING THE PRESSURE
CAUTION:
Never attempt to open the lid while the floating valve is still lifted. Always allow
the pressure to fully release before opening.
To release the pressure naturally
1. Simply allow the Multi Cooker to switch to the KEEP WARM function until the
floating valve drops on its own. This process may be sped up by pressing the
CANCEL button, which will turn off the Multi Cooker’s heating element.
To release the pressure using the quick release method
1. Use a long-stemmed utensil, such as a wooden spoon or tongs, to turn the pressure
regulator knob to “Venting.”
CAUTION:
When the pressure is releasing, hot steam will release from the pressure
regulator knob. To prevent splattering, a towel may be placed over the pressure
regulator knob before turning the pressure regulator knob to “Venting.”
NEVER PLACE YOUR HAND OR FACE OVER THE PRESSURE REGULATOR KNOB
WHILE PRESSURE IS RELEASING. STEAM IS VERY HOT!
To open the lid before the programmed time is up
1. Use a long-stemmed utensil, such as a wooden spoon or tongs, to turn the pressure
regulator knob to “Venting,” or press CANCEL and wait for the floating valve to
drop naturally. The lid may be opened once the valve drops.
The lid may also be opened before the Multi Cooker comes to pressure and the
floating valve has not lifted yet.
OPENING THE LID
1. Ensure that the floating valve has dropped.
2. Use the handle on the top of the lid to turn the lid to the right.
3. Lift it up and slowly turn your wrist 90 degrees so that any moisture that has collected on
the inside of the lid can drip into the cooking pot.
4. Once the excess moisture has dripped into the cooking pot, the lid may be placed in one of
the Multi Cooker’s handles.
Operating Instructions
BEFORE FIRST USE
Remove all packing materials and stickers from the inside and outside of the Multi Cooker.
Gently wipe down exterior with a damp cloth or paper towel. Never immerse the Multi
Cooker, its base, cord or plug in water or any other liquid.
Wash all removable parts, except for the power cord and plug, with a sponge and warm,
soapy water. Do not use abrasive cleaning agents or scouring pads. Dry all parts thoroughly.
Read all instructions and follow them carefully.
NOTE:
Always remember to secure the gasket before securing the lid.
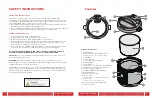
REMOVING AND SECURING THE GASKET
To remove the gasket
1. Turn lid upside down.
2. Pull gasket away from the metal ring until it is fully removed.
To secure the gasket
1. Turn lid upside down and place the inside of the gasket onto the gasket holder. It
should be positioned between the gasket holder and the inner edge of the lid.
2. Continue pushing the gasket onto the gasket holder while rotating the lid. It is fully
secured when all parts of the gasket holder sit flush within the inside of the gasket.
SETTING UP THE MULTI COOKER
1. Plug the base of the power cord into the power cord port.
2. Plug the power cord into the wall. The Multi Cooker will beep once and the word “OFF” will
illuminate on the screen.
3. Ensure that the condensation cup is in place on the back of the Multi Cooker.
4. Put your cooking pot into the Multi Cooker.
5. Put your ingredients into the cooking pot.
6. Select and start a function using the detailed instructions on
pages 13 to 26.
SECURING THE LID
1. Make sure the gasket, on the inside of your lid, is fully secured. (Read “Removing and
Securing the Gasket" above.)
2. Place your lid onto the Multi Cooker. Line up the arrow on the top of the lid with the arrow
located next to the unlock symbol on the Multi Cooker.
3. Once it is secure, use the lid handle to turn the lid to the left, lining up the arrow with the
arrow next to the lock symbol; this will lock the lid.


