


19
20
MODEL: RJ40-6-D-BLACK
MODEL: RJ40-6-D-BLACK
Operating Instructions
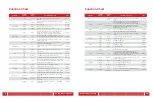
8. PRESSURE COOK
• PRE-PROGRAMMED TIMES:
Less = 20 minutes, Normal = 35 minutes, More = 45 minutes
• MAX TIME:
4 hours
•
TO USE:
a. If desired, use the Sauté function to brown the meat, poultry and/or vegetables.
Otherwise, put ingredients, including at least 1 cup of liquid, into the cooking pot. Do
not fill more than
2/3
.
b. Secure the lid and ensure the pressure regulator knob is set to the "Sealing" position.
c. Press the PRESSURE COOK button. Use the - and + buttons to adjust the cooking
time, OR press the PRESSURE COOK button again to select a preset cooking time.
The mode will change from “Normal” to “More” or “Less.” (Normal, More and Less
refer to preset cooking times. All can be adjusted further using the - and + buttons.)
d. At this point, the pressure may also be adjusted by pressing the PRESSURE LEVEL
button. Less, Low Pressure & Normal Mode and High Pressure & More Mode may be
selected. (Low Pressure & Normal Mode are designed to cook 9 minutes longer than
High Pressure & More Mode. Results will be very similar.) Press START.*
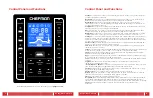
e. Once the START button is selected, the Multi Cooker will beep three times and the
word “On” will display on the screen. The selected cooking mode (Less, Normal or
More) will also display on the screen along with the cooking cycle indicator. The
cooking cycle indicator will display throughout the entire cooking process with the
words “Preheating,” “Cooking,” or “Keep Warm” displayed below it.
NOTE:
The amount of preheating time varies based on the amount of ingredients in
the cooking pot.
f. Right before the Multi Cooker comes to pressure, it will hiss slightly and steam will
start to escape from the pressure regulator knob.
g. Once it reaches full pressure, the floating valve will pop up and remain lifted the entire
time the Multi Cooker is at full pressure. The cooking cycle indicator will switch from
“Preheating” to “Cooking,” and the Multi Cooker will start to count down.
The lid will be locked during this time. As a safety precaution, it may not be opened.
DO NOT ATTEMPT TO OPEN THE LID WHILE THE FLOATING VALVE IS LIFTED!
h. When the programmed time fully counts down, the Multi Cooker will beep 10 times
and then switch to the Keep Warm function. While in the Keep Warm function, the
Multi Cooker will count up.
i. At this point, the pressure may be released naturally or by using the quick release
method. The natural release method is recommended for large cuts of beef or bone-
in chicken that will benefit from additional cooking time. The quick release method is
recommended for quick cooking pieces like boneless chicken breast.
j. Always press CANCEL when you are done cooking to turn the Multi Cooker OFF.
*Before pressing START, the DELAY TIMER may be set using the instructions on
page 26.
Operating Instructions
7. PORRIDGE
•
PRE-PROGRAMMED TIMES:
Less = 5 minutes, Normal = 20 minutes, More = 30 minutes
•
MAX TIME:
4 hours
•
TO USE:
a. Put the grains into the cooking pot. Fill with 1
½
times the amount of water or other
liquid such as milk, almond milk, etc. If using steel cut oats, the ratio is typically 1 cup
steel cut oats to 2
¼
cup liquid.) Do not fill more than
1/2
.
b. Secure the lid and ensure the pressure regulator knob is set to the "Sealing" position.
c. Press the PORRIDGE button. Use the - and + buttons to adjust the cooking time, OR
press the PORRIDGE button again to select a preset cooking time. The mode will
change from “Normal” to “More” or “Less.” (Normal, More and Less refer to preset
cooking times. All can be adjusted further using the - and + buttons.)
d. At this point, the pressure may also be adjusted by pressing the PRESSURE LEVEL
button. Less, Low Pressure & Normal Mode and High Pressure & More Mode may be
selected. (Low Pressure & Normal Mode are designed to cook 9 minutes longer than
High Pressure & More Mode. Results will be very similar.) Press START.*
e. Once the START button is selected, the Multi Cooker will beep three times and the
word “On” will display on the screen. The selected cooking mode (Less, Normal or
More) will also display on the screen along with the cooking cycle indicator. The
cooking cycle indicator will display throughout the entire cooking process with the
words “Preheating,” “Cooking,” or “Keep Warm” displayed below it.
NOTE:
The amount of preheating time varies based on the amount of ingredients in
the cooking pot. A large amount of ingredients will take longer to come to pressure
than a small amount. This process may be sped up if you start the function before
securing the lid. It may also be sped up if you Sauté some of the ingredients before
adding the liquid.
f. Right before the Multi Cooker comes to pressure, it will hiss slightly and steam will
start to escape from the pressure regulator knob.
g. Once it reaches full pressure, the floating valve will pop up and remain lifted the entire
time the Multi Cooker is at full pressure. The cooking cycle indicator will switch from
“Preheating” to “Cooking,” and the Multi Cooker will start to count down.
The lid will be locked during this time. As a safety precaution, it may not be opened.
DO NOT ATTEMPT TO OPEN THE LID WHILE THE FLOATING VALVE IS LIFTED!
h. When the programmed time fully counts down, the Multi Cooker will beep 10 times
and then switch to the Keep Warm function. While in the Keep Warm function, the
Multi Cooker will count up.
i. At this point, the pressure may be released naturally or by using the quick release
method. The natural release method is recommended for larger, heartier grains like
wheat berries. The quick release method is recommended for smaller grains that are
easy to overcook like quinoa.
j. Always press CANCEL when you are done cooking to turn the Multi Cooker OFF.
*Before pressing START, the DELAY TIMER may be set using the instructions on
page 26.


