background image

- 4 - 


.

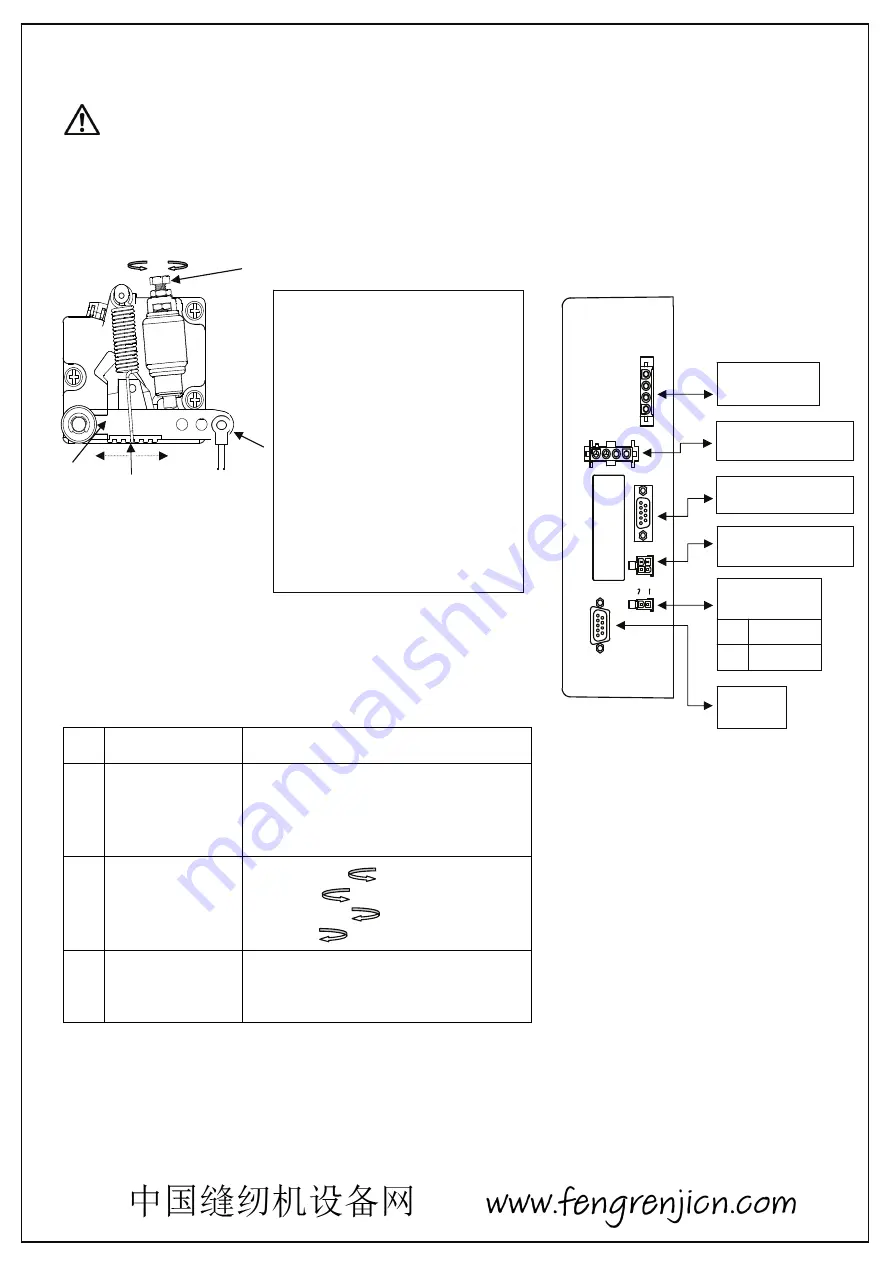
調整踏板


2.3. Speed Control Unit Adjustment 


3.插孔配置


項目


Term of adjustment


調整方法

Adjustment result


調整踏板踩踏施力


Toeing forward 
force adjustment


彈簧掛勾向右移時,變重。


Spring A move to right = force increased 

彈簧掛勾向左移時,變輕。


Spring A move to left = force decreased


后踏返回壓力的調整


Heeling backward 
force adjustment


調整螺絲B為      時、阻力變輕。


Bolt B turn


= force decreased 

調整螺絲B為      時、阻力變重。


Bolt B turn


= force increased


調整踏板行程


Treadle stroke 
adjustment


聯接桿裝在右側行程大,裝在左側行程小。

Rod D secure at right = stroke is longer 
Rod D secure at left = stroke is shorter


踏板的各部位名稱


Components of speed control unit 

:


see figure 


  A:前踏用的拉引彈簧


A

Spring for toeing forwardforce   

adjustment 

  B:後踏的壓力調整螺絲


B

Bolt for heeling backward force   

adjustment 

  C:踏桿


C

Treadle / Pedal arm 

  D:踏板的聯接桿


D

Pitman rod for Treadle / Pedal 


警告: 
為了安全起見,進行各調整前請關閉電源開關,
並拔下電源插頭。 

輕 


     重 

Caution : 


For person safety, turn off the power switch and remove

the power plug from outlet before any adjustment. 

decrease


increase


3. Connector Diagram


馬達出力 

MOTOR 

AC

電源


AC POWERSUPPLY

位置檢出器 

SYNCHRONIZER


馬達編碼器 

ENCODER

照明出力 

LIGHT


0V 

+12V 

踏板 

PEDAL


decrease


increase


GOLDEN WHEEL

Summary of Contents for M121 Series

Page 1: ...TION MANUAL 使用说明书 M121系列 为了安全地使用 请您在使用之前仔细阅读本使用说明书 另外 请您注意保管本使用说明书 以便随时查阅 Read safety Instructions carefully and understand them before using Retain this Instruction Manual for future reference No M121A01 No M121A01 GOLDEN WHEEL ...

Page 2: ...rposes 注意 請使用馬達及控制箱銘板上所標示規格 10 以内的電源電壓 避免造成運作失常或故障 Attention Only use Power Voltage indicated on the name plate of the M121 in 土 10 ranges It becomes a cause of malfunction or failure 使用本機須遠離高週波発振機及會產生強電界或磁界之處 電磁波可能會導致本驅動裝置產生錯誤運作 本產品不得置於直接日曬處或於室外使用 勿使用用在40 以上或5 以下室溫的場所 勿於暖房 或靠近電熱器之處 使用 濕度在 20 以下或 80 以上的地方或會結露的地方請勿使用 灰塵多的地方 有水蒸氣的地方 或者有腐蝕性氣體的空氣中 有可燃性氣體發生的地方都不要使用本製品 電源線上請勿放置重物 或過度加壓 彎曲 拉扯 電源線須距離皮帶輪及皮...

Page 3: ...ng on the machine in the first time use low speed to operate and check the correct rotation direction During machine operation don t touch any moving parts All moving parts must use the protective device to avoid the body contact and objects insertion Maintenance and repairs must be done by the specially trained personnel All spare parts for repair must be approved or supplied by the manufacturer ...

Page 4: ...絲 a Synchronizer Installation Mounting the Synchronizer onto the flange of machine pulley and match the stopper with a stop groove of the synchronizer With then tighten and secure 2 screws of the synchronizer b 調整檢出器 在實際安裝縫糿機時一邊進行上位置停止一邊調整 調整 針上 上位置 鬆開位置檢出器接頭的 2 個螺絲 將接頭旋轉到適當的停止位置 調整後再栓緊螺絲予以固定 b Synchronizer Adjustment Adjust this position with the synchronizer installed onto the sewing machine and...

Page 5: ...d D secure at right stroke is longer Rod D secure at left stroke is shorter 踏板的各部位名稱 Components of speed control unit see figure A 前踏用的拉引彈簧 A Spring for toeing forwardforce adjustment B 後踏的壓力調整螺絲 B Bolt for heeling backward force adjustment C 踏桿 C Treadle Pedal arm D 踏板的聯接桿 D Pitman rod for Treadle Pedal 警告 為了安全起見 進行各調整前請關閉電源開關 並拔下電源插頭 輕 重 B D C A 輕 重 Caution For person safety turn off the power s...

Page 6: ...數A 5 1 Parameter A F 鍵 F Key 參數設定模式切換 參數代碼增加 參數値增加 回復正常模式 Change to the parameter setting mode Increment Parameter code Increment parameter value Return to normal mode SET 鍵 SET Key 選擇參數編號 儲存參數値 變更針停止位置 Select Parameter code Save parameter value Changing the needle position 參數代碼 機能 表示範圍 設定分解能 備考 A 1 最高速度 2 B 1 100r min 上限限制於 B 1 的値 下限限制於 A 2 的値 最低速度的 10 位數不顯示 1 2 A 2 最低速度 20 A0 10r min 2 A 5 以踏板加針...

Page 7: ... 100r min 1 A C Stitch numbers for slow start 0 10 1stitches A D Pedal curve 0 2 1 參數代碼 機能 表示範圍 設定分解能 備考 B 1 最高速度 限制値 2 縫糿機速度 100r min 1 B 2 旋轉方向 0 1 0 CCW 1 CW B 3 以踏板加針後 逆轉機能 使用切換 ON OF 切線後 增加針數機能 B 4 以踏板加針後 逆轉機能 旋轉方向 0 1 0 逆轉 1 正轉 B 5 以踏板加針後 逆轉機能 旋轉角度 0 F0 1 度 B 3 ON 時有用 2 B 6 以踏板增針後 逆轉機能 旋轉速度 20 30 10r min B 3 ON 時有用 B D 連續切線時 馬達動作模式選擇 TS TK TS 標準動作 TK 從上停止切線時 沒有旋轉動作 Parameter code Parameter f...

Page 8: ...電壓是否超過 確認主基板的控制迴路有無異常 E04 電源線電圧下 降 電源電壓過低時 入力電壓錯誤時 確認AC電源電壓在正確值 確認定格電壓沒有超過 確認主基板的控制御迴路有無異常 E05 編碼器 AB 信號異常 編碼器的插頭沒有完全插入 編碼器的信號斷線 檢查編碼器插孔 配線 確認編碼器信號沒有異常 E06 馬達断線 馬達的插頭沒有完全插入 馬達的配線斷線 檢查馬達的插頭 配線 E07 位置檢出器 異常 位置檢出器的信號無法檢出 縫糿機的負荷太大或馬達皮帶輪有異物阻礙 布料太厚針無法穿透 檢查位置檢出器的插孔 配線 確認檢出器的信號沒有異常 檢查縫糿機是否鎖住 E12 初期磁極 檢出錯誤 電源ON時 磁極檢知信號異常時 編碼器的插頭沒有完全插入 編碼器的配線斷線 檢查編碼器的插孔 配線 確認磁極檢知信號沒有異常 E13 皮帶輪比 演算錯誤 皮帶輪比的演算未正常結束 上位置信號異常 上位置...

Page 9: ...r synchronizer connectors and its connection Please check the synchronizer sensor and its signal Please check the machine head to see if objects stuck in the motor pulley or rotate not smoothly E12 Initial magnetic pole detection error When magnetic pole detection signals are abnormalities at the time of the Power ON The connector of the encoder is not inserted completely Wiring of an encoder is d...

Page 10: ...動能力負荷過大 請更換出力更大的 馬達 即使警報發生中也還能繼 續運作 請停止運轉 降低檢出的馬 達電流後 會自動解除 Alarm code Alarmname Contents Status How to release alarm E50 Pedal position alarm When the pedal unit is not neutral position at Power ON Cannot operate during the alarm Please return the pedal to neutral position E54 Overload alarm The load of the sewing machine islarge to the drive capability of themotor Please change into a high outpu...

Page 11: ...启翔股份有限公司 CHEE SIANG INDUSTRIAL CO LTD No 32 Wu Chuan 7th Road Wu Ku Wu Ku District 24890 New Taipei City Taiwan GOLDEN WHEEL ...

Reviews: