background image

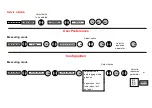
Delete a Batch 


User Preferences 

Measuring mode 


Configuration 

Measuring mode 


Main menu 

Data base 

Actions 

Delete 

Select batch 

to be deleted 


OK


OK


ESC 


ESC 

Main menu 

Setup 


User preferences 


OK

Select option 


Adjust to 

requested 

parameter 


OK


Main menu 


active batch 


OK


configuration 


OK

Select option 

target ball size 

data logging mode 

graphics 

upper spec. limit 

lower spec. limit 

set point 


OK

Adjust to 

requested 

parameter 

7|8|9 
4|5|6| 
1|2|3| 


OK

Ready 

or 

Summary of Contents for MiniTest 7200 FH

Page 1: ...nd navigation key block may also assume different functions Press OK to confirm settings store values or select menu items Press ESC to abort actions or to quit submenus Use ARROW keys to navigate through the menu or change settings If the alphanumerical block has been activated OK and ESC keys also assume navigation functions The gauge features a context sensitive on line help According to screen...

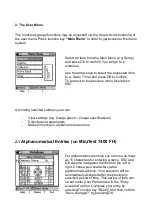
Page 2: ...you can View settings e g Gauge specs Gauge specifications Select preset parameters Make numerical or alphanumerical entries 2 1 Alphanumerical Entries on MiniTest 7400 FH For alphanumerical entries you can use as many as 15 characters for entering a name ESC and OK assume navigation functions to the left or right Choose your character via the alphanumerical block Your selection will be automatica...

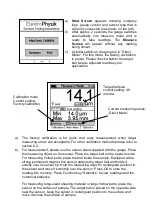
Page 3: ...lug is correctly inserted into the guide way of socket The red marking at the probe plug must be positioned correctly to the red marking at the sensor plug f Fully engage the sensor plug into the sensor socket to the stop 3 2 Switch ON and Take Readings This setting can be made at initial use or as requested at any time Press the red ON OFF button on the left side of gauge and ESC simultaneously t...

Page 4: ...th the gauge Place the measuring object on the sensor Place the target ball on the opposite side For measuring hollow parts place the ball inside the sample Equipped with a strong permanent magnet the sensor attracts the target ball and holds it exactly over its sensor tip Hold the measuring object in rectangular position to the sensor and move it smoothly over the sensor Press OK to store the rea...

Page 5: ...all target ball Factory calibration OK OK Calibration mode CALIBRATE 0 0µm Calibration target ball target ball ZERO only n x Zero OK OK Calibration point OK OK Zero Point Calibration Calibration mode Calibration target ball OK ESC Function key Navigation block Display Signs and Symbols ...

Page 6: ...ball target ball OK 7 8 9 4 5 6 1 2 3 Ready OK Calibration point 1 n x calibration standard OK OK µm If the value on calibration standard matches value on display If the displayed value does not match calibration standard Adjust to calibration value in the numerical field Zero only 1 point Calibration point OK n x Zero 0 0µm OK OK Calibration mode ...

Page 7: ...ngle reading Delete all readings of active batch Readings Delete reading Help Extras ESC OK Statistics Select reading to be deleted Statistics Delete all readings OK OK ESC Help Extras Batch Statistics Readings Select value to be deleted Help Extras Delete reading ESC OK Delete all readings Statistics Help Extras OK OK ESC DELETE FUNCTIONS ...

Page 8: ...tch to be deleted OK OK ESC ESC Main menu Setup User preferences OK Select option Adjust to requested parameter OK Main menu active batch OK configuration OK Select option target ball size data logging mode graphics upper spec limit lower spec limit set point OK Adjust to requested parameter 7 8 9 4 5 6 1 2 3 OK Ready or ...

Reviews: