Check box HSV4 Setup & User Manual Download Page 24

24 

NX Meshing Access Point Installation 


CheckBox-NX-AP-PoE meshing access points are available in indoor only and indoor/
outdoor models. For outdoor areas, or areas with high moisture or tough environments 
use the CheckBox NX-Outdoor-AP-PoE. 

Before starting the installation, please make a 

note of the serial number of each access point and keep a record of where you physically 
install each one.  This will assist you when naming the unit in the mesh display, and help 
with troubleshooting in the future. 
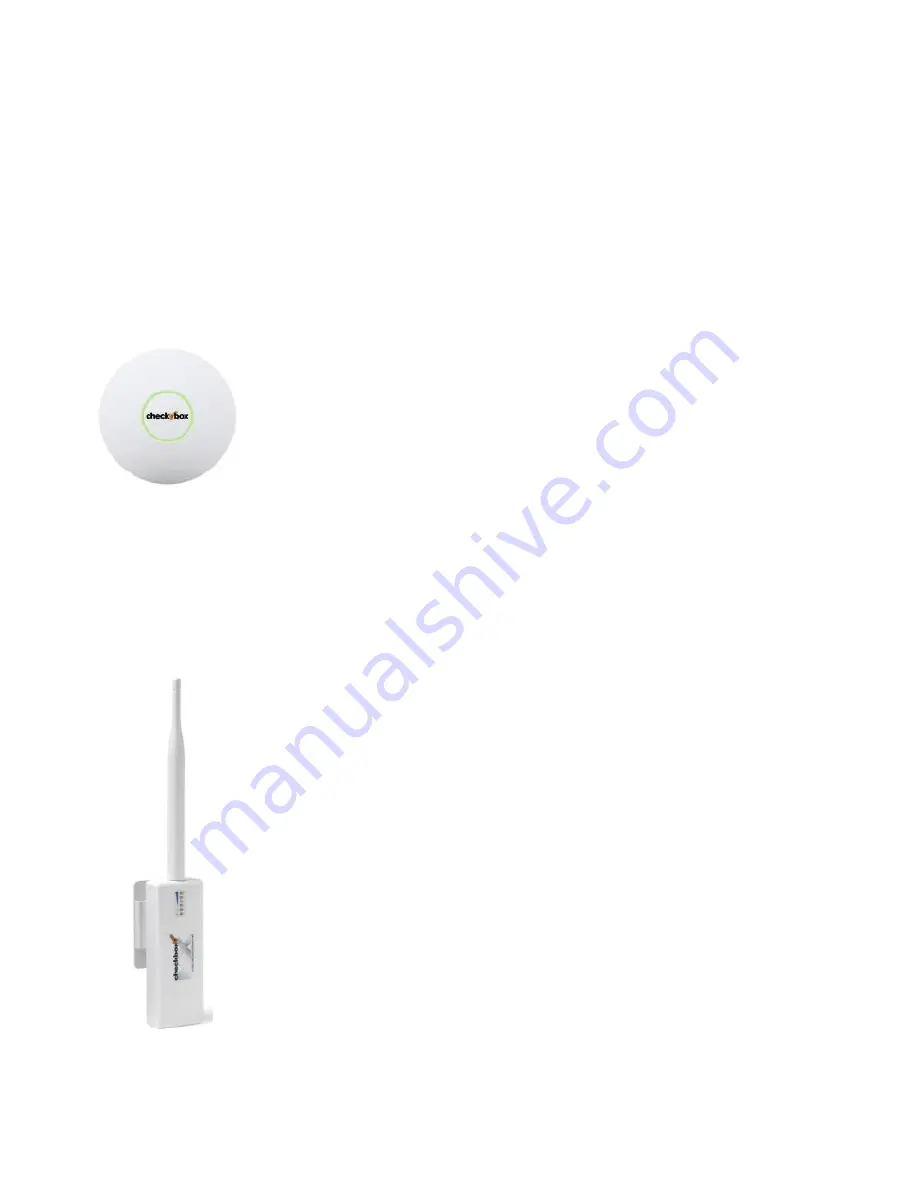
 

Indoor unit 

Wall  Mounting  –  Remove  the  white  bracket  from  the  CheckBox-NX-AP-
PoE  meshing  access  point  and  use  the  bracket  as  a  template  to  mark 
holes  for  the  mounting  screws.  If  appropriate  drill  a  hole  to  pass  the 
Ethernet cable through the wall with the cable coming out in the notched 
area of the bracket to line up with the Ethernet port on the unit. 

Ceiling  Tile  Mounting  –  Remove  the  ceiling  tile  from  the  ceiling  and  use 
the metal mounting plate on the top side of the ceiling tile as a template. 

Drill three small holes for the mounting screws and one large hole in the smaller circle to 
pass the Ethernet cable through. 

On the bottom side of the ceiling panel align the white bracket so that the mounting holes 
match up and use the included screws and nuts to secure the white bracket to the bottom 
of the ceiling tile. 

Once  the  mounting  bracket  has  been  secured,  connect  the  CheckBox-NX-AP-PoE 
meshing access point to the Ethernet cable and attach the unit to the bracket with a twist. 

Outdoor unit 

Remove  the  white  bracket  from  the  NX-Outdoor-AP-PoE  meshing  access 
point and use as a template to mark holes for the mounting screws. Once the 
mounting  bracket  has  been  secured,  connect  the  NX-AP-PoE  meshing 
access point to the Ethernet cable and attach the unit to the bracket. 


The CheckBox-NX-AP-PoE meshing access point is powered by the included 

power  supply  and  connected  to  the  unit  via  an  Ethernet  cable.  Connect  the 
other end of the Ethernet cable to the included PoE power supply into the port 
marked “POE”. The CheckBox-NX-AP-PoE  meshing access  point cannot be 
powered  by  a  powered    Ethernet  switch.  Connecting  the  unit  to  a  powered 
Ethernet switch can damage the unit and will void the warranty.  

The CheckBox-NX-AP-PoE meshing access point can be used as a wired AP, 
wired back to the CheckBox controller via a physical network connection, or it 
can be used in a meshing configuration, connecting to the network wirelessly. 
If you wish to connect to the network physically, plug the network connection 
into the port marked LAN on the power supply. If you wish to use the unit in a 
meshing configuration the LAN port can remain empty. 


Once  the  CheckBox-NX-AP-PoE  meshing  access  point  is  installed and  powered  up  be 
sure to log into your master controller admin screen to accept the unit into your mesh. 

Summary of Contents for HSV4

Page 1: ...heckBox Wireless Hotspotstm are designed to be Easy to Install Easier to Manage and Easiest to Afford To make set up as easy as possible please take a moment to completely read through these instructi...

Page 2: ...estions can be found in here We are constantly working on adding new features to CheckBox and as these features develop they will be added to your system automatically via system updates These updates...

Page 3: ...tem from outside the hotspot 15 Accessing your system from the Internet 16 Network setup 7 Current network configuration 15 Administering active clients 18 Client Usage Policy 19 Signal strength power...

Page 4: ...th2 connects to your second Internet connection if you have one Eth1 connects to your third Internet connection if you have one Eth0 connects to the local area network or wired mesh node repeaters Pow...

Page 5: ...will keep office and guest data separate while allowing the CheckBox to share the Internet connection with one modem You may also use an Ethernet switch attached to your CheckBox to connect multiple C...

Page 6: ...twork hotspot the default name for the CheckBox wireless network You can change this name later Open your web browser and you should see a generic welcome screen This is the welcome screen your guests...

Page 7: ...work Setup page you will see a summary of the Internet connections currently connected to each of the ports on your CheckBox This page will show you the recent data rates speed and maximum data rate o...

Page 8: ...v4 If you are using other brands of access points you will need to manage channel changes and SSID as per their manufacturer s directions By default the ssid is hotspot To change the ssid select Netwo...

Page 9: ...or printed tickets and have enabled credit cards then only the credit card buttons will be displayed Access Tickets allow you to create and distribute tickets for your guests that allow them an amoun...

Page 10: ...ct Telephone Number Off Express Checkout Settings No Press Save and then go back up to Payment Data Transfer optional and you will now have an Identity Token It is very important that you copy this to...

Page 11: ...ricted free access to your customers but still have the custom ers view your site welcome page you can set the Trial Time and Trial Period time to be the same For example by setting the Trial Time and...

Page 12: ...ets for one time events You can have two different codes defined with different amounts of access time assigned to each code To set up Permacodes click on the Access Controls button on the top level m...

Page 13: ...e and then Edit Logon Text from the drop down menu In this box you will see some html tags and then the default text You can change the text to your own message and if you are familiar with html you c...

Page 14: ...e It may look fine on your screen but may not fit on somebody else s screen File size refers to the amount of data used to record the picture information Too little data and the picture looks course b...

Page 15: ...immediately under eth3 for modems plugged into port 3 eth2 for modems plugged into port 2 and eth1 for modems plugged into port 1 This is the IP address assigned by your ISP or internal router to our...

Page 16: ...how to enable static routing or virtual servers Due to variations between different router models CheckBox support can not assist with making changes to your office router In order to access your Chec...

Page 17: ...site ID number and user name please contact support checkboxsystems net to request one To Access your site via the Remote Access go to www checkboxsystems net and click on the Login on the top of the...

Page 18: ...ll be identified with a ticket number of none Here you can manually allow them online by clicking on that ticket number and selecting the an amount of time The third column for each client lists how m...

Page 19: ...r speed calculated to prevent them from exceeding the hourly limit you have set in the Client Usage Policy To set the Client Usage Policy select the Administration on the top menu and then select the...

Page 20: ...ccess point the access point in this case is the CheckBox system Long range antennas are rated in dbi and can sometimes help and sometimes can make the situation worse While a standard antenna sends o...

Page 21: ...l factors How great a distance do you need to cover What are the surroundings Are there walls or open spaces Is the building made of wood rebar reinforced concrete or steel Is there any interference i...

Page 22: ...actively determine the best route back to the master unit Once your Mesh Repeaters are in place you can monitor their status by selecting Mesh on the top menu You can check the status of your repeater...

Page 23: ...Yellow or Red Units highlighted in yellow will have slower connections that will be unreliable Units in Red are not able to support traffic or users as they have a very low or no connection often as...

Page 24: ...om of the ceiling tile Once the mounting bracket has been secured connect the CheckBox NX AP PoE meshing access point to the Ethernet cable and attach the unit to the bracket with a twist Outdoor unit...

Page 25: ...l need to download some configuration updates to your CheckBox units which may take up to 4 hours to complete Setting alerts to Aggressive will generate an alert if a CheckBox mesh node or a master un...

Page 26: ...ts connecting to the wireless service configuring their wireless settings and logging on Support staff have instant real time access to systems can perform diagnostics and when appropriate restart net...

Page 27: ...are connected to power Outdoor units only Repeaters are mounted at least 20 feet off of the ground and at least 4 feet away from other antennas Serial number of each repeater is noted for labeling by...

Page 28: ...r or replacement of the components of the system as we determine necessary The warranty does not cover damage due to improper installation use of unauthorized accessories including but not limited to...

Reviews: