background image

Page 4 of 22

 B

EFORE 

Y

OU 

B

EGIN

COLORdash Par-H7 IP User Manual Rev. 1

Safety Notes

Read all the following safety notes before working with this product. These notes contain important 
information about the installation, usage, and maintenance of this product.

Personal Safety

Avoid direct eye exposure to the light source while the product is on.

Always disconnect the product from the power source before cleaning or replacing the fuse.

Always connect the product to a grounded circuit to avoid the risk of electrocution.

Do not touch the product’s housing when operating because it may be very hot.

Mounting and Rigging

Do not submerge this product (IP65). Temporary outdoor operation is fine.

When using this product in an outdoor environment, use IP65 (or higher) rated power and data 
cables. Secure unused power and data ports with attached IP65 covers.

CAUTION: When transferring product from extreme temperature environments, (e.g., cold truck to warm, 
humid ballroom) condensation may form on the internal electronics of the product. To avoid causing a 
failure, allow product to fully acclimate to the surrounding environment before connecting it to power.

Not for permanent outdoor installation in locations with extreme environmental conditions. This 
includes, but is not limited to:

Exposure to a marine/saline environment (within 3 miles of a saltwater body of water).

Locations where the normal high or low temperatures exceed the temperature ranges in this 
manual.

Locations that are prone to flooding or being buried in snow.

Areas where the product will be subjected to extreme radiation or caustic substances.

Mount this product in a location with adequate ventilation, at least 20 in (50 cm) from adjacent 
surfaces.

Make sure there are no flammable materials close to the product when operating.

When hanging this product, always secure to a fastening device using a safety cable.

Power and Wiring

Always make sure you are connecting the product to the proper voltage in accordance with the 
specifications in this manual or on the product’s specification label.

Never connect the product to a dimmer pack or rheostat.

Never disconnect this product by pulling or tugging on the power cable.

Operation

Do not operate this product if there is damage on the housing, lenses, or cables. Have the damaged 
parts replaced by an authorized technician at once.

Do not cover the ventilation slots when operating to avoid internal overheating.

The maximum ambient temperature is 113 °F (45 °C). Do not operate the product at higher temperatures.

In the event of a serious operation problem, stop using this product immediately!

Expected LED Lifespan

LEDs gradually decline in brightness over time, primarily because of heat. LEDs that are arranged in 
clusters experience higher operating temperatures than single LEDs. For this reason, operating clustered 
LEDs at their fullest intensity significantly reduces the LEDs’ lifespan. Under normal conditions, this 
lifespan is 40,000 to 50,000 hours. If extending this lifespan is vital, lower the operating temperature by 
improving the ventilation around the product, thus reducing the ambient temperature. In addition, limiting 
the overall projection intensity may extend the LEDs’ lifespan.

This product contains no user-serviceable parts. Any reference to servicing in 
this User Manual will only apply to properly trained, certified technicians. Do not 
open the housing or attempt any repairs.

All applicable local codes and regulations apply to proper installation of this 
product.

If your Chauvet product requires service, contact Chauvet Technical Support. 

!

Summary of Contents for COLORdash Par-H7IP

Page 1: ...User Manual ...

Page 2: ...rpose without written consent from Chauvet Document Printing For best results print this document in color on letter size paper 8 5 x 11 in double sided If using A4 paper 210 x 297 mm configure the printer to scale the content accordingly Intended Audience Any person installing operating and or maintaining this product should completely read through the guide that shipped with the product as well ...

Page 3: ...up 8 AC Power 8 AC Plug 8 Power Linking 8 DMX Linking 9 DMX Personalities 9 Master Slave Connectivity 9 Mounting 10 Orientation 10 Rigging 10 Procedure 10 4 Operation 11 Control Panel Operation 11 Control Options 11 Programming 11 Control Panel Lock 11 Passcode 11 Menu Map 12 Configuration DMX 14 DMX Personalities 14 DMX Control 14 DMX Values 15 13Ch 15 8 Ch 16 6 Ch 16 Configuration Standalone 16 ...

Page 4: ...TENTS COLORdash Par H7 IP User Manual Rev 1 TOC 2 of 2 Fixture Hours Software Version 18 Factory Reset 18 5 Technical Information 19 Product Maintenance 19 6 Technical Specifications 20 7 Returns 21 8 Contact Us 22 ...

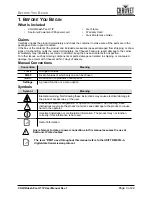
Page 5: ...r H7 IP Seetronic Powerkon IP65 power cord Gel Frame Warranty Card Quick Reference Guide Convention Meaning 1 512 A range of values 50 60 A set of values of which only one can be chosen SET A button on the product s control panel Settings A product function or a menu option Symbol Meaning Electrical warning Not following these instructions may cause electrical damage to the product accessories or ...

Page 6: ...cm from adjacent surfaces Make sure there are no flammable materials close to the product when operating When hanging this product always secure to a fastening device using a safety cable Power and Wiring Always make sure you are connecting the product to the proper voltage in accordance with the specifications in this manual or on the product s specification label Never connect the product to a d...

Page 7: ... RGBAWP dimmer strobe 13 channel RGBWAP dimmer strobe color macro white balance auto speed dimmer speed Rugged RGBWA UV LED wash for events where indoor outdoor flexibility is needed At home in any weather conditions with IP rated power and DMX connections Adjustable PWM Pulse Width Modulation to avoid flickering on camera RDM Remote Device Management for added flexibility Selectable smooth dimmin...

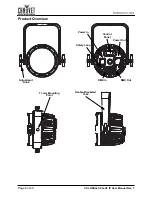
Page 8: ...Page 6 of 22 INTRODUCTION COLORdash Par H7 IP User Manual Rev 1 Product Overview Control Panel DMX Out DMX In Adjustment Knob Power In Power Out Safety Loop 13 mm Mounting Point Double Bracketed Yoke ...

Page 9: ...Page 7 of 22 COLORdash Par H7 IP User Manual Rev 1 INTRODUCTION Product Dimensions 11 26 in 286 mm 5 55 in 141 mm 9 57 in 243 mm 7 87 in 200 mm 6 93 in 176 mm 6 18 in 157 mm 1 85 in 47 mm ...

Page 10: ...plug Power Linking The product supports power linking You can power link up to 26 products at 120 V up to 46 at 208 V or up to 50 at 230 V This product comes with a power input cord Power linking cables are available from Chauvet for purchase Always connect the product to a protected circuit circuit breaker or fuse Make sure the product has an appropriate electrical ground to avoid the risk of ele...

Page 11: ...ar H7 IP the master to control one or more COLORdash Par H7 IP products the slaves without a DMX controller One COLORdash Par H7 IP becomes the master when running an auto or custom program or by being in a Static mode You must configure each slave s control panel to operate in Slave mode During Master Slave operation the slaves will operate in unison with the master DO NOT connect a DMX controlle...

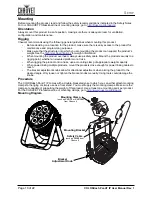
Page 12: ... cable Mount the product securely to a rigging point whether an elevated platform or a truss When rigging the product onto a truss use a mounting clamp of appropriate weight capacity When power linking multiple products mount the products close enough for power linking cables to reach The bracket adjustment knobs allow for directional adjustment when aiming the product to the desired angle Only lo...

Page 13: ... another programming level you will see that first option or you will see the selected value Press MENU repeatedly to exit to the previous main level Control Panel Lock This setting enables you to activate or disable the control panel lock which keeps unauthorized users from changing the product s settings 1 Go to the Key Lock main level 2 Select On or Off Passcode After being prompted to enter th...

Page 14: ...olor R Red G Green B Blue A Amber W White P Ultraviolet UV RG Red Green RB Red Blue RA Red Amber RW Red White RP Red UV GB Green Blue GA Green Amber GW Green White GP Green UV BA Blue Amber BW Blue White BP Blue UV AW Amber White AP Amber UV WP White UV RGB Red Green Blue RGA Red Green Amber RGW Red Green White RGP Red Green UV RBA Red Blue Amber RBW Red Blue White RBP Red Blue UV RAW Red Amber Wh...

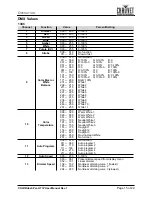
Page 15: ...WP Red Green Blue Amber White UV Color Temperature Warm White 1 Preset white color temperatures Warm White 2 Warm White 3 Neutral White 1 Neutral White 2 Neutral White 3 Daylight 1 Daylight 2 Daylight3 Moving Head White Manual Color Mixer Red 0 255 Combine red green blue amber white and ultraviolet to make a custom color 0 100 Green Blue Amber White UV Auto Show Auto 1 5 1 100 Automatic programs M...

Page 16: ...or each DMX mode is as follows LED Frequency 600Hz Selects the PWM output frequency 1200Hz 2000Hz 4000Hz 6000Hz 25kHz Back Light On Display backlight always on 10S Turns off display backlight after 10 sec of inactivity 20S Turns off display backlight after 20 sec of inactivity 30S Turns off display backlight after 30 sec of inactivity Key Lock On Turns the passcode on or off Off Information Fixtur...

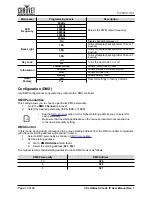
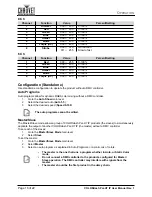
Page 17: ... R 100 G 0 B 100 0 R 100 G 0 100 B 0 100 R 100 0 G 100 0 B 100 RGB 100 White 1 White 2 White 3 White 4 White 5 White 6 White 7 White 8 White 9 White 10 White 11 10 Color Temperature 000 005 006 025 026 050 051 075 076 100 101 125 126 150 151 175 176 200 201 225 226 250 251 255 No function Warm White 1 Warm White 2 Warm White 3 Neutral White 1 Neutral White 2 Neutral White 3 Daylight 1 Daylight 2 D...

Page 18: ...Go to the Master Slave Mode main level 2 Select Master 3 Select an auto program as explained in Auto Programs or a static mix of colors Channel Function Value Percent Setting 1 Dimmer 000 255 0 100 2 Red 000 255 0 100 3 Green 000 255 0 100 4 Blue 000 255 0 100 5 Amber 000 255 0 100 6 White 000 255 0 100 7 Purple UV 000 255 0 100 8 Strobe 000 010 011 255 No function Slow to fast Channel Function Va...

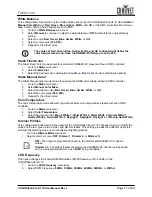
Page 19: ... other colors Color Temperature The color temperature mode allows for permanent white color temperature presets without a DMX controller 1 Go to the Static main level 2 Select Color Temperature 3 Select the desired color Warm White 1 Warm White 2 Warm White 3 Neutral White 1 Neutral White 2 Neutral White 3 Daylight 1 Daylight 2 Daylight 3 or Moving Head White Dimmer Profiles This setting determine...

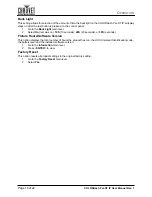
Page 20: ...ght main level 2 Select On remains on 10S 10 seconds 20S 20 seconds or 30S seconds Fixture Hours Software Version This option displays the total number of hours the product has run the UID Universal Identification code the battery level and the installed software version 1 Go to the Information main level 2 Press ENTER to view Factory Reset This option resets all product settings to the original f...

Page 21: ...reased mechanical wear To clean the product 1 Unplug the product from power 2 Wait until the product is at room temperature 3 Use a vacuum or dry compressed air and a soft brush to remove dust collected on the external vents 4 Clean all transparent surfaces with a mild soap solution ammonia free glass cleaner or isopropyl alcohol 5 Apply the solution directly to a soft lint free cotton cloth or a ...

Page 22: ... 51 A 0 27 A Power linking current products 13 6 A 26 products 13 6 A 50 products Power I O U S Canada Worldwide Power input connector Seetronic Powerkon IP65 Seetronic Powerkon IP65 Power output connector Seetronic Powerkon IP65 Seetronic Powerkon IP65 Power Cord plug Edison U S Local Plug Type Power Lifespan LED 10 W 50 000 hours Color Quantity Current hex color RGBAW UV 7 2 3 A Parameter Value ...

Page 23: ...an RMA number Chauvet will refuse any product returned without an RMA number Once you have the RMA number provide the following information on a piece of paper and place it inside the box Your name Your address Your phone number RMA number A brief description of the problem Be sure to pack the product properly Any shipping damage resulting from inadequate packaging will be your responsibility FedE...

Page 24: ...560 Website Toll Free 800 762 1084 www chauvetlighting com EUROPE General Information Technical Support Address Stokstraat 18 Email eutech chauvetlighting eu 9770 Kruishoutem Website Belgium www chauvetlighting eu Voice 32 9 388 93 97 General Information Technical Support Address Unit 1C Email uktech chauvetlighting com Brookhill Road Industrial Estate Pinxton Nottingham UK Website NG16 6NT www ch...

Reviews: