background image

MAINTENANCE

Care and Cleaning

The Hydrocollator is equipped with an immersion type heating element and a hydraulic capillary type 
thermostat which evenly maintains the HotPac temperature in the water and provides a ready supply of heated 
packs. It is critical to maintain the water level over the top of the HotPac to avoid damage to the heating 
element, the stainless steel, or the HotPac. Water is constantly lost during operation due to evaporation. 
Therefore, it is essential that water be added daily. The tank should also be drained and cleaned systematically, 
at minimum intervals of every two weeks.

Always unplug the unit from the power source when emptying or cleaning the unit. Drain the unit by the drain 
valve located at the bottom rear of the unit. Either move the unit to a floor drain or attach the extension hose to 
it when draining.

Your Hydrocollator Heating Unit is made of high quality stainless steel that should last a lifetime. You must 
properly care for your Hydrocollator Heating Unit if you wish for it to last a lifetime.

Follow these simple steps to ensure that your Hydrocollator Heating Unit lasts.

1.  Chlorine means rust to stainless steel. No bleach or any cleaner with high chlorine content should be used.

2.  Clean regularly for optimal service and operation. 

NOTE:

 Failure to maintain your equipment (including regular cleaning) will void your warranty.

3.  Fill daily with water. Water is constantly lost during operation due to evaporation.

4.  Chlorine in regular tap water may be present in high enough concentrations to damage your unit.  If 

you suspect high levels of chlorine in your Hydrocollator Heating Unit, we recommend the addition of a 
dechlorinator.

5.  Certain additives (such as herbal teas, essential oils, etc.) will damage the components of the heating unit 

including the stainless steel. The Hydrocollator Heating Unit was designed to heat water and HotPacs only.

To avoid potential for rusting:

1. 

Do not

 use bleach or cleaners with high chlorine content.

2. 

Do not

 use paper clips, safety pins, staples, coat hangers, etc., in or on the unit.

3. 

Do not

 clean the unit with steel wool or a carbon steel brush.

4. 

Do not

 use abrasive cleaners which tend to disturb the grain in the finish.

5.  Water level is critical: Add water daily and keep it full.

6.  Regularly clean and drain the tank (every two weeks).

7.  Remove all deposits from interior surfaces and parts (including heating element). The deposits are 

concentrations of chlorine that allow rusting to begin. If allowed to accumulate on the heating element, 
these deposits will lower the efficiency of the element and increase the power consumption of the unit.

8.  If you suspect that you have “hard water”, you may need to change your water more frequently. Salt deposits 

are an indication of hard water that will eventually cause rust.

17

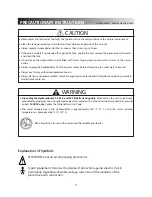
 Do not move the Hydrocollator while filled with water. Tipping over could result in a burn to the user or  

   others.

 Always unplug the Hydrocollator from the power source before attempting to empty water from  


   unit.

WARNING

Hydrocollator® Mobile Heating Units

Summary of Contents for Hydrocollator M-2

Page 1: ...User Manual Hydrocollator MOBILE HEATING UNITS SS 2 M 2 M 4 ISO 13485 CERTIFIED 120 220 240 Volt Units...

Page 2: ...a trademark of Chattanooga Group 2006 Encore Medical Corporation or its affiliates Austin Texas USA Any use of editorial pictorial or layout composition of this publication without express written co...

Page 3: ...WARNING indicator explains possible safety infractions that will potentially cause serious injury and equipment damage DANGERS Text with a DANGER indicator explains possible safety infractions that a...

Page 4: ...s which are exposed to contamination hazardous or cleaning materials bodily fluids mold etc CAUTION Grounding the Hydrocollator SS 2 M 2 and M 4 Mobile Heating Unit Make certain the unit is electrical...

Page 5: ...unit is operating IMPORTANT Some models are fitted with a thermal cut out thermostat which acts as a Non self resetting thermal cut out In the unlikely event of a fault condition this device is desig...

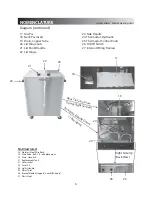
Page 6: ...Bulb Themo A B Assembly 13 Reset Overtemp Button 6 Lid 14 Fuses 7 3 inch Caster 15 Pilot Lamp Red 8 Overtemp Light 16 Pilot Lamp Clear 5 View Inside 2 3 4 1 NOTE M 4 model shown models will vary All...

Page 7: ...Internal Wiring Harness 22 Lid Hinge 6 17 18 19 22 Diagram continued 20 Not illustrated 28 Stainless Steel Wire Rack 29 DrainValve Ball 1 2 in Replacement 30 Drain Hose Bib 31 Replacement Tank 32 Out...

Page 8: ...52 cm L x 39 cm W Weight 30 lbs 13 6 kg Standard Accessories Includes eight Standard size HotPacs M 2 Model Power Supply 110 120V 220 240V Rated Frequency 50 60Hz Power Consumption 1000 W Tank Capacit...

Page 9: ...C 74 C Thermal Cut out Temp 190 F 14 F 88 C 8 C Accuracy 10 Heating Up Time Time to 160 F 70 C 8 Hours Cool Down Time Time from 160 F 70 C 4 Hours Safety Class Type B Safety Tests UL 544 Dimensions 3...

Page 10: ...asy to operate The controls are located in the rear near the bottom of the unit The thermostat controls the temperature of the water It is located near the bottom of the unit on the control panel It h...

Page 11: ...eping 2 Too long a period between cleanings 1 Replace packs 2 Drain and clean Packs Too Hot 1 Thermostat set too high 2 Thermostat failure 1 Adjust thermostat 2 Replace thermostat 1 Thermostat set too...

Page 12: ...e Rod Nuts 2 each 21737 21 Lid Knob Handle 21025 22 Lid Hinge Rod 22303 23 Handle Side 20237 Thermo Low Water Kit 20548 27 Wiring Internal Harness 61579 28 Stainless Wire Rack 22304 29 Drain Valve Bal...

Page 13: ...1 Lid Knob Handle 21025 22 Lid Rod Hinge 22231 23 Handle Side 2 20237 Thermo Low Water Kit 20548 27 Wiring Internal Harness 61579 28 Stainless Wire Rack 22259 29 DrainValve Ball 1 2 in Replacement 210...

Page 14: ...andle 21025 22 Lid Hinge Rod 22361 23 Side Handle Serial Above 5149 20237 Thermo Low Water Kit 20548 27 Wiring Internal Harness 61579 28 Rack Stainless Steel 22374 29 Drain Valve Ball 1 2 in Replaceme...

Page 15: ...dle Side Common 2 20237 34 Lid Assembly With Handle 22219 9 Cover Junction Box M 2 220 240 Volt 22087 29 Drain Copper M 2 Part A 25010 21286 5 Bracket Bulb Thermostat H20 S A Lo Water 2 21023 35 Water...

Page 16: ...ished 20513 23 Handle Side Common 2 20237 34 Lid Assembly With Handle 22297 9 Cover Junction Box M 2 220 240 Volt 22087 29 Drain Copper M 2 Part A 25010 21286 5 Bracket Bulb Thermostat H20 S A Lo Wate...

Page 17: ...4 Coupled M F 21635 7 Caster 3 in 4 21260 Handle M SS Lid Finished 20513 34 Lid Sub Assembly M 4 With Handle 22348 9 Cover Junction Box 18 25x19 125 M 4 22360 29 Drain Copper M 2 Part A 25010 21286 5...

Page 18: ...during operation due to evaporation 4 Chlorine in regular tap water may be present in high enough concentrations to damage your unit If you suspect high levels of chlorine in your Hydrocollator Heatin...

Page 19: ...eterioration of the pack The pack may also be cleaned by scrubbing the pack with soap and water The simplified method of keeping the pack clean is to keep it immersed in water The Hydrocollator HotPac...

Page 20: ...failure in the Product caused by product misuse including but not limited to the failure to provide reasonable and necessary maintenance or any use that is inconsistent with the Product User s Manual...

Page 21: ...2006 Encore Medical L P 4717 Adams Road P O Box 489 Hixson TN 37343 1 423 870 2281 1 800 361 6661 1 423 870 7200 1 423 870 2046 chattgroup com ISO 13485 CERTIFIED U S A Outside U S A Fax Canada 22151B...

Reviews: