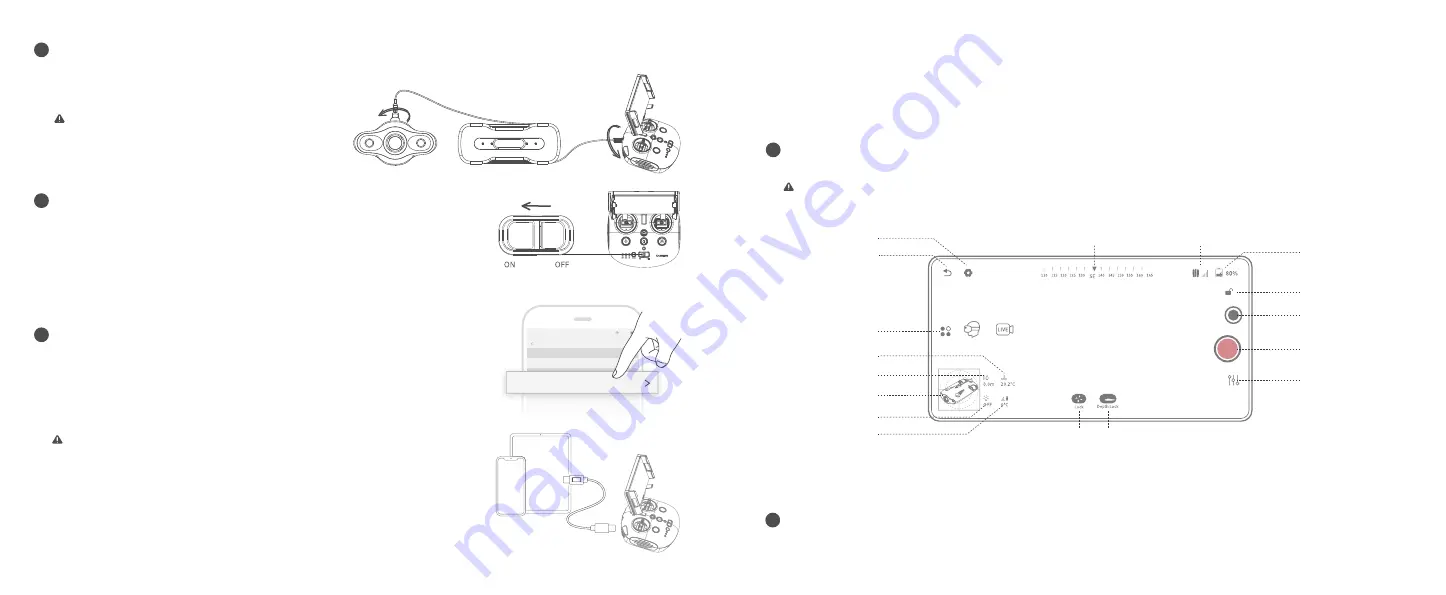
Connect remote controller to your phone/tablet
Method 1:USB Direct Cable Connection
Choose an appropriate remote controller cable based on the type of mobile device.
A Lightning connector cable, micro USB cable, and TYPE-C cable are included in the packaging.
Connect the end of the cable with the mobile phone logo to the mobile device.
4
Method 2:Wi-Fi Connection
a. On the Phone/Tablet, go to Wi-Fi settings.
b. Wait for 5-10 seconds and the Chasing_xxxx network will appear as an option.
c. Click to connect and enter the Wi-Fi password: 12345678
Drop the ROV into Water
a. Grasp the grips on both sides of the ROV with both hands and gently throw the ROV into the water.
b. Unlock the Thruster(motors) to dive; c. For a better experience, it is recommended to ensure that the water depth exceeds 1 meter.
6
Connect ROV with Remote Controller
a. Insert one end of the tether connector into the remote controller connector socket;
b. Reserve a suitable length and hang the Buckle on the Buckle Bracket, and make it tension;
c. Insert the other end of the tether connect
2
Warning: Check whether the O-ring on the
tether connector pre-dive. If it is missed or
damaged, please replace it in time.
Note: *It is recommended to use this kind of way to connect mobile phone/tablet
and remote controller.
*For iOS users, select "Auto" for IP address configuration.
*If the Android device has a "USB OTG" switch, you need to turn it on.
*If the connection fails, please try to turn off your phone's Wi-Fi and
mobile network. If still fails, it may be a phone/tablet
compatibility problem. Please select method 2----Wi-Fi connection.
*The remote controller type-c port and attached remote controller
cables do not support charging.
Start (turn on) the ROV
3
a. Turn on the remote controller power button;
b. A few seconds later, the remote controller’s indicator lights up, 5G or 2.4G light will be
always on. The drone LED lights will flash shortly, accompanied by two self-tests sounds;
c. Check all the connectors and lights pre-dive, and unlock the ROV when everything is
ready underwater.
USB 10/100 LAN
IPV4 ADDRESS
Gladius_5G_xxxxx
xxxxxxxxxx
CHOOSE A NETWORK...
6:27
89%
Ethernet
xxxxxxxxxx
xxxxxxxxxx
Configure IP
Automatic
App interface Introduction
Open the APP and enter the camera, you will see the real-time scene transmission.
5
General Settings
Compass
VR Live Stream
Return
Side Menu
Depth
Light
Angle
Unlock/lock ROV Mode
3D Gesture
Signal Strength
Battery
White Balance Lock
Picture
Video Recording
Camera Settings
Temperature
Note:You could check more guidance videos on the website page https://www.chasing.com/,or you could contact the global support
team with any questions :[email protected]


