background image

13 


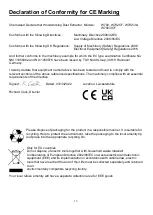
Declaration of Conformity for CE Marking 


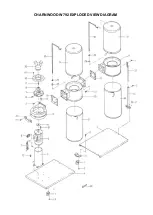
Charnwood Declare that Woodworking Dust Extractor, Models: 

W792, W792CF, W792/3 & 
W792/3CF 

 
Conforms with the following Directives:   

Machinery Directive 2006/42/EC 


Low Voltage Directive 2006/95/EC 

 
Conforms with the following UK Regulations:   Supply of Machinery (Safety) Regulations 2008 


Electrical Equipment (Safety) Regulations 2016 

 
And further conforms to the machinery example for which the EC type examination Certificate No. 
NM 11050062 and NL11050076 have been issued by TUV Nord Group, 30519 Hannover 
Germany. 
 
I hereby declare that equipment named above has been tested and found to comply with the 
relevant sections of the above referenced specifications. The machinery complies with all essential 
requirements of the directive. 
 
Signed:   


Dated: 03/10/2022   

Location: Leicestershire 


Richard Cook, Director 


Please dispose of packaging for the product in a responsible manner. It is suitable for 
recycling. Help to protect the environment, take the packaging to the local amenity tip 
and place into the appropriate recycling bin. 


Only for EU countries 
Do not dispose of electric tools together with household waste material! 
In observance of European Directive 2002/96/EC on waste electrical and electronic 
equipment (EEE) and its implementation in accordance with national law, electric 
tools that have reached the end of their life must be collected separately and returned 
to an 
environmentally compatible recycling facility. 
 

Your local refuse amenity will have a separate collection area for EEE goods 

Summary of Contents for W792

Page 1: ...F A 16 amp fixed electric supply is required to run this machine Recommended breaker size 16 Amps Type C Charnwood Cedar Court Walker Road Hilltop Industrial Estate Bardon Hill Leicestershire LE67 1TU Tel 01530 516 926 email sales charnwood net website www charnwood net ...

Page 2: ... childproof Use padlocks master switches and remove starter keys 9 Do not force the machine It will do the job better and be safer at the rate for which it is designed 10 Use the right tools Do not force the machine or attachments to do a job for which they are not designed Contact the manufacturer or distributor if there is any question about the machine s suitability for a particular task 11 Wea...

Page 3: ...body away from the end of the suction hose W792 Specification Motor Available in 240v single phase or 415v 3 phase 2200w 3hp Recommended breaker size MCB 16 Amps Type C Airflow Without Bag 3450m3 hour 2600cfm Inlet Diameter 1 x 150mm or 3 x 100mm Bag capacity 2 x 148 Litres Maximum continuous run time 8 hours Sound Level 85 dB A Dimensions WxDxH 1560mm x 550mm x 1920mm Weight Gross Net 80kg 75kg R...

Page 4: ...Q R S U A Right Collector Body H Column O Collection Bag B Left Collector Body I Filter Bag P Bag Straps C Motor Assembly J Lower Support Leg Q Castors D 3 Way Inlet K Upper Support Leg R Fixings Pack E Rubber Gasket L Base Joining Bracket S Right Base F Rubber Gasket M Foam Sealing Strip T Left Base G Motor Cooling Fan N Handle U Bag Support ...

Page 5: ...cket set Attach The Castors Turn the assembled base upside down Use 24 x Hex head screws 5 16 x 1 2 to fix the 6 castors to the underside of the base Fit The Motor Cooling Fan Slide the fan onto the motor spindle Secure it using a cross head screwdriver Fit The Column To The Motor Fit the Column over the end of the motor Align the column feet so that they are parallel to the to the straight side o...

Page 6: ...g 4 of the longer Hex head screws 5 16 x 3 4 Tighten with a 12mm spanner or socket Assemble The 2 Support Legs Slide the Upper Support Leg into the Lower Support Leg until the holes line up Secure each leg using 2 Hex head screws 5 16 x 1 2 Tighten with a 12mm spanner or socket Fit the 2 Support Legs The Support Leg sits on the Base with the curved edge over the outside of the Base Secure using 2 ...

Page 7: ... the 2 parts Tip Use a G clamp to hold the 2 parts in place whilst fitting the screws Use 8 Hex Head screws 5 16 x 1 2 to secure the Collector Body to the impellor housing Attach the Support Leg to the Left Collector Body Secure using 2 Hex head screws 5 16 x 1 2 ...

Page 8: ...t Collector Body to the Leg Support using 2 Hex head screws 5 16 x 1 2 Fit the 2 Filter Bag Supports Thread a Nut 20mm onto the end of the Filter Bag Support Add a Washer Screw the Filter Bag Support into the threaded hole in the Collector Body Rotate at least 5 times and stop with the hook directly over the centre of the Collector Drum Use a 12mm spanner to lock the Nut down onto the Collector Bo...

Page 9: ...r collector body The foam helps to create an airtight seal for the bags Fit the plastic Collection Bag Open the bag and fit it over the outside of the Collector Body rim Use the 3 spring clips located around the drum top hold the bag in place whilst fitting the Bag Strap Fit the Bag Strap over the plastic bag so it sits on the foam strip Engage the spring latch into one set of hooks and fasten it ...

Page 10: ...ctor is 150mm diameter It can be converted to 3 x 100mm diameter inlets by fitting the 3 Way Inlet Use a cross head screwdriver to remove the retaining screw from the inlet Fit the 3 Way Inlet over the 150mm inlet and then re fit the screw Blanking caps are provided if only 1 or 2 x 100mm diameter hoses are to be used The Extractor is now ready to be connected to the electric supply 16 amp 240v pl...

Page 11: ...s it may be more convenient to use a smaller diameter hose This will inevitably reduce the performance of the machine and the length of small diameter hose should be kept to a minimum Adjustments If one of the collection bags fills up faster than the other this can be adjusted using the Splitter which is located inside the Left Collector Drum Remove the filter bag from the drum and locate the spli...

Page 12: ...d fittings for splits or air leaks Secure the leaks and replace any worn hose Large pieces may be blocked by the inlet grill Remove the hose and Y shaped connector from fan housing and check for pieces of wood or foreign bodies that are unable to pass through the grill Remove them and reattach hose Check circuit breaker Reset as required Loose wire Remove the On Off switch check the wires are push...

Page 13: ...bove referenced specifications The machinery complies with all essential requirements of the directive Signed Dated 03 10 2022 Location Leicestershire Richard Cook Director Please dispose of packaging for the product in a responsible manner It is suitable for recycling Help to protect the environment take the packaging to the local amenity tip and place into the appropriate recycling bin Only for ...

Page 14: ...Head Screw 3 8 x 1 2 1 16 Washer 1 17 Hex Head Screw M6 x 1 0 x 18mm Left Hand Thread 1 18 Inlet Cover 1 19 Pan Head Screw 10 24UNC x 3 8 12 20 Handle 1 21 Hex Head Screw 1 4 x 1 2 8 22 Hex Head Screw 5 16 x 3 4 4 24 Rubber Gasket 1 25 Left Collector body 1 26 Rubber Gasket 1 27 Right Collector Body 1 27A Foam Sealing Strip 4 28 Washer 5 16 2 29 Nut 5 16 18UNC 2 30 Upper Bag Support 2 31 Filter Ba...

Page 15: ...15 CHARNWOOD W792 EXPLODED VIEW DIAGRAM ...

Page 16: ...16 Update October 2022 Charnwood Cedar Court Walker Road Hilltop Industrial Estate Bardon Hill Leicestershire LE67 1TU Tel 01530 516 926 email sales charnwood net website www charnwood net ...

Page 17: ...otation The cartridges will be tight to fit on next to each other but will go on Cleaning Routine To clean the filter daily or after each use if used less frequently make one complete rotation of the handle in both clockwise and anti clockwise directions This will dislodge trapped dust particles which will fall into the collection bag Charnwood Cedar Court Walker Road Hilltop Industrial Estate Bar...

Reviews: