ChargeArm CA01 User Manual Download Page 9


User Manual ChargeArm v.1.0 


5.


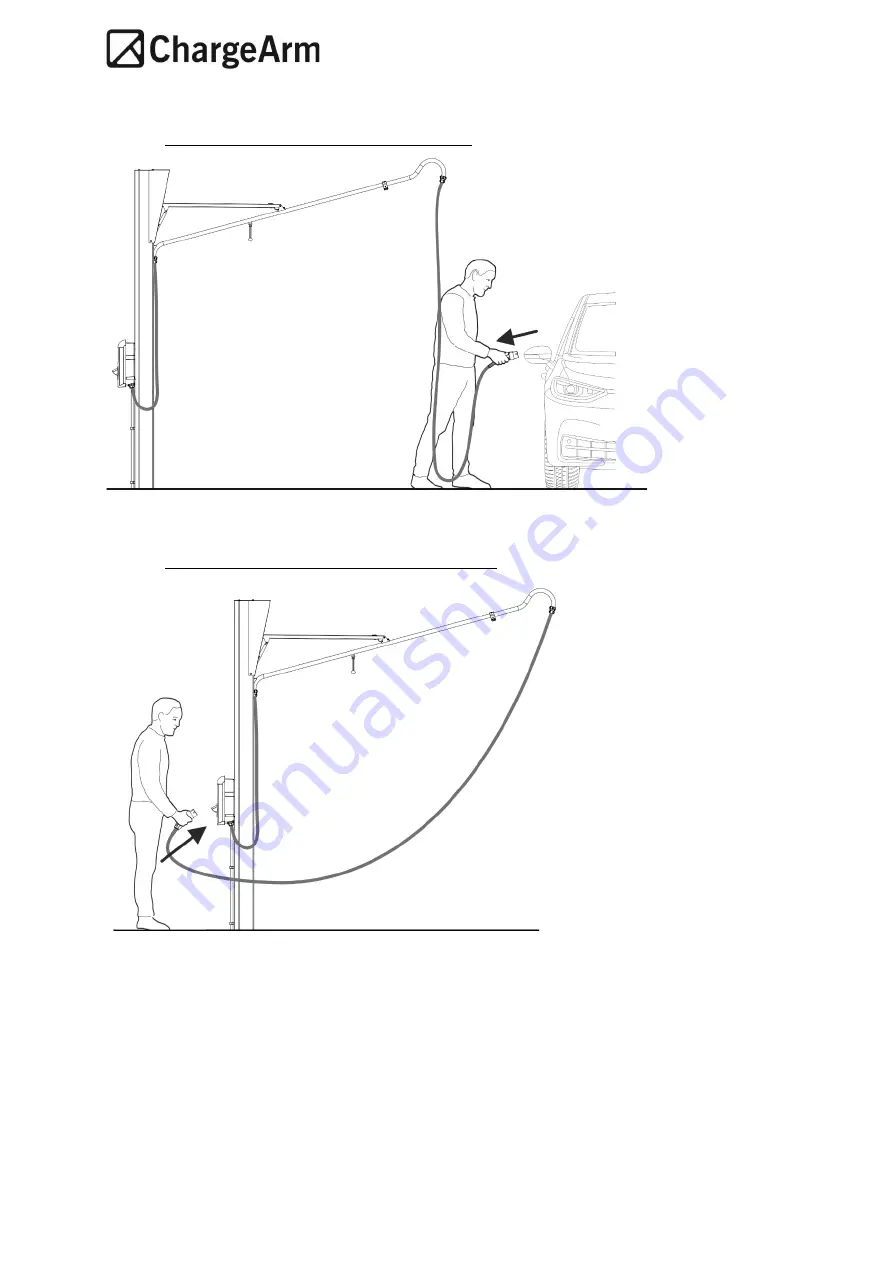
After charging, disconnect the charging cable: 

 
-


Follow the 
procedure as 
described in 
your car

’s


manual. 


6.


Put the charge cable connector back in its holder:  

-


Depending on your 
installation this can also 
be a different holder. 


Summary of Contents for CA01

Page 1: ...User Manual ChargeArm v 1 0 1 User Manual...

Page 2: ...0 2 Contents 1 CE Declaration of conformity 3 2 Introduction 4 3 Safety 5 4 Use 7 5 Maintenance 12 6 Product specifications 13 7 Mounting accessories 15 8 Troubleshooting 16 9 Storage transport 17 10...

Page 3: ...e responsibility that the following product Equipment ChargeArm Brand name ChargeArm Model type CA01 is in conformity with the Directive 2006 42 EG of the European parliament and the council of 17 May...

Page 4: ...such as a pavement in a safe and user friendly manner Should the ChargeArm extend over public domain please check with you local authorities if this is permitted Your installer is obligated to instal...

Page 5: ...ner described in chapter 4 so as to avoid fingers hands or clothing being trapped in the ChargeArm structure Do not use the ChargeArm when it is damaged While extending the arm only pull the charge ca...

Page 6: ...hargeArm v 1 0 6 Check on a regular basis if greenery is blocking the movement of the arm Trim away vegetation if necessary Do not use a strimmer near the base of the ChargeArm as it may damage the ch...

Page 7: ...ltiple ways such as the wall mounted version but in general the manner of use will be the same 1 Release the Charge cable Depending on your installation this can be from the charge box or from a separ...

Page 8: ...out Pull gently on the charge cable and let the arm automatically fly out Make sure no one is standing in the movement zone of the arm 4 Connect the charge cable to the car Follow the instructions of...

Page 9: ...0 9 5 After charging disconnect the charging cable Follow the procedure as described in your car s manual 6 Put the charge cable connector back in its holder Depending on your installation this can a...

Page 10: ...Start pulling down the arm using the pull cord 8 Move the arm to the fully closed position Whilst still pulling down on the pull cord use your other hand to push the arm inwards Try to move the arm in...

Page 11: ...rgeArm v 1 0 11 9 Push the cable into the cable clamp to achieve a tidy look for your ChargeArm This feature is only intended to tidy up the cable It is recommended however not doing so will not affec...

Page 12: ...to be replaced For gas lift replacement contact your installer Only a dedicated gas lift may be used which can be ordered by your installer Do not use a different type of gas lift as this will alter...

Page 13: ...User Manual ChargeArm v 1 0 13 6 Product specifications Freestanding version...

Page 14: ...User Manual ChargeArm v 1 0 14 Wall mounted version...

Page 15: ...choice has already been made for a charge box and it s method of mounting If during the life of the ChargeArm a new charge box needs to be mounted the following mounting options are available It is po...

Page 16: ...f you notice any deformation Do not use any lubricants in the column of the ChargeArm The track wheels inside the arm are designed to run without any lubrication The ChargeArm does not fully extend or...

Page 17: ...ather influences Damage caused by third parties or abnormal circumstances such as fire and storm damage 11 Notes THIS DOCUMENT CONTAINS INFORMATION THAT MAY CHANGE WITHOUT PRIOR NOTICE The latest vers...

Reviews: