ChamSys QuickQ 10 Installation, Software Manual And Warranty Certificate Download Page 8

www.chamsys.co.uk

                                                                                                                                                      QuickQ User Manual


Page 

8

 of 

43


Powering Up 


To power up the console, simply plug in the supplied 12v DC power supply. If the console has been shut down via 
the software, press the power switch on the back panel. After a few seconds the screen will come to life, you will 
see the operating system loading.   
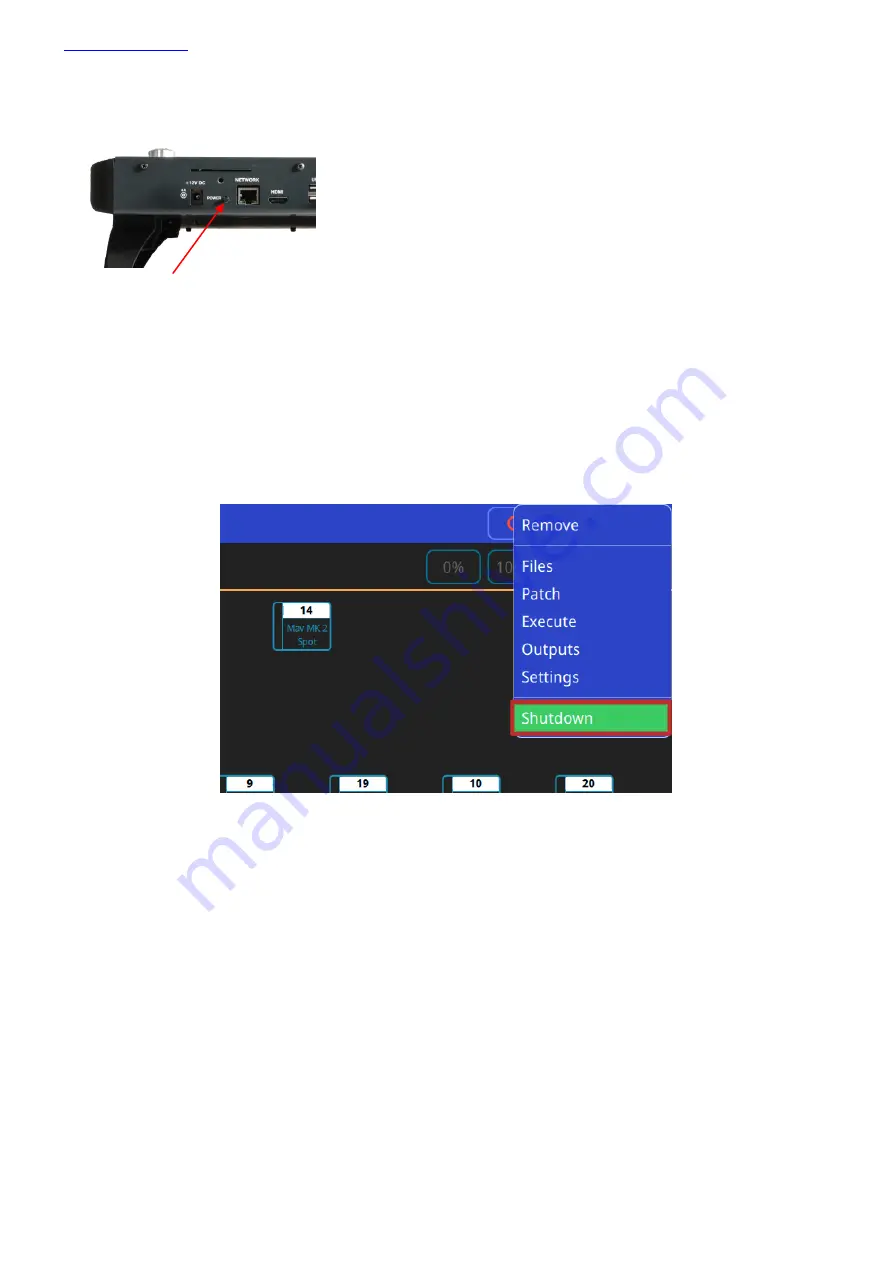
Powering Down 

To power down the console it is necessary to shut down the QuickQ application.  The console operating system 
performs an automatic shutdown and turns itself off when complete.  

To quit the QuickQ application, press the 

Menu button on the top right of the display and then select the QUIT soft button.  When asked for confirmation, press 
the YES. 


If for any reason you are unable to power off the console then you may need to force the console to power off as 
below. 
 

Forcing the Console to power off


Switch off the console at the mains supply.  

Summary of Contents for QuickQ 10

Page 1: ...ChamSys QuickQ 10 QuickQ 20 and QuickQ 30 Console Installation Software manual and Warranty Certificate...

Page 2: ...e usage copy storage distribution modification or printing of this manual or its content for any other purpose without written consent from ChamSys Intended Audience Any person installing operating an...

Page 3: ...s and Patching 14 3 0 Home Screen and Controlling Fixtures 18 3 2 Controlling Fixtures with QuickQ 19 3 3 Recording Items with QuickQ 26 3 4 Editing Cues 32 3 5 Effects 33 3 6 Execute Window 35 3 7 MI...

Page 4: ...onsole Do not rub firmly on the metal or plastic surfaces this may cause the paint or lettering to be removed Gently use a damp cloth to clean the panels Do not put water on the touch screen as this m...

Page 5: ...ber Each fixture is given a number during patching Fixtures 1 to 20 or 1 to 40 on the QQ30 can also be controlled from the fixture faders with the corresponding number These may also be referred to as...

Page 6: ...different Playbacks are the faders on the bottom right of the console QQ10 has one theatre style cue stack and two chase cue stacks QQ20 and QQ30 each have 10 playbacks Palettes a collection of fixtur...

Page 7: ...uickQ consoles use the same operating system utilising the same installer cdq extension files Connections The picture below shows the connections on the QuickQ 20 console The QuickQ 10 and 30 consoles...

Page 8: ...To power down the console it is necessary to shut down the QuickQ application The console operating system performs an automatic shutdown and turns itself off when complete To quit the QuickQ applicat...

Page 9: ...sed user interface making them extremely user friends Other key areas of the QuickQ physical hardware is the Multi function fixture Group Cue faders to the left of the display and the Playback section...

Page 10: ...ion and Menu as pictured below Below this a soft toolbar of options specific to each window can be found For example in the Home window buttons on screen to open controls for Intensity Position Colour...

Page 11: ...l options that can be applied to the console these can be found below the Network DMX User Interface and Update buttons Changing the way the console playbacks cue stacks and chases behave QuickQ conso...

Page 12: ...pective of patch or address Hot takeover mode allows the console s output to automatically be enabled and disabled based on the current DMX traffic on the connected network If for instance QuickQ dete...

Page 13: ...er Interface Options The User Interface options window enables users to change the console language Supporting GB English US English Spanish and Dutch the language can be changed by pressing the langu...

Page 14: ...Show soft button This clears the current show file from memory saved shows still remain stored on the console and can be loaded back into memory at any point by selecting the Load Show option in this...

Page 15: ...or Add some fixtures open the patch window from the menu button and select the button on the lower right hand side of the patch window The Add Fixtures window has two different views Quick and Find F...

Page 16: ...w features a name column the default for this field is the fixture name from the QuickQ fixture library This name is used on the Home screen and can custom set per fixture It is recommended that you n...

Page 17: ...he repatch option from the action menu bar at top of window Removing fixtures To remove a fixture from the Patch select remove from the action menu then select the fixture s to be removed Note that th...

Page 18: ...cting fixtures either in the Layout window or using the multi functional faders on the left of the console pressing the Record icon and selecting an empty fader in Group mode The newly created group s...

Page 19: ...The fader controls the group of fixtures intensity Multiple groups of fixtures can be selected in one go Press on a button beneath the fader for the start of the range and at the same time press a fi...

Page 20: ...eam or Position the latest one to be activated will have its contents output on the stage Activating Cues and Releasing Cues Cues can be started and stopped from playing or outputting by raising and l...

Page 21: ...ur fixtures in patch to their function makes selection easier Lamp On and Lamp Off In addition at the top of this window there are buttons to lamp on or strike selected instruments or to lamp off the...

Page 22: ...screen Colour Palettes Default Colour Palette Select to return colour to defaults Colour Picker Touch within this colour picker to change colour Changes using other controls will be displayed here Man...

Page 23: ...osition in more than one cue consider saving it to a palette Palettes are referenced in cues so modifying a palette will change every cue it the palette is used in Position Palettes Default Palette se...

Page 24: ...a palette will change every cue it the palette is used in Beam Palettes Press Record button and use the green button to add your own Default Palette select to return to beam defaults Beam encoders pul...

Page 25: ...ore than one cue consider saving them to a palette Palettes are referenced in cues so modifying a palette will change every cue it the palette is used in Beam Palettes Press Record and use the green b...

Page 26: ...tures Turn them on and make a change to their position colour or beam attributes To record a colour palette select the colour window Press Record Buton Select the green Button Editing a Palette Select...

Page 27: ...lour beam and position add any effects and press record With the multifunction faders in cue mode select one of the faders The LEDs above empty faders will flash on and off For faders already containi...

Page 28: ...changed live Speed Use this encode to modify the speed of the chase without using tap to time The encoder tab can also be pulled out and the speed can be multiplied or divided using buttons on the ta...

Page 29: ...he console will only operate on playback 1 in this mode and will run any fade timing assigned to the cues on playback 1 The go button in the cue stack window can also be used All other cue stacks in t...

Page 30: ...n be used to run the cues on the cue stack A running cue will have a green outline and a progress bar in the fade column Cue Name will be empty when a cue is recorded and can be edited by selecting by...

Page 31: ...s the fade in time This can be changed to result in modified timing for example colour could have a shorter or longer fade in time Cue Wait and Follow Times To change the Wait or Fade times on a cue i...

Page 32: ...move and then select a cue to delete Record Merge To add selected and captured attributes to an existing cue Select some fixtures and make any required changes Press record Select Show Options Select...

Page 33: ...shape to a given attribute this shape can be controlled in size and speed Changing the size will change how far from the original value that attribute will move for each part of the effect Adding FX...

Page 34: ...e to the starting value of the attributes when you applied the effect IE if your fixtures are at 50 intensity and you put a 100 size on your dimmer effect the lights will chase from 0 100 where a 50 s...

Page 35: ...ts LTP channels will use the current value as the starting point for the effect IE a circle effect on pan and tilt will use the current position of the fixture as the centre of the circle movement rel...

Page 36: ...43 Using the link option will allow for clicking on an execute to release any other executes that are linked to it In order to Link executes they must be directly next to each other horizontally Use t...

Page 37: ...e MIDI timecode can be enabled on individual cue stacks by pressing the menu button selecting cue stack options and enabling Use MIDI Timecode Once enabled timecode values can be inserted into the wai...

Page 38: ...labelled Audio In To enable sound to light for a chase enter the desired cue stack window either by holding or double tapping on the corresponding playback legend From here access the chase options v...

Page 39: ...le Update procedure Download latest QuickQ console software from www chamsysquickq com Copy downloaded file to a USB Drive Unplug any HDMI monitors from the console and power on the console Insert the...

Page 40: ...ordance with the instructions may cause interference with radio and television reception However there is no guarantee that interference will not occur in a particular installation If this equipment d...

Page 41: ...2 2 Network 1 x 10 100 Mbps port 1 x 10 100 Mbps port 1 x 10 100 Mbps port External Monitor 1920 x 1080 HDMI 1920 x 1080 HDMI 1920 x 1080 HDMI Audio In Out Mini Jack In Out Mini Jack In Out Mini Jack...

Page 42: ...with the WEEE disposal and recycling regulations http ec europa eu environment waste weee index_en htm ChamSys products must not be disposed of through normal household waste For non UK customers plea...

Page 43: ...ch as liquid damage spills onto the console For Warranty claims please contact the dealer you purchased the console from If you are based outside of the UK please contact your local dealer Your local...

Reviews: