background image

100378 - 43cc cULTivATOR

SPEcificATiONS

19

How to Prepare Your cultivator for Restarting

In the Spring, when you take your cultivator out of storage, remove 
the spark plug. Pull the starter cord three or four times to clean oil 
from the combustion chamber. Wipe oil from the spark plug. Place 
the spark plug back into the cylinder. Reconnect the spark plug 
wire back on the spark plug. Then follow the steps to refuel and 
restart your cultivator.

Re-Starting Problems After Storage

If your cultivator won’t restart in the Spring - or if it lacks its usual 
power - the carburetor may need attention or the spark plug 
may be at fault. Check to see if the plug is fouled with oily black 
deposits. Clean or replace it if it is.

Also, check whether the center electrode is rounded at the end, 
or if the ground electrode is worn. If either is the case, you should 
replace it with a NHSP L8RTC or NGK BPMR7A spark plug. Use a 
19 mm spark-plug wrench to install it. Adjust the plug gap to 0.5 - 
0.7 mm (0.020 - 0.028 in.). To install the spark plug first turn the 
plug until it is finger tight, then tighten it a quarter turn more with 
a socket wrench.

NOTicE

To avoid possible damage to the threads, do not try to remove the 
plug from a hot aluminum cylinder head.

SPEcificATiONS

cultivator Specifications

Start Type

 ....................................................

Recoil

Gasoline/Oil Ratio

 ..............................................

50:1

Fuel Capacity

 ........................................

0.3 gal. (1.1 L)

Weight

 ............................................

36.4 lb. (16.5 kg)

Height

 ..............................................

38.6 in. (98 cm)

Width

 ...............................................

18.9


in. (48 cm) 

Length

 .............................................

30.3 in. (77 cm)

Engine Specifications

Model

 .....................................................

1E40F-2E

Displacement

 ..................................................

43 cc

Type

 ........................................................

2-Stroke

Spark Plug

OEM Type

 ............................................

TORCH L8RTC

Replacement Type

 .....................

NGK BPMR7A or equivalent

Gap

 .................................

0.020-0.028 in. (0.5-0.7 mm)

Summary of Contents for 100378

Page 1: ...ains important safety precautions which should be read and understood before operating the product Failure to do so could result in serious injury This manual should remain with the product Specificat...

Page 2: ...e Engine 15 Special Feature 15 Tips for Extending Engine Life 15 Cultivating 15 Maintenance 16 How to Check Clean and Change the Air Filter 16 Cleaning Air Filter 16 Idle Speed Adjustment 17 Clear Blo...

Page 3: ...as been made to ensure the accuracy and completeness of the information in this manual at the time of publication and we reserve the right to change alter and or improve the product and this document...

Page 4: ...retraction of the starter cord will pull hand and arm towards the engine faster than you can let go Unintentional startup can result in entanglement traumatic amputation or laceration Broken bones fr...

Page 5: ...or feet near or under tines Do not use near underground electric cables telephone lines pipes or hoses If in doubt contact your utility or telephone company to locate underground services Don t overre...

Page 6: ...gasoline tank Only fill or drain gasoline outdoors in a well ventilated area DO NOT pump gasoline directly into the engine at the gas station Always use an approved fuel container to transfer the gaso...

Page 7: ...vileged and shall not be disclosed to or used by or for outside parties without the explicit consent of Champion Power Equipment Safety Icons C WARNING Operation of this equipment may create sparks th...

Page 8: ...ection with side shields marked to comply with ANSI Z87 1 Safety Alert This machine was built to be operated according to the safe operation practices in this manual As with any type of power equipmen...

Page 9: ...is 50 1 and add if necessary 2 Primer bulb 2a For cold starts press primer bulb 7 10 times 2b For warm starts DO NOT press primer bulb 3 Move choke lever to the CHOKE position 4 Holding the unit firml...

Page 10: ...e yourself with the location and function of the controls and features Save this manual for future reference Cultivator 1 Fender Guard 2 Fuel Tank 0 3 gal 1 1 L 50 1 ratio 3 Engine 43cc 4 Middle Handl...

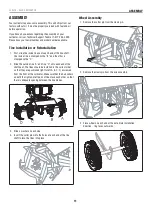
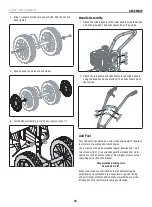
Page 11: ...e other is stamped with a C 2 Slide the outside tine A and tine D onto each end of the shaft next The tines should be installed in the correct order so that they are positioned right to left A B C D a...

Page 12: ...s should be on the outside Add Fuel Your cultivator is powered by a two stroke engine which requires a fuel mixture of gasoline and lubricating oil Use a mixture of 50 parts unleaded regular gasoline...

Page 13: ...ls like 50 1 TruFuel are also good options to fuel your cultivator Ethanol High levels of ethanol can cause deterioration of rubber and or plastic parts and disruption of engine lubrication Never use...

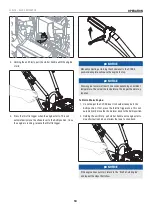
Page 14: ...engine to stop NOTICE Allow engine to warm at least 30 seconds depending on ambient temperature The colder the temperature the longer the warm up required To Start a Warm Engine 1 Do not adjust the C...

Page 15: ...you pull your cultivator backward it provides extra resistance to the tines so they dig deeper What s more when you go backward you create a soil bed that stays light and fluffy ready for plating Plac...

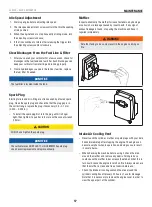
Page 16: ...ll void your warranty NOTICE For Emission control devices and systems read and understand your responsibilities for service as stated in the Emission Control Warranty Statement of this manual How to C...

Page 17: ...tighten it a quarter turn more with a socket wrench 19 mm CAUTION DO NOT overtighten the spark plug NOTICE The cultivator uses NHSP L8RTC or NGK BPMR7A spark plug Use an exact replacement and replace...

Page 18: ...in it Even under ideal conditions stored fuel containing ethanol or MTBE can start to go stale in as little as 30 days Since stale fuel has a high gum content it can clog the carburetor this will in...

Page 19: ...t if it is Also check whether the center electrode is rounded at the end or if the ground electrode is worn If either is the case you should replace it with a NHSP L8RTC or NGK BPMR7A spark plug Use a...

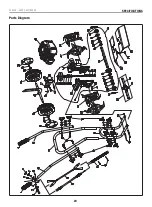
Page 20: ...100378 43cc Cultivator Specifications 20 Parts Diagram...

Page 21: ...lutch Drum 1 33 2310003937 Roller Bearing 629 2RS 1 34 2320088857 Flange Bushing Worm Shaft 1 35 2310004438 Needle Roller Thrust Bearing 1 36 2320093333 Bearing Thrust Reducer 1 37 2320111467 Worm Sha...

Page 22: ...100378 43cc Cultivator Specifications 22 Engine Parts Diagram...

Page 23: ...027110 Circlip Piston Pin 2 34 2320050831 Piston 1 35 2320008661 Piston Pin 1 36 2320048282 Piston Ring Assembly 2 37 2320050467 Gasket Cylinder 1 38 10301805 Cylinder 1 39 2310003892 Screw M5 x 20 4...

Page 24: ...e is blocked The fuel line runs from the fuel tank to the carburetor Pull it off at the carburetor end Fuel should drip slowly from the line Wipe off any excess or spilled fuel If fuel does not drip f...

Page 25: ...glected involved in an accident abused loaded beyond the product s limits or modified Normal maintenance is not covered by this warranty and is not required to be performed at a facility or by a perso...

Page 26: ...If any emission related part on your engine or equipment is defective the part will be repaired or replaced by CPE OWNER S WARRANTY RESPONSIBILITIES As the small off road engine owner you are responsi...

Page 27: ...the Operators Manual shall be warranted for the period of time prior to the first scheduled replacement point for that part If the part fails prior to the first scheduled replacement the part shall be...

Page 28: ...r Mounting Brackets Carburetor Purge Port Connector TO OBTAIN WARRANTY SERVICE You must take your CPE engine or the product on which it is installed along with your warranty registration card or other...

Reviews: