


PROGRAMMING
1
1
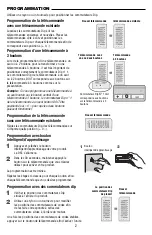
Press and release the Smart/Learn button
on your product. The LED will light.
2
2
Within 30 seconds press and hold the
button on the remote control that you
wish to activate your product.
Programming is complete.
Repeat the steps above for each button and/or
remote control you would like to program.
Programming with Smart/Learn button
2
Programming the remote control to an
existing remote control
Locate the dip switches in the new and old
remote controls. Place remote controls side by
side and set the dip switches in the remote
controls to matching positions (+,0,-).
Programming a 3-button remote control
When programming a single or 2-button remote
control to a 3-button remote control it is very
important to set dip switch #1 to the correct
position. The dip switch in the single or 2-button
remote control MUST correspond to the buttons
on the 3-button remote control as shown.
Example:
If you are programming a
single-button remote control to the middle button
on the 3-button remote control, dip switch #1 in
the single-button remote control MUST be set to
“0” in order for both buttons to work.
+
0
–
12
3
4
5
6
7
8
9
+
0
–
12
3
4
5
6
7
8
9
=
+
0
–
12
3
4
5
6
7
8
9
+
0
–
12
3
4
5
6
7
8
9
=
+
0
–
12
3
4
5
6
7
8
9
+
0
–
12
3
4
5
6
7
8
9
=
+
0
–
1
+
0
-
New Remote Control
Dip Switch Settings
From Product
3-Button
Remote Control
Single or 2-Button
Remote Control
Dip switch #1 must
correspond to the 3-button
remote control buttons
Existing Remote Control
New Remote
Control
1
2
Smart/Learn Button
Programming the remote control
without an existing remote control
Set the dip switches in the remote controls to
any position you want (+,0,-).
+
0
–
1
2
3
4
5
6
7
8
9
New Remote Control
Use a pen or screwdriver to slide the dip switches.
Check the dip switch settings on the back of
your product.
Use a pen or screwdriver to slide the dip
switches in the remote control to match the
dip switches on the back of the product.
When the dip switches have been set press the remote
control button to activate your product.
Programming with dip switches


