background image

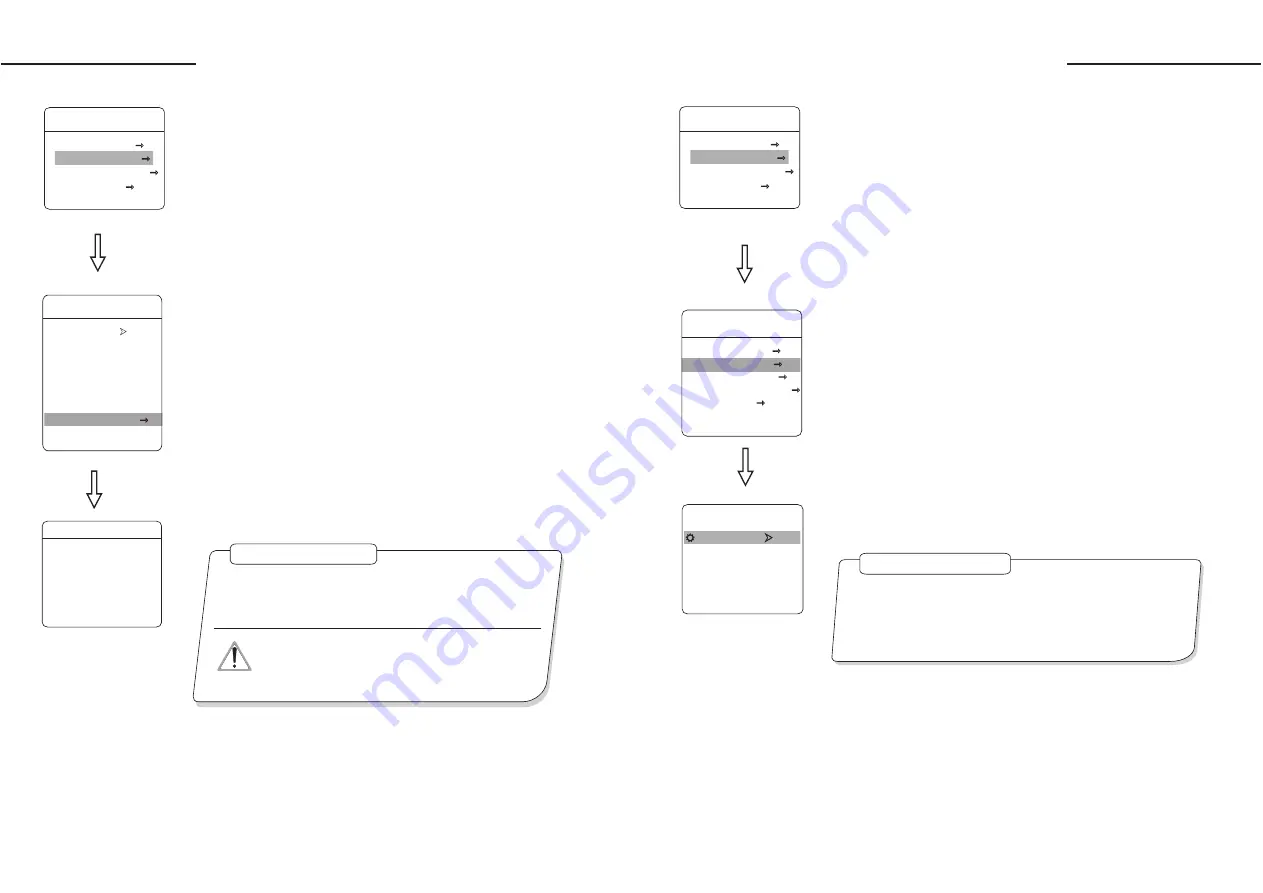
6. 1. 6  Day/night setting

1

2

3

DAY/NIGHT SETTING

4

. The system enters into the main menu by calling 95 preset or by 

calling 9 preset twice within 3 seconds. 

. Operate the joystick up and down and move the cursor to

CAM-

ERA SETTING

to enter submenu.

. Operate the joystick up and down and move the cursor to

LENS 

PARAMETERS

, press

OPEN

to enter

the cursor jumps to right, there are three choices of "DAY/NIGHT", 

which is as follows:


THRESHOLD

:sensitive of IR cut filter, the range from 0 to

                                       28dB.

5. Press

OPEN

to save.


AUTO

: IR cut filter mode, it means the dome 

                                  automatically transfers according to sensitivity.


TIME

: set the time of opening IR cut filter


COLOR

: set as color mode


BLACK

 : set as black and white mode 

OPERATION KNACKS

NOTICE

         IR cut filter function uses color in day; use black and white at 
night. This function not only guarantees the quality of image, but 
also saves the room of storage.  

This function depends on the models and parameters 
of built-in camera in dome, if the camera haven't this 
function, then this function is invalid.(N/A)

DAY/NIGHT       TIME
  DAY TIME        00:00
  NIGHT TIME    00:00
  THRESHOLD   10dB
BACK
EXIT

DAY/NIGHT  SETTING

LENS PARAMETERS

ZOOM  SPEED         HIGH
DIGITAL  ZOOM         ON
BLC  MODE                OFF
SLOW  SHUTTER          ON
WDR  MODE              N/A
MIRROR                     ON
FLIP                            ON    
DAY/NIGHT  SETTING
BACK
EXIT

2 1

MAIN   MENU

SYSTEM  SETTING
CAMERA  SETTING
FUNCTION  SETTING
DISPLAY SETUP
EXIT

Camera setting

6. 2  AE mode

1. 

2. 

● 

AUTO 

: default

● 

SHUTTER

 : 


IRIS

● 

BRIGHT

:

4

The system enters into the main menu by calling 95 preset or by 

calling 9 preset twice within 3 seconds. 

Operate the joystick up and down and move the cursor to

CAM-

ERA SETTING

 to enter submenu.

3. Operate the joystick up and down and move the cursor to

AE 

MODE SETTING

, press 

OPEN

, tilt up/down joystick to choose

 AE mode, modes for choosing as follows: 
      

 setting, auto Iris  mode


shutter priority mode


iris priority mode


 brightness priority mode 

. Choose iris priority mode

IRIS

, press

OPEN

to save.

5


         The camera can automatically calculate suitable exposure 
amount according to brightness of scenery and CCD sensitivity, in 
the situation that the exposure amount is certain: 

SHUTTER

 (shutter priority) is to fix shutter speed, the camera will auto decide 
to use how much iris; 

IRIS

(iris priority) is to fix the size of iris, 

and auto-decide to use shutter speed. 

BRIGHT

(brightness 

priority)is point that the camera TTL check the light directly and 
control the brightness of image.                           

. Move joystick to the sub-choices of AE mode 

IRIS F1.4

, press 

OPEN

 to choose adequate Iris, press 

OPEN

 to save.

● 

it means shutter speed, when AE mode 

is shutter priority, this function can be set.

● 

 IRIS                 F1.4

 it means the size of iris, when AE mode 

is iris priority, this function can be set.

● 

BRIGHT       F2.0/ODB

it means brightness, when AE mode 

is brightness priority, this function can be set.

 SHUTTER         1/50

OPERATION KNACKS

Quality of photo relates to exposure amount, that is to say how 

much light can make CCD receives legible image. Exposure 

amount is relative to the time of lighten (be up to shutter speed) 

and the area of lighten (be up to the size of iris). 

CAMERA  SETTING

LENS PARAMETERS
AE MODE SETTING
AWB  MODE SETTING                
ADVANCE  PARAMETERS
PRIVACY MASK
BACK
EXIT

AE MODE SETTING

AE  MODE          AUTO 
  SHUTTER           N/A
  IRIS                   N/A
  BRIGHT             N/A
BACK
EXIT

2 2

MAIN   MENU

SYSTEM  SETTING
CAMERA  SETTING
FUNCTION  SETTING
DISPLAY SETUP
EXIT

Camera setting

Summary of Contents for VKFCSD22IR Series

Page 1: ...Infrared Speed Dome Manual...

Page 2: ...and s 5 1 2 5 1 3 M 5 2 5 3 5 4 Dome ID setting 5 5 Password setup 5 6 Clock setting 5 7 5 7 1 Power up action 5 7 2 PAN TILT setting 5 7 3 Time action setup 5 7 4 Park action setup 5 8 Defaults 6 Cam...

Page 3: ...precise optical product Do not touch it directly to avoid scratches which can affect image quality Requirements to service personnel All the service work should be done by qualified technicians Don t...

Page 4: ...product is high technology surveillance product with high definition and color camera variable speed pan tilt and multifunction decoder It can reduce the connection and installation process between sy...

Page 5: ...ray and thus make the brightness of deferent image stable User may adjust iris by controlling keyboard to get required brightness that you need User also can resume auto Iris by joystick operation Whe...

Page 6: ...5 1 1 Power up and self testing 5 1 3 Menu and keyboard operation DOME S N VERSION DOME S N VERSION PROTOCOL FACTOTY PROTOCOL FACTOTY DOME ID 001 DOME ID 001 BAUD RATE 4800bps BAUD RATE 4800bps MODEL...

Page 7: ...2 Operate the joystick up and down and move the cursor to SYS TEM SETTING press OPEN to enter submenu 3 Operate the joystick up and down and move the cursor to DOME ID SETTING press OPEN to call dome...

Page 8: ...ial one which is 000000 and then user may set the password by himself again MAIN MENU SYSTEM SETTING CAMERA SETTING FUNCTION SETTING DISPLAY SETUP EXIT SYSTEM SETTING EDIT DOME TITLE DOME INFO DOME ID...

Page 9: ...to save Operate the joystick up and down and move the cursor to Operate the joystick and 5 7 2 PAN TILT setting When manually adjusting for far focus situation the dome responds at a high speed so th...

Page 10: ...ESETS CLEAR ALL PATTERNS CLEAR ALL TOURS CLEAR ALL PRIVACIES FACTORY DEFAULTS RESTART restart the dome 4 The system enters into the main menu by calling 95 preset or by calling 9 preset twice within 3...

Page 11: ...SETTING DISPLAY SETUP EXIT 6 1 3 Back light compensation 1 2 LENS PARAMETERS 3 4 The system enters into the main menu by calling 95 preset or by calling 9 preset twice within 3 seconds Operate the jo...

Page 12: ...AE MODE SETTING AWE MODE SETTING ADVANCE PARAMETERS PRIVACY MASK BACK EXIT 19 MAIN MENU SYSTEM SETTING CAMERA SETTING FUNCTION SETTING DISPLAY SETUP EXIT Camera setting NOTICE This function is relativ...

Page 13: ...and move the cursor to CAM ERA SETTING to enter submenu 3 Operate the joystick up and down and move the cursor to AE MODE SETTING press OPEN tilt up down joystick to choose AE mode modes for choosing...

Page 14: ...camera does not have such function when the setting option shows N A CAMERA SETTING LENS PARAMETERS AE MODE SETTING AWB MODE SETTING ADVANCE PARAMETERS PRIVACY MASK BACK EXIT 6 3 White balance mode AW...

Page 15: ...ling 9 preset twice within 3 seconds Click each command to enter preset menu according to the order of the left picture As follows preset and call preset function can be set by keyboard operation inpu...

Page 16: ...s of other labels are the same as above NOTICE MAIN MENU SYSTEM SETTING CAMERA SETTING FUNCTION SETTING DISPLAY SETUP EXIT FUNCTION SETTING PRESETS SCAN PATTERNS TOUR ZONES BACK EXIT 1 left limit and...

Page 17: ...f set the presets of the second line move the cursor to the second line press OPEN to continue edit Press OPEN to save after setting press CLOSE to exit TOUR NUMBER TOUR RUN TOUR CLEAR TOUR EDIT MAIN...

Page 18: ...ime label 305 45 305 45 01X 01X Direction label Zoom magnification label 31 DISPLAY SETUP DOME TITLE OFF PRESET TITLE OFF ZOOM POSITION ON ZONES NAME OFF DIRECTION LABEL ON TEMPERATURE LABEL OFF TIME...

Page 19: ...R GAIN N A B GAIN N A BACK EXIT AWB MODE SETTING SHARPNESS 05 HI RESOLUTION ON MAX GAIN 28dB EXPOS COMP N A BACK EXIT ADVANCE PARAMETERS PRIVACYNUMBER 01 EDIT PRIVACY ENABLE PRIVACY OFF CLEAR PRIVACY...

Page 20: ...e cables are long in the connection The reliability of control signals is decreased with the phenomena that the dome does not respond or just responds at intervals to the controller or does continuous...

Page 21: ...26 27 28 29 30 31 32 20 21 22 23 24 1 1 1 1 1 0 0 0 0 0 0 0 0 1 0 0 Bit 1 2 3 4 5 6 7 8 0 0 0 0 0 0 0 0 1 0 0 0 0 0 0 0 0 1 0 0 0 0 0 0 1 1 0 0 0 0 0 0 0 0 1 0 0 0 0 0 1 0 1 0 0 0 0 0 0 1 1 0 0 0 0 0...

Page 22: ...0 0 0 1 1 0 1 0 0 0 0 1 0 1 1 0 0 0 0 1 1 1 1 0 0 0 0 1 132 133 134 135 39 S w i t c h n u m b e r ID Bit 1 2 3 4 5 6 7 8 S w i t c h n u m b e r ID 1 2 3 4 5 6 7 8 Bit Sw1 Sw1 0 0 0 1 0 0 0 1 1 0 0 1...

Page 23: ...tortious won t exceed the amount of the products The factory won t bear any responsibility for the special unexpected and continue damage caused by any other reasons Our company has the final right of...

Page 24: ...ESET Enter menu CALL 94 PRESET Restart CALL 92 PRESET Set scan1 Left limit CALL 93 PRESET Set scan1 Right limit CALL 97 PRESET Run scan1 CALL 99 PRESET Run pattern 1 CALL 62 PRESET Open IR LED manual...

Reviews: