Challenge SS20CSDRI Original Instruction Manual Download Page 8

Customer Helpline

 0345 640 0800

8


50MM PH2 BITS 

1

50MM SL6 BITS 

1

CHARGER 

1

Accessories

Operating Instructions

NOTE: Before using the tool, read the instruction book carefully.
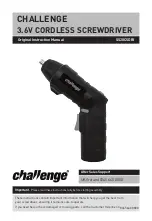
Intended Use

This tool is intended for driving in and loosening screws.

1. CHARGING THE BATTERY
A) BEFORE OPERATING
NOTE:

a) Do not use any charger other than that specifically provided for use with the 
equipment.
b) If the power tool is very hot you must remove your power tool from the charger and  
allow time for the battery to cool down before recharging.
c) The battery in your new tool is not charged when it leaves the plant. Therefore it 
must be fully charged before using for the first time.
d) Please charge the battery to reach full or no less than half charge before storage. If 
the tool will not be used for long periods of time, charge the battery every 3-6 months. 

Plug the charger plug into a suitable power outlet. Next, connect the DC plug to the 

Charging port (6). When charging is completed, unplug the charging, disconnect the 

charger from the screwdriver. The screwdriver is now ready to be used.

Plug charger plug into a suitable power outlet and afterwards plug the DC plug into 
charging port(6), the charging indicator (red) will illuminate at this time.
The charger indicator (red) will go out and the charging indicator (green) will illuminate 
when charging is complete, then unplug the charging plug from the wall socket and then 

the tool is ready to use. 

B) CHARGING PROCEDURE

Important: 

When charging, the charger and power tool may become warm to the touch, this is 
normal and does not indicate a problem.

WARNING: When battery charge runs out after continuous use or exposure to 
direct sunlight or heat, allow time for the tool to cool down before re-charging 

to achieve the full charge.

OPERATION 
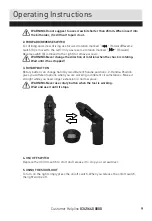
1. FITTING AND REMOVING BITS 

Insert the bit into the bit holder(1) and push the bit into the bits holder until fully inserted. 

To remove the bit, simply pull it out of the bit holder. 

Summary of Contents for SS20CSDRI

Page 1: ...ting assembly SS20CSDRI These instructions contain important information that will help you get the best from your screwdriver ensuring it remains safe to operate CHALLENGE If you need help or have da...

Page 2: ...mer Helpline 0345 640 0800 2 Contents Safety Information 3 In The Box 7 Accessories 8 Operating Instructions 8 Trouble Shooting 10 Maintenance 10 Technical Data 10 Environmental Protection 13 Guarante...

Page 3: ...tection Wear dust mask Double insulation Indoor use only Do not expose to rain or water Do not burn Li ion battery This product has been marked with a symbol relating to separate collection for built...

Page 4: ...e the risk of electric shock d Do not abuse the cord Never use the cord for carrying pulling or unplugging the power tool Keep cord away from heat oil sharp edges or moving parts Damaged or entangled...

Page 5: ...of the reach of children and do not allow persons unfamiliar with the power tool or these instructions to operate the power tool Power tools are dangerous in the hands of untrained users e Maintain po...

Page 6: ...n the event of battery leaking do not allow the liquid to come into contact with the skin or eyes If contact has been made wash the affected area with copious amounts of water and seek medical advice...

Page 7: ...below 4 C or above 40 C This is important as it can prevent serious damage to the power tool 18 Charge only power tool of the same model provided by manufacturer and of models recommended by manufactu...

Page 8: ...itable power outlet Next connect the DC plug to the Charging port 6 When charging is completed unplug the charging disconnect the charger from the screwdriver The screwdriver is now ready to be used P...

Page 9: ...rter than 25mm When insert into the bit holder it is difficult to pull it out 4 ON OFF SWITCH Depress the On Off switch to start and release it to stop your screwdriver 3 ROTARY BUTTON Rotary button c...

Page 10: ...hooting Problem Possible cause Solution 1 Charger not plugged into a working outlet 2 Surrounding air temperature is too hot or too cold Forward Reverse switch at middle position 1 Plug charger into a...

Page 11: ...anti vibration accessories are used And the tool is being used as intended by its design and these instructions This tool may cause hand arm vibration syndrome if its use is not adequately managed WA...

Page 12: ...unauthorized modifications or alterations or has been the subject of commercial use In the event of a problem with the product within the guarantee period please return it to your nearest store If the...

Reviews: