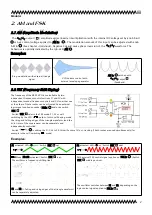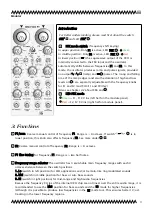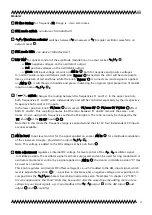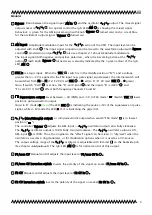
Modular
4. Adjustment
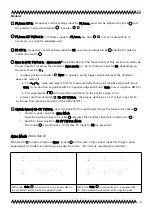
The XR22 VCO FT is already carefully adjusted, no further
calibrations should be needed; for better understanding or in
the case of unintended detuning, here is an overview of the
adjustment control elements:
2
3
4
5 6
7
8 9
21
10
11
13 14
15 16
17
18 19
20
22
12
Objekt in Pfade:
4
4
14
Falsche Zahlen
4
1V/Octave Adjustment
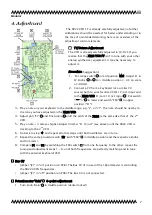
The VCO is already carefully adjusted to 1V/Oct. If you
realize that the XR22 VCO FT isn't in tune with your other
analog synthesizer equipment, it may be necessary to
adjust it.
Procedure
(Suggestion):
1.
Put range switch in mid position 'Mid'. Adjust F1 &
F2 knobs & to ≈ middle position (≈ 4,5 on scale
or ≈80Hz)
2.
Connect a CV from a keyboard (or a similar CV
source) both to your favorite VCO's 1V/oct. input and
to the XR22 VCO F1/com 1V/oct. input . Put switch
"
F1/com
F2
F1 Fine Tune
F2 Fine Tune
F1/com CV ins
F2 CV ins
+
Switch
"com"
Frequency
Control
VCO
FSK in
Switch "FSK"
F1
F2
Output
6
F1
F2
16
LO MID
HI
4
Σ
com
CV
F2
" in lower and switch "FSK"
2
3
4
5 6
7
8 9
21
10
11
13 14 15 16 17
18 19
20
22
12
Objekt in Pfade:
4
4
14
Falsche Zahlen
in upper
position ("F1").
3.
Play a note on your keyboard in the middle range, e.g. "c", or "c1". The note should be nearby to
the tone you have adjusted on the XR22 VCO.
4.
Adjust poti "F1" and fine tuning until the pitch of the XR22 is the same like that of the 2
nd
VCO.
5.
Play a note ≈ 3 octaves higher. Adjust trimmer "F1 1V/oct" (see above) until the XR22 VCO is
tracking to the 2
nd
VCO.
6.
Go back to step "4" and repeat all other steps until both oscillators are in tune.
7.
Repeat the same procedure with "F2" (with "FSK"
2
3
4
5 6
7
8 9
21
10
11
13 14 15 16 17
18 19
20
22
12
Objekt in Pfade:
4
4
14
Falsche Zahlen
in middle position and the respective knobs
and trimmers).
8.
Compare F1 and F2 by switching the FSK switch
2
3
4
5 6
7
8 9
21
10
11
13 14
15 16
17
18 19
20
22
12
Objekt in Pfade:
4
4
14
Falsche Zahlen
from one frequency to the other; repeat the
tuning and adjustment steps 1.- 8. until both frequencies are perfectly matching and in tune
with the external keyboard/VCO.
Bus CV
•
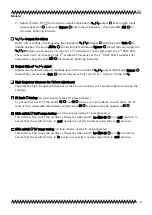
Jumper "JP1" in "on" position (on PCB): The Bus CV (if in use) of the 16pol Header is controlling
the XR22 VCO's frequencies.
•
Jumper "JP1" in "off" position (on PCB): The Bus CV is not connected.
Potentiometer 'Gain' 0-point adjustment
1.
Turn knob 'Gain' in middle position (denter locked)
7
2
3
4
5 6
7
8 9
21
10
11
13 14
15 16
17
18 19
20
22
12
Objekt in Pfade:
4
4
14
Falsche Zahlen
4
2
3
4
5 6
7
8 9
21
10
11
13 14
15 16
17
18 19
20
22
12
Objekt in Pfade:
4
4
14
Falsche Zahlen
4


