background image

Page 14

For technical questions, please call 1-800-444-3353.

SKU 92359

Cleaning, Maintenance, and 

Lubrication

Note:

  These procedures are in addition to 

the regular checks and maintenance 

explained as part of the regular 

operation of the air-operated tool.

1. 

Daily - Air Supply Maintenance: 

Every day, perform maintenance 

on the air supply according to 

the component manufacturers’ 

instructions.   The lubricator’s oil 

level needs to be maintained and 

the moisture filter must be regularly 

drained.   Performing routine 

maintenance on the air supply 

will allow the tool to operate more 

efficiently and will also reduce wear 

on the tool.

Clearing Jams


TO PREVENT 

SERIOUS INJURY 

FROM ACCIDENTAL 

OPERATION, BEFORE ANY 

MAINTENANCE OR REPAIRS 

ARE DONE (including clearing 

jams):

• Wear ANSI-approved safety 

goggles with side shields.  

Other people in the work area 

must also wear ANSI-approved 

impact safety goggles with side 

shields.

• Release the trigger.

• Detach the air supply.

• Attempt to fire Tool into piece 

of scrap wood to ensure that 

it is incapable of firing any 

fasteners.

• Empty Canister and leave it 

open during service. 

1.  Occasionally a nail may become 

jammed in the firing mechanism of 

Nailer, making the tool inoperable.

2.  To remove a jammed nail,


disconnect 

Nailer from its compressed air supply.  

Attempt to fire the Roofing Nailer 

into a piece of scrap wood to ensure 

it is disconnected.  Remove the 

Nails form the Nail Canister (82) and 

discharge any possible trapped air.

3.  Remove and discard all jammed/

damaged nails from the nailer.  

Detach and discard all damaged or 

improperly collated nails from the coil.  

Examine the nailer for any broken, 

worn or damaged parts.  If any part 

appears damaged or worn, have the 

tool repaired by a qualified service 

technician.

Summary of Contents for 92359

Page 1: ...opyright 2004 2009 by Harbor Freight Tools All rights reserved No portion of this manual or any artwork contained herein may be reproduced in any shape or form without the express written consent of H...

Page 2: ...dous situation which if not avoided could result in death or serious injury CAUTION used with the safety alert symbol indicates a hazardous situation which if not avoided could result in minor or mode...

Page 3: ...drugs alcohol or medication A moment of inattention while operating the tool increases the risk of injury to persons b Dress properly Do not wear loose clothing or jewelry Contain long hair Keep hair...

Page 4: ...king adjustments doing tool maintenance clearing jams touching the safety nosepiece leaving work area loading or unloading the tool Such precautionary measures reduce the risk of injury to persons e S...

Page 5: ...of eye protection by the operator and others in the work area 2 Keep fingers away from trigger when not driving fasteners to avoid accidental firing 3 Choice of triggering method is important Check m...

Page 6: ...pressor used to power this tool 23 Install an in line shutoff valve to allow immediate control over the air supply in an emergency even if a hose is ruptured 24 Do not engrave or stamp anything into t...

Page 7: ...n to the hand past hand injuries nervous system disorders diabetes or Raynaud s Disease should not use this tool If you feel any symptoms related to vibration such as tingling numbness and white or bl...

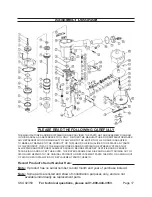
Page 8: ...e Assembly Diagram near the end of this manual Unpacking When unpacking make sure that the item is intact and undamaged If any parts are missing or broken please call Harbor Freight Tools at 1 800 444...

Page 9: ...t while working 4 Release the tool s trigger 5 Close the in line safety valve between the compressor and the tool 6 Turn on the air compressor according to the manufacturer s directions and allow it t...

Page 10: ...igned to prevent inadvertent firing The tool should only fire if the Safety Nosepiece is pressed against the workpiece prior to pulling the Trigger It should only fire again if both Trigger and Safety...

Page 11: ...Tool into a piece of scrap wood to ensure that it is disconnected and is incapable of firing any fasteners 1 To open the Canister 82 push down on the Latch 68 and swing the catch 64 and the Canister C...

Page 12: ...To fire place the nose of the Nailer on the workpiece and push down until it stops Pull the Trigger to fire one nail Note The Nailer should not fire if the Nose is not fully depressed To fire another...

Page 13: ...ing 10 Clean external surfaces with clean dry cloth Then store the tool indoors out of children s reach USER MAINTENANCE INSTRUCTIONS Procedures not specifically explained in this manual must be perfo...

Page 14: ...proved safety goggles with side shields Other people in the work area must also wear ANSI approved impact safety goggles with side shields Release the trigger Detach the air supply Attempt to fire Too...

Page 15: ...Clearing Jams instructions 2 Fill with correct fasteners 3 Empty then fill with correct fasteners 4 Clean and lubricate magazine and pusher 5 Check for loose connections and make sure that air supply...

Page 16: ...Page 16 For technical questions please call 1 800 444 3353 SKU 92359 PARTS LIST Nail Canister Canister Cover Turntable Latch Catch...

Page 17: ...THIS MANUAL AS A REFERENCE TOOL ONLY NEITHER THE MANUFACTURER OR DISTRIBUTOR MAKES ANY REPRESENTATION OR WARRANTY OF ANY KIND TO THE BUYER THAT HE OR SHE IS QUALIFIED TO MAKE ANY REPAIRS TO THE PRODUC...

Page 18: ...ntal or consequential damages so the above limitation of exclusion may not apply to you THIS WARRANTY IS EXPRESSLY IN LIEU OF ALL OTHER WARRANTIES EXPRESS OR IMPLIED INCLUDING THE WARRANTIES OF MERCHA...

Reviews: