


Page 14
For technical questions, please call 1-800-444-3353.
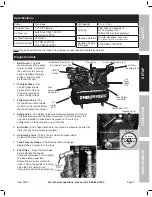
Item 56101
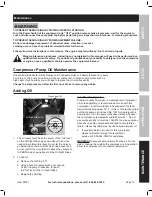
Changing Oil
1. Place a container under the Drain Plug.
2. Remove the Oil Plug to allow air flow into the Pump.
3. Remove the Drain Plug, allowing the
oil to drain into the container.
4. When the oil is completely drained from
the Pump, replace the Drain Plug.
5. Fill the Pump with new compressor oil to
the FULL level on the Oil Sight Glass.
6. Replace and tighten the Oil Plug.
7. Discard the old oil according to local,
state and federal regulations.
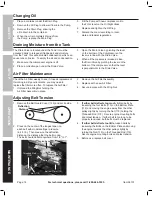
Draining Moisture from the Tank
The Drain Valve is located under the Tank. It must be
accessed daily to release all trapped air and moisture
from the Tank. This will eliminate condensation which can
cause tank corrosion. To empty the air and condensation:
1. Make sure the compressor engine is off.
2. Place a collection pan under the Drain Valve.
3. Open the Drain Valve by pivoting the lever
on the bottom of the Compressor so the
lever is in line with the Drain Valve.
4. When all the pressure is released, close
the Drain Valve by pivoting the lever on the
bottom of the compressor so that the lever
is perpendicular to the Drain Valve.
Air Filter Maintenance
Check the Air Filter weekly to see if it needs replacement.
If working in dirty environments, you may need to
replace the filter more often. To replace the Air Filter:
1. Unthread the Wing Nut holding the
Air Filter Assembly in place.
2. Remove the Air Filter Assembly.
3. Replace with a new Air Filter.
4. Secure in place with the Wing Nut.
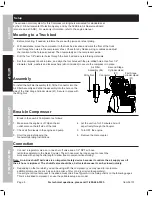
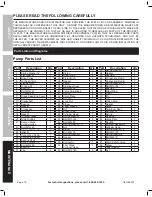
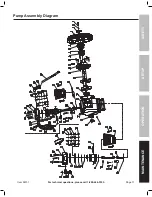
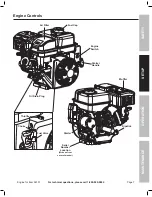
Adjusting Belt Tension
1. Remove the Belt Guard Cover (129) and set it aside.
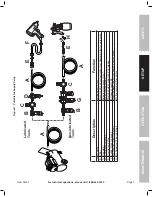
2.
Deflection
Distance
Press on the center of the longest span on
each belt with moderate finger pressure
(4-4.5 lb.). Then measure the deflection
distance, the distance that the belt moved.
The belt should deflect anywhere from 1/2″ to 1″.
Bottom Plate (114)
Nut (115)
Threaded Rod
(118)
Bolts (110)
Engine
Mounting
Bolts
Engine Base
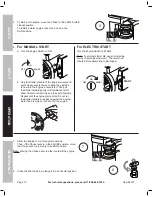
3.
If either belt deflects too much,
tighten belts by
loosening the four Bolts (110) on the Bottom Plate
(114) and moving the engine away from the other
pulley slightly by turning the Nut (115) holding the
Threaded Rod (118). Secure engine mounting bolts
and retest tension. If either belt is too long to be
properly tensioned, both belts must be replaced.
4.
If either belt deflects too little,
loosen belts by
loosening the Bolts on the Bottom Plate and moving
the engine towards the other pulley slightly by
turning the Nut (115) on the Threaded Rod (118).
Secure engine mounting bolts and retest tension.
5. Before use, replace belt cover.
SAFETY
OPERA
TION
MAINTENANCE
SETUP