Central Machinery 34542 Assembly And Operating Instructions Manual Download Page 8

SKU 34542         For technical questions, please call 1-800-444-3353        PAGE 8

5.

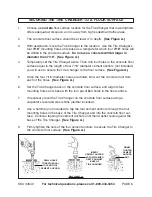
Work the Mount/Demount Bar (14) all the way around the Center Post (1) to
demount the bead completely.

6.

Pull the tire up toward the top of the bead.  Place the flat end of the
Mount/Demount Bar (14) between the tire and the rim as before.  Then, repeat
the process to remove the tire from the rim completely.

7.

Repair the tire.  Then, mount the tire back on the rim and set the tire on top of
the rim.

8.

Hook the end of the Mount/Demount Bar (14) over the edge of the rim.

9.

Push the tire forward over the edge of the rim at the place the Mount/Demount
Bar (14) is.

10.

Position the bead so it will slide across the flat portion of the hook end of the
Mount/Demount Bar (14).

11.

Press down on the tire with one hand against the rim.  With the other hand, pull
the Mount/Demount Bar (14) clockwise around the Center Post (1) until the bead
starts to mount on the rim.  It should only have to move a few inches before you
can let go of the tire and use both hands on the Mount/Demount Bar.

12.

Continue around the rim until the tire mounts over the edge of the bead.  Repeat
this procedure on the second bead to completely mount the tire.

13.

IMPORTANT:  If the tire bead starts to seat while you are mounting the tire, the
tire will need to stretch more and will be more difficult to mount.  To prevent this,
push down on the tire so it doesn’t seat on the upper edge of the rim during
mounting.

14.

NOTE:  The bead running across the top of the Mount/Demount Bar (14) keeps
the Bar hooked on the edge of the rim.  The tire bead will run across the top (flat
part of the mounting end of the Bar) and against the curved Wheel Lug Peg (3)
when mounting the tire on the rim.

ATV Tires:

1.

NOTE:  ATV tires are difficult to demount and mount because of their small
diameter.  Additionally, the tires are soft and bend easily when breaking the bead.

2.

If the Bead Breaker Shoe (10) slides off the tire, hold the Shoe in place and work
around the rim breaking the bead a little at a time.

3.

Place lubricant between the tire and rim to make it slide off easier.

Summary of Contents for 34542

Page 1: ...D INSTRUCTIONS BEFORE USE Do to continuing improvements actual product may differ slighlty from the product described herein Copyright 2006 by Harbor Freight Tools All rights reserved No portion of th...

Page 2: ...invite accidents 2 Do not operate tools and equipment in explosive atmospheres such as in the presence of flammable liquids gases or dust Tools and equipment can create sparks which may ignite the dus...

Page 3: ...installing this product TOOL USE AND CARE 1 Do not force the tool Use the correct tool for your application The correct tool will do the job better and safer at the rate for which it is designed 2 St...

Page 4: ...ustrial applications must follow OSHA guidelines 4 Never stand on the Tire Changer Serious injury could result if the Tire Changer is tipped 5 Do not allow children and other unauthorized people to ha...

Page 5: ...Never overinflate tires or other inflatable items When inflating a tire with compressed air make sure to inflate the tire to the exact PSI as recommended by the tire manufacturer Always use a pressur...

Page 6: ...pping the cement anchors until their washer rests against the base of the Tire Changer See Figure A 9 Firmly tighten the nuts of the four cement anchors to secure the Tire Changer to the concrete floo...

Page 7: ...ce turn the tire and try again in several loca tions 7 Turn the tire over and repeat Steps 1 through 6 above Demounting And MountingTires 1 After the bead is broken place the tire up on the machine wi...

Page 8: ...move a few inches before you can let go of the tire and use both hands on the Mount Demount Bar 12 Continue around the rim until the tire mounts over the edge of the bead Repeat this procedure on the...

Page 9: ...Changer If abnormal noise or vibration occurs have the problem corrected before further use Do not use damaged equipment 2 To clean the Tire Changer use a mild detergent or mild solvent Then dry 3 CAU...

Page 10: ...PAGE 10 2 4 14 3 5 1 5 6 6 7 6 6 8 8 10 13 9 11 12 11 12 11 11 12 12 9 Part Description Qty Part Description Qty 1 Center Post 1 8 Hump Pin Rings 2 2 Pedestal Cap 1 9 Side Base Channel 2 3 Wheel Lug...

Page 11: ...limitation of exclusion may not apply to you THIS WARRANTY IS EXPRESSLY IN LIEU OF ALL OTHER WARRANTIES EXPRESS OR IMPLIED INCLUDING THE WARRANTIES OF MERCHANTABILITY AND FITNESS To take advantage of...

Reviews: