37
11.4 WINTER TRACK KIT (Part No. 849-160)
Available in a ladder style, belted snow track, 22" wide for
minimal ground pressure, 1.85" steel grouser for maximum
snow penetration.
11.4.1 Installing the Axle Extension
1. Raise the vehicle off the ground and remove the
wheels.
2. Install the extension studs on all of the vehicle wheel
studs and tighten securely.
3. Place the axle extension collars onto the extension studs
and seat firmly against the axle hub plate. The small hole
must face away from the hub plate.
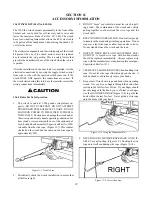
Figure 11-5. Installing the Axle Extensions.
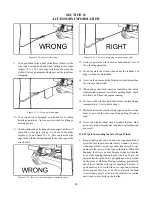
Figure 11-6. Check stud position in axle extension.
The extension studs have hexagonal sides and must sit
properly within the slots on the axle extension. If the
extension studs are misaligned with the slots of the axle
extensions when installing, adjust each stud as neces
-
sary by tightening them further until alignment allows
for the extension to slide on easily (by hand), up against
the axle hub.
SECTION 11
ACCESSORY INFORMATION
Damage to the extension studs, bolts, or axle extension
may occur if the extension studs are not tightened cor
-
rectly. Use good judgment when installing.
4. Tires must be checked for size to ensure that equal size
ones are installed on the front and rear where most of the
traction is transmitted to the tracks. If this is not done,
chain windup will happen causing damage to the drive
system components. Tires can be sized this way:
a. With the tires still off the machine, inflate them all
to 10 psi. If the tires were just installed on rims or
were left set under 5 psi, it is very important that the
tires have a chance to sit for at least 24 hours while
pressurized. Re-check the tire pressure and re-set to
10 psi if required.
b. Measure the circumference of each tire using a suit-
able tape measure, being sure to measure around the
center-line of the tire.
Figure 11-1. Write down the
measurement on each tire.
c. Try to put matched tire sizes on the front and rear
of each side; i.e. From the four tires on the left side,
choose two with a circumference within 1/2" of each
other and then put the smaller of these two on the
front and the larger one on the back. Do the same on
the right side of the Centaur.
Two tires that measure the same circumference when at
10 psi, should always be the same circumference when at
equal pressure.
Check tire pressure every 10 hours and
adjust so that front and rear tires have equal pressure.
5. If tire sizing is strictly adhered to, all drive chains should
be left connected to the drive train for optimum perform-
ance. If you are experiencing frequent drive chain windup,
remove tracks and recheck tires to ensure that front and
rear tire circumference is equal with equal tire pressure.
6. Install the Multi-Trac XT wheel assemblies. Use extreme
care and allow extra installation time to protect the axle
extensions from damage. Torque the wheel nuts to 65
ft-lbs. (88 Nm).
11.4.2 Track Installation
1. Lay the two assembled tracks on the ground in front of
the vehicle so the open side of each grouser is forward.
2. Drive the vehicle forward onto the tracks until only three
segments are in front of the tires.
Summary of Contents for 2008 Centaur
Page 53: ...45 NOTES ...
Page 54: ...46 NOTES ...


