25
SECTION 7
MAINTENANCE INFORMATION
Check the area around the exhaust system periodically
for accumulated debris, particularly when traveling
through dry vegetation. Failure to inspect and clean
the exhaust system on a regular basis may create a fire
hazard.
DO NOT ALLOW ANYONE TO TOUCH THE EXHAUST
COMPONENTS. A SEVERE BURN CAN RESULT.
A complete check over of your CENTAUR vehicle is
recommended once a year. This will reduce maintenance
costs over the life of your vehicle and ensure it will func
-
tion properly during use periods.
7.5 STEERING SYSTEM
7.5.1 STEERING CENTERING ADJUSTMENT
Remove the sheet metal covers covering the hydrostat control
arm located under the seat. Lift the vehicle so that all drive
wheels are off the ground.
With the gear shift in neutral, start engine and allow to idle at
1000 rpm. Loosen the steering spring centering plate located
under the ROPS cross tube (under the seat) and adjust to the
left or right until the wheels stop moving.
Tighten the plate to 22 ft.lbs (30 N.m) and ensure that the
centering plate does not hit the steering arm when steering left
or right. The plate should be positioned so there is at least a
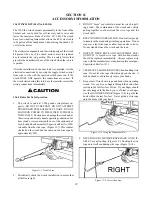
1/8” gap between it and the steering arm ( Figure7-18). Turn
the steering wheel left and release. Turn the steering wheel
right and release. The steering wheel should return to center
each time. Once centred, the wheels should not rotate.
Figure 7-18. Position of steering spring plate.
7.5.2 STEERING WHEEL & LOCK ADJUSTMENT
Adjust the steering cable so that the wheel will be centered
when released. Ensure that the steering wheel has unrestricted
rotation to the stops located at the bottom of the steering wheel
housing. Adjust cable if necessary.
Tighten all nuts and bolts associated with the steering system.
Ensure that all cotter pins and hair pins are secured and free
from wear.
Vehicles produced from S/N 0108063 are equipped with
a steering lock. This lock system ensures that the steering
wheel can not be turned until the armrest is in the lowered
position.
With the armrest DOWN ensure that the steering lock pin is
not engaged or making contact with the adjustable plate on
the hydrostat unit. Adjust if necessary for sufficient clearance
between the two.
To disconnect or adjust the spring pin end of the cable, remove
or loosen the 2 fasteners securing the bracket to the welded
tab on the upper cross brace assembly. Slide the bracket until
approximately 1/8” protrudes through the locking slide plate
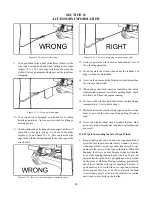
when the armrest is in the upright position (Figure 7-19).
Figure 7-19. Adjusting the spring pin end of the cable.
Generally, when the cable is fastened at the bracket on
the upper cross brace assembly, if it is installed with an
equal amount of threads on either side of the welded tab,
the cable will be properly set. The bracket need only then
be slid within the slots to achieve the 1/8” measurement
required through the locking plate when the armrest is
in the up position (Figure 7-20).
Summary of Contents for 2008 Centaur
Page 53: ...45 NOTES ...
Page 54: ...46 NOTES ...


