background image

25

Users

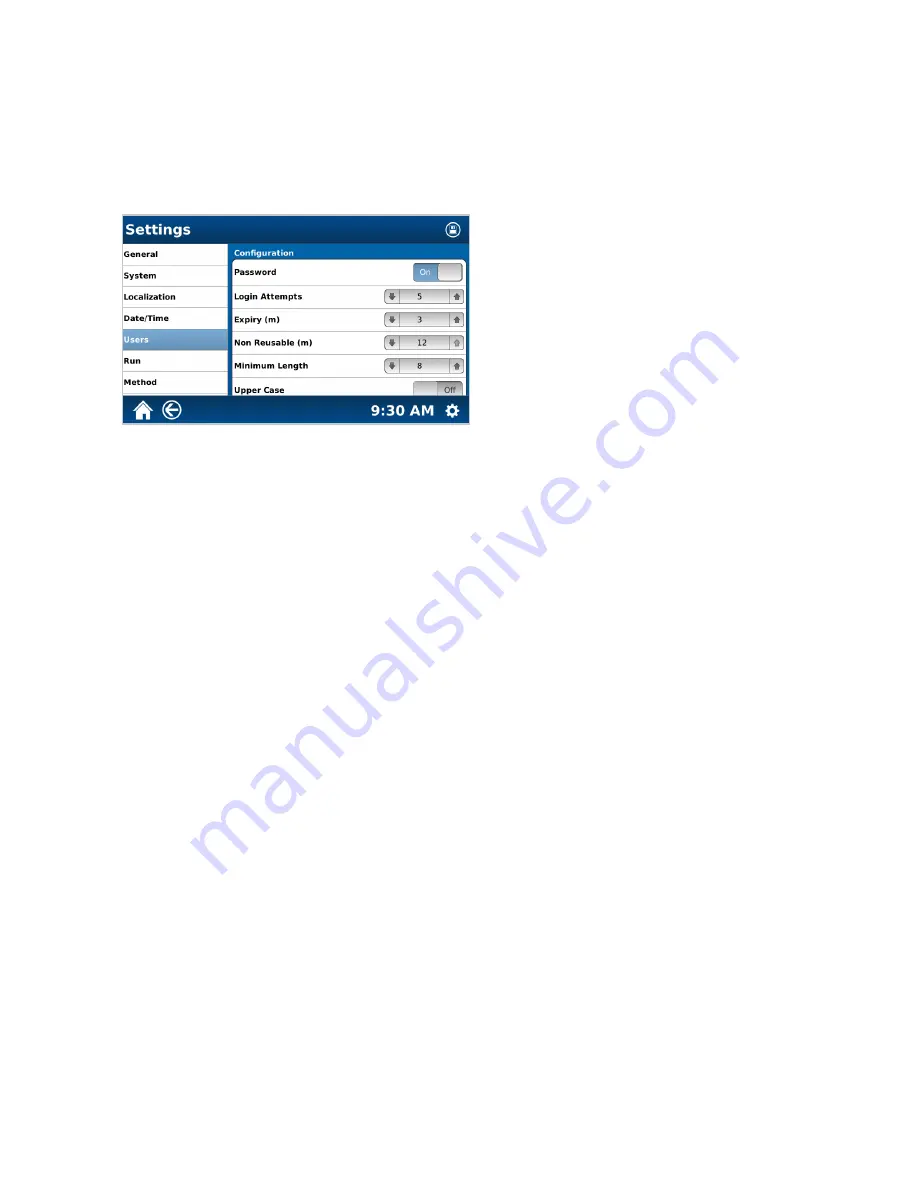
Password Configuration

Determines password criteria for all users. Only an administrator can change the Auto Login to on/off. 

1. 

Select the System Settings icon in the bottom right corner of the screen.

2. 

Select Settings. 

3. 

Select Users.

4. 

 Scroll down to “Password Settings“ and toggle to “ON” or “OFF.”
• ON - The administrator determines password criteria for all users.  

• OFF - no criteria when creating a password. The Home Screen will be displayed once the MARS 6 completes 

the initial power up.

Summary of Contents for MARS 6 iWave

Page 1: ...MARS 6 iWave Microwave Digestion System Manual...

Page 2: ...THIS PAGE INTENTIONALLY LEFT BLANK...

Page 3: ...ods One Touch Method Creation 20 Classic Method Creation 20 Edit Method 20 Delete Method 20 Export Method 21 Import Method 22 Users Create User 23 Edit Delete User 24 Auto Login 24 Password Configurat...

Page 4: ...Warranty Limited Warranty Information 42 Technical Assistance Applications Support 44 Technical Support 44 Contact Information CEM Corporation Headquarters 45 CEM International Subsidiaries 45 CEM Au...

Page 5: ...d below NOTE A NOTE is intended to provide emphasis on procedures that may be misinterpreted or overlooked or to clarify confusing situations CAUTION A CAUTION is intended to provide essential informa...

Page 6: ...nformation including but not limited to training notes and videos application notes software updates and parts can be viewed on CEM s website at www cem com The MARS 6 iWave is designed to be operated...

Page 7: ...pletion of the cool down time Vent vessels and reseal Restart method from the beginning Allow vessels to cool to completion of the cool down time before opening the microwave door Instrument Safeguard...

Page 8: ...Hydrazine Ammonium Perchlorate etc Pyrophoric chemicals Hypergolic mixtures Nitric Acid and Phenol Nitric Acid and Triethylamine Nitric Acid and Acetone etc Animal Fats Esters of glycerol capable of...

Page 9: ...ers 2 Door Handle Permits ease of opening instrument door 3 Internal Printer optional Permits printing of method parameters graphs and or method data 4 Cooling Fan Draws room air past the electronics...

Page 10: ...s fumes from the microwave cavity 3 Cavity Exhaust Blower Directs air from the microwave cavity to the exhaust outlet at the rate of 3 6 m3 minute 125 ft3 minute 4 External Sensor Port Permits interfa...

Page 11: ...ntable drive shaft to pass through the cavity floor and engage the Turntable 4 Floor Mat Protects the Teflon Coating on the Floor of the Mars 6 Cavity 5 Door Inerlock 3 door safety interlocks and an i...

Page 12: ...tware Icons Icon Description Icon Description Icon Description Add Stage Home Run Back Information Save Blower Import Screen Context Menu Delete iWave System Settings Done New Temperature Edit Power T...

Page 13: ...be copied and the copy can be edited Classic Methods are created by the user and can be edited at any time These methods are typically for users with unique or specialized products that do not have a...

Page 14: ...ation etc and users Video Visual display to ensure proper system handling and usage Logout Protects the current user s access or prevent unauthorized actions on the current login session Tools System...

Page 15: ...t Date Time Location for setting the correct date and time Users Manage users passwords and log in preferences Run Adjustments to settings specific to each sample run including data output vessel cool...

Page 16: ...12 Software Overview Logout Displays logout screen...

Page 17: ...ed during shipping If the instrument or accessories have damage contact the freight carrier to report the damage and file a damage report Contact your CEM Representative for assistance WARNING If any...

Page 18: ...at and remove the foam from the top of the system 7 Lift the system from the sides onto bench top near exhaust service two people required Do not place the system in a fume hood 8 Remove the plastic a...

Page 19: ...acking material for use if returning the instrument to the manufacturer for service System Setup 1 Connect the exhaust hose to back of the system 2 Connect the opposite end of the exhaust hose to a fu...

Page 20: ...de of the instrument and position it in the ON position 6 When the system is first powered on during the install a Line Voltage message will appear 7 Determine the line voltage from outlet 60 Hz 208 V...

Page 21: ...ols 9 3 Select the System tab The iWave Temperature s will appear under Status NOTE The Side iWave Temperature C will only appear for the iPrep 16 vessel set 9 4 Ensure sensors are clean and free of d...

Page 22: ...table drive lug and press Start 10 6 Once the alignment process is complete there will be three 3 possible outcomes Turntable is Aligned proceed with next step Turntable is not aligned It is recommend...

Page 23: ...ly understand all documentation before operating the instrument iPrep Vessel Series iPrep Vessel Series Manual P N 600856 EasyPrep Vessel Series EasyPrep Vessel Series Manual P N 600962 MARSXpress Ves...

Page 24: ...ic is the recommend sample type for most samples Contact CEM before selecting any other sample types 6 Select Hold Time and enter in the appropriate hold time 7 If applicable select Sample Prep Notes...

Page 25: ...instrument 2 Select and hold long touch the method to be exported 3 Select the Screen Context Menu in the upper right corner of the screen NOTE To select multiple methods to export select Multi Select...

Page 26: ...trument 2 From the Home Screen select Classic or One Touch 3 Select the Screen Context Menu located in the upper right corner of the screen 4 Select Import 5 Select the method to import 5 1 If the met...

Page 27: ...bottom right corner of the screen 2 Select Settings 3 Select Users 4 Scroll down until Users section appears 5 Select Add User 6 Enter the User Name 7 Assign the User Group Administrators Ability to...

Page 28: ...n appears 5 Select the Edit icon or Delete icon If Edit is selected make the appropriate changes and select the Save icon If Delete is selected confirm that the user wishes to delete the selected user...

Page 29: ...he System Settings icon in the bottom right corner of the screen 2 Select Settings 3 Select Users 4 Scroll down to Password Settings and toggle to ON or OFF ON The administrator determines password cr...

Page 30: ...can be exported and or printed 5 1 To export run data Install a USB in the USB port on the right side of the MARS 6 instrument Select the Export icon to export data 5 2 If the instrument is equipped w...

Page 31: ...he top right corner 5 The results can be printed or exported by selecting the Print or Export icon s NOTE Activity log has a lot of data and if it is not filtered to a specific user and date range the...

Page 32: ...on the keyboard to save the screenshot to the USB An on screen notification will appear software version 1 40 4 Press OK to clear the notification 5 Remove USB and plug into a computer 6 The screensho...

Page 33: ...t the calibrator to warm until the Ready light is illuminated WARNING To prevent the possibility of burns DO NOT touch the heating module or Teflon cover surrounding the heating module 2 Select the Sy...

Page 34: ...emperature calibration Read and fully understand the AutoCal manual P N 600835 before operation 1 Plug the AutoCal into an electrical outlet close enough to the instrument for it to be placed on the i...

Page 35: ...the sensor 10 Press Start 11 Wait for a stable reading Repeat the above steps to calibrate the remaining sensor s NOTE The Side iWave Temperature C will only appear for the iPrep 16 vessel set 12 Ver...

Page 36: ...turntable drive lug and press Start 6 Once the alignment process is complete there will be three 3 possible outcomes Turntable is Aligned No alignment is required Turntable is not aligned It is recom...

Page 37: ...r and place the thermometer in the beaker 13 2 Stir the water thoroughly for 15 seconds then measure and record the peak temperature reading This is the final temperature Tf 14 To determine the microw...

Page 38: ...e Print icon is displayed on the screen during method performance or when viewing method information and previous method performance data Replace Printer Paper 1 Lift the printer cover 2 Position the...

Page 39: ...the MARS 6 USB port 4 Select the System Settings icon in the bottom right corner of the screen 5 Select Tools 6 Select Update Manager 7 Select the available software version and highlight the latest s...

Page 40: ...l of the acids Dispose of all waste in accordance with all applicable local state and federal health and safety recommendations After Every Use Wipe inside of MARS 6 cavity including temperature senso...

Page 41: ...ce WARNING Acid can condense and collect inside the blower duct Annually Preventative Maintenance by CEM Certified Technician Contact the CEM Service Department for assistance As Needed If installed r...

Page 42: ...n fuse Contact CEM Corporation No Microwave Power Instrument door ajar Close MARS 6 door before pressing start Incorrect percentage of power selected View Method section for programming methods Low li...

Page 43: ...for ventilation Electrical Requirements This instrument conforms to Globally Harmonized EN61010 1 Standard for Safety Requirements for Electric Equipment for Measurement Control and Laboratory Use Pa...

Page 44: ...This instrument complies with United States Code of Federal Regulations 21CFR Part 1030 10 C for microwave leakage A verification report is on file This instrument complies with FCC Requirements in th...

Page 45: ...n if full programmed power is applied continuously over a specified period of time ReactiGuard Continuously monitors the cavity and disables the magnetron if disturbances occur inside the cavity TempG...

Page 46: ...pair or Any other damage caused by purchaser or its agents Responsibilities of Purchaser To ensure warranty coverage the purchaser must Use the instrument according to directions Connect the instrumen...

Page 47: ...nd the face hereof CEM Corporation shall not be liable for loss of use of instrument or other incidental or consequential costs expenses or damages incurred by the purchaser or any other user This war...

Page 48: ...Support or email CEM MARS 6 iWave applications support at analytical support cem com Technical Support CEM is proud to provide technical support for the MARS 6 iWave from a team of specially trained...

Page 49: ...gique de Saclay 4 rue Ren Razel 91892 ORSAY Cedex France Web Address http www cemfrance fr Email info fr cem com Germany CEM GmbH Phone 011 49 2842 9644 0 Fax 011 49 2842 9644 11 Address Carl Friedric...

Page 50: ...one 353 0 1 885 1752 Address Sky Business Centre 9a Plato Business Park Damastown Dublin 15 Ireland Web Address http www cemmicrowave co uk Email info ireland cem com CEM Authorized Dealers For a comp...

Page 51: ...THIS PAGE INTENTIONALLY LEFT BLANK...

Page 52: ...which shall not be reproduced or transferred to other documents or disclosed to others without prior written permission of CEM Corporation CEM iPrep iWave and One Touch are registered trademarks of C...

Reviews: