background image

Multimedia Operation (continued)

30

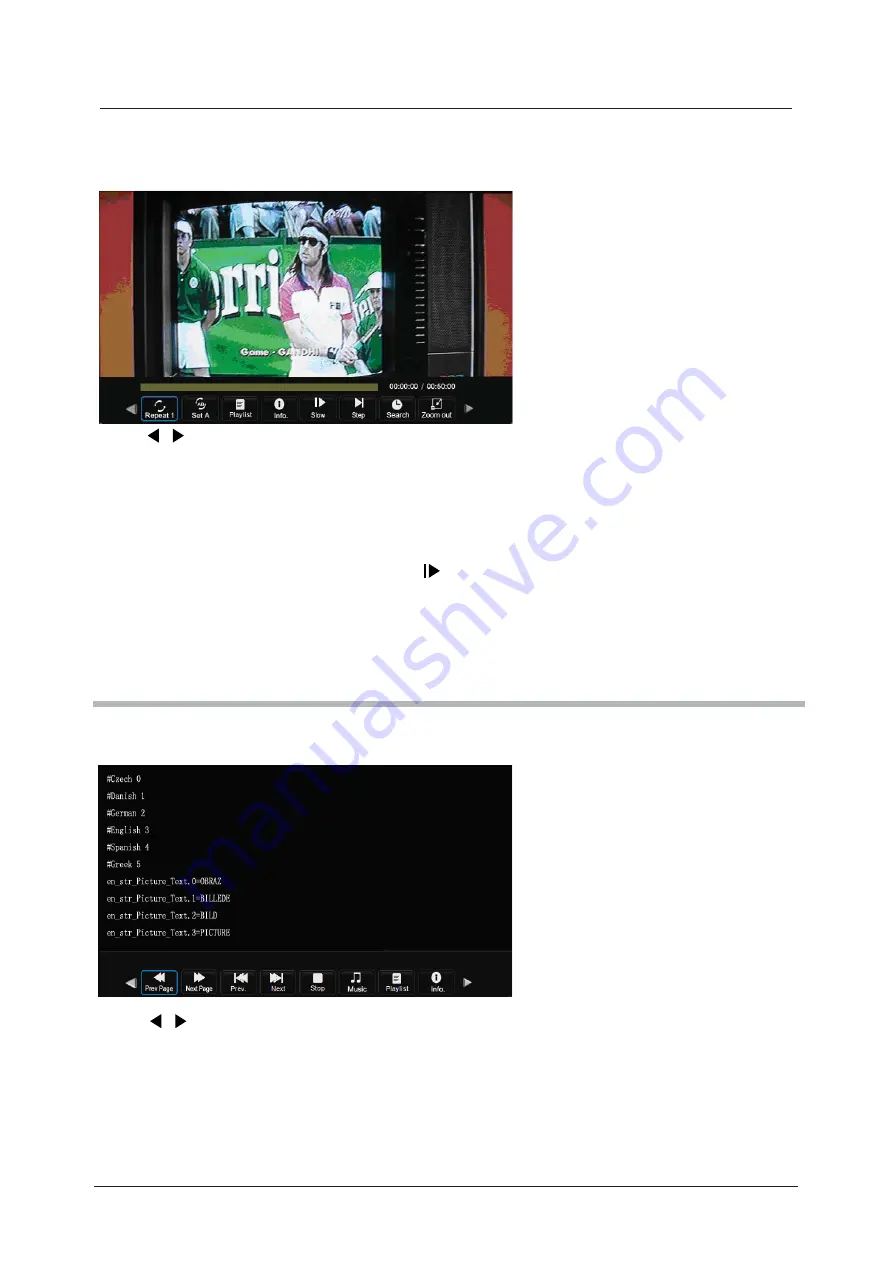
3. Movie

4. Text

Press     /     buttons to select the option on the menu, and press 

OK

 button to activate.

Repeat:

 Select the repeat mode from Repeat All, Repeat 1, Repeat None.

Set A-B:

 Select and play the preferable part of the file by setting A and B at the beginning and end. 

Press

OK

 button to cancel.

Playlist:

 Display the playlist on the screen.

Info:

 Display the information of the movie file.

Slow:

 Play the movies at slow speed, press      button to cancel and resume at normal speed.

Step:

 Step quickly through the movie by using this option

 Program the movie form the time you set.

Zoom

In

/

Out

:

 Zoom In/Out of the movie screen.

Aspect Ratio:

 Select the aspect ratio of the on screen display.

Move View:

View the film in Zoom out mode.

Press     /     buttons to select the option on the menu, and press the

OK

 button to activate.

Prev/Next page:

 Turn to previous/next page of the text.

Prev./Next:

 Turn to previous/next file.

Stop:

 Stop auto turning pages.

Music:

 Play/pause the background music of your choice.

Playlist:

Display the playlist on the screen.

Info:

Display the information of the text file.

Watch a film

View text files

Goto Time:

Summary of Contents for C16100F-LED

Page 1: ...LED digital colour TV C16100F LED USER GUIDE...

Page 2: ...supports high definition video input via the HDMI socket on the back of the TV Safety is important To ensure your safety and the safety of others please read the safety precautions BEFORE you operate...

Page 3: ...setup Source menu Menu settings 8 11 Unit and Accessories 6 7 12 13 17 18 19 19 20 27 Multimedia Operation Recording Operation 28 30 31 33 EPG menu 34 DVD Operation 35 42 3 5 43 44 Contents SimpleTrou...

Page 4: ...these instructions Do not use this TV near water Clean only with a slightly damp cloth Do not block any ventilation openings Install in accordance with the supplied Quick Start Guide and this User Gu...

Page 5: ...rom the mains supply socket Do not pull on the flex the flex can become overloaded and cause a short circuit Set up the unit so that no one is able to trip over the flex Do not place heavy items on th...

Page 6: ...r blinds to prevent direct sunlight falling on the screen Place the TV on a sturdy platform of which the surface should be flat and steady This will prevent it from falling over Make sure the televisi...

Page 7: ...the menu Vol Press to adjust the volume CH Press to skip through the channels SOURCE Press to display the input source menu STANDBY Turn ON OFF the TV set EJECT PLAY The functions of the DVD buttons a...

Page 8: ...eries Unit and Accessories continued 7 Power cable Converter cable for YPBPR video Converter cable for AV Mains adaptor USER GUIDE QUICK START GUIDE User Guide Quick Start Guide Warranty Card Warranty...

Page 9: ...a Satellite receiver the remote controls only the Satellite receiver and not the TV when you press Press to control the TV again Used on TVs with DVD or PVR Used on TVs with PVR or Internet Player Use...

Page 10: ...ays a page that gives telephone numbers for service Press to enter press again to exit Quick Start Searches all ATV and DTV channels by a single key can take up to 10 Mins Info Taste In DTV mode shows...

Page 11: ...Dependant on the model of TV some keys will have no function Dependant on Model Remote control continued 10 HOLD TEXT iViewer DVD...

Page 12: ...other strong light sources may interfere with the signal from the remote control In this situation turn the TV away from the light source WARNING DO NOT LEAVE BATTERIES IN THE REMOTE CONTROL FOR EXTE...

Page 13: ...s This instruction manual shows the simplest and most effective way of connecting your TV to ancillary equipment Alternate methods are listed below HDMI Lead You can connect this TV to a compatible de...

Page 14: ...Connecting external devices continued 13 Satellite Box or Blu ray DVD USB device Coax Common Interface TV Signal Output to Audio amplifier AV IN Headphone out...

Page 15: ...continued 14 Name Function Description VGA Connect to the PC VGA output to display PC graphics Connect to the video output of external devices mini AV POWER Connect to power supply Connect to the sca...

Page 16: ...a PC VGA cable not supplied to connect the TV to your PC You can also use an HDMI cable to connect to your PC if your PC Graphic card supports HDMI When the HDMI cable is used the PC audio cable is n...

Page 17: ...r cables refer to the video camera instruction manual Video recorder Connect the Scart cable to the TV and video recorder Turn on both video recorder and the TV Select Scart source You can now see the...

Page 18: ...Switch on the DVD player Select SCART as input source When using the HDMI cable Select HDMI as input source HDMI to HDMI SCART All illustrated cables are not supplied Connecting external devices cont...

Page 19: ...INTO THE COMMON INTERFACE SLOT THEN ADD THE SMART CARD TO THE CAM 1 Turn on the TV and ensure DTV Source is selected 2 If the CAM is detected the TV will display the following message on the screen Co...

Page 20: ...all available ATV and DTV channels and store them By pressing the Quick Start button the first time installation can be recalled at any time TV Auto installation setup Source Menu 19 Power On Off the...

Page 21: ...of time options TV SETTINGS MENU Allows you to search channels and set up a variety of channel options Select DTV source for example Allows you to customize the sound options and effects Select DTV so...

Page 22: ...Manual Tuning menu select a DTV channel press the OK button to start searching ATV Manual Tuning Press the OK button to enter the ATV Manual Tuning menu Storage To Select a position for storing the pr...

Page 23: ...ges will be saved ATV mode only Skip Select a channel and press the BLUE button this will label the channel As long as the channel has a skip label it will be skipped when searching through the channe...

Page 24: ...s the overall brightness of the picture Colour Control the colour Sharpness Increase this setting to see crisp edges in the picture decrease it for soft edges Tint Controls the tint NTSC mode only Col...

Page 25: ...Bass Can be adjusted when the sound mode is set to User Controls the relative intensity of lower pitched sounds Balance To adjust the balance of the left and right speakers audio output or turn off t...

Page 26: ...n 120min 180min 240min and off PC Setup PC mode only Press the OK button to enter the submenu to adjust the Horizontal Vertical position or Size and Phase of the picture Note The options Schedule List...

Page 27: ...he subtitle language Menu Time Out Allows you to setup the length of time that the on screen display is visible 5s 10s 15s 20s 25s 30s 35s 40s Country This is defaulted to UK but can be changed by usi...

Page 28: ...d has been changed you must enter the current password New Enter the new password Confirm Enter the new password Lock Channel You must enter the password to view channels that have been locked Use and...

Page 29: ...he device will be displayed on the screen 3 Press button to select the files on the USB device PHOTO MUSIC MOVIE TEXT to view or play 1 Press the SOURCE button on the remote control to display the inp...

Page 30: ...Move the photo in Zoom out mode Press buttons to select the option on the menu and press the OK button to activate Press buttons to select the music and press the OK button to play Repeat Select the r...

Page 31: ...cancel and resume at normal speed Step Step quickly through the movie by using this option Program the movie form the time you set Zoom In Out Zoom In Out of the movie screen Aspect Ratio Select the a...

Page 32: ...tion 31 Press the MENU button and select EXTRAS menu 1 Schedule List 2 Recorded List Display the recorder schedule list INFO Display the information of the programmes you have recorded RED button Dele...

Page 33: ...e the setting and exit the menu there will be a hint on the screen Set the timer record The TV will record the programme automatically according to your settings Setup the PVR File system before you s...

Page 34: ...recording from the beginning Note a Display and exit the navigation menu by pressing the Exit button b Press the STOP button to exit the Timeshift mode c Press PLAY button to play the programme you ar...

Page 35: ...starts it will be recorded to the USB device Remind Press the GREEN button to display the remind menu and set the time When the programme starts the TV will automatically switch to this programme Sch...

Page 36: ...Eject the disc press the EJECT button on the TV or the button on the remote control Insert Disc according to picture next to disc slot Audio DVD Setup Restore Setting Press MENU button on the remote c...

Page 37: ...6 9 ENG Off OSD Lang Screen Saver TV Display 16 9 ENG Off OSD Lang Screen Saver On Off Last Memory On Exit Setup Last Memory On Exit Setup Last Memory On Exit Setup This setting enables you to watch t...

Page 38: ...ff TV Display 16 9 ENG Off OSD Lang Screen Saver Last Memory On Exit Setup In the Audio Setup page press the button to select the Speaker Setup option then press OK on the remote control to see the Sp...

Page 39: ...38 Volume You must press STOP twice to enter the Preference settings that...

Page 40: ...39 that that...

Page 41: ...40 The user...

Page 42: ...41 The user...

Page 43: ...high density compressed data that needs proper handling 1 Hold the disc with fingers by outer edge and or the center spindle hole Do not touch the discs surface 2 Do not bend or press the disc 3 Do n...

Page 44: ...NO DISC Disc damaged or dirty Picture Freezes or breaks up Disc damaged or dirty Certain disc functions not working Disc may not support required feature Read disc information Turn sound Mute OFF Soun...

Page 45: ...frared Control distance 6m Control angle 30 degrees Horizontal Batteries 2 x 1 5V SizeAA Dimensions 60 x204 x32mm Weight 140g without batteries TV System Audio System BG DK L L I Screensize 15 6 Diago...

Page 46: ...unit according to the instructions of the wall bracket not supplied 100mm 100mm 4 Mounting holes Screw size M4 x10 1 The stand must first be removed Place the TV face down 2 Remove the two screws on...

Page 47: ......

Page 48: ......

Reviews: