2
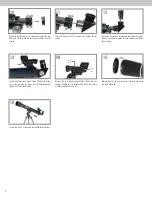
Loosen the thumbscrews on the focuser and remove the cap.
Make sure the two thumbscrews do not protrude into the
opening.
To install the finderscope, loosen the two Philips–head screws
on it’s side and slide the clamp over the dovetail bracket.
Tighten the Phillips-head screws.
You are now ready to start using your AstroMaster telescope.
Insert the diagonal into the focuser and tighten the set
screws.
Remove the small plastic tab under the battery cover by
pulling it straight out. For longer battery life be sure to turn
off finderscope when not in use.
Loosen the set screw on the diagonal, then insert the chrome
barrel of the 20mm eyepiece into the diagonal and tighten
the set screw.
Remove the lens cap from the front of the telescope before
you begin observing.
10
11
13
14
14
15
16
12
On/Off
Switch
Battery
Cover
Summary of Contents for ASTROMASTER LT 70 AZ
Page 1: ... 22109 QUICK SETUP GUIDE ...


