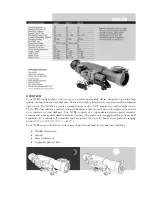
background image

2

 | 

ITALIANO

1 5

1 6

1 4

1 1

1 2

1 3

1

2

Inserire 8 batterie AA nel gruppo batteria. Assicurarsi 

di installare le batterie con la polarità corretta, 

abbinando i poli + e - indicati nel vano batterie.

È possibile sistemare il gruppo batteria sul vassoio 

porta accessori oppure è possibile appenderlo a uno 

dei bulloni che tengono unite le gambe alla testa del 

treppiede. Collegare il connettore del gruppo batteria 

alla porta di alimentazione alla base del braccio a 

forcella motorizzato.

Rimuovere il tappo della lente dalla parte anteriore del 

telescopio.

Verificare che il piccolo interruttore Wi-Fi sopra 

l'interruttore di alimentazione sia nella giusta posizione. 

Quindi, accendere l'interruttore di alimentazione alla 

base della forcella motorizzata.

Sul proprio dispositivo, accedere al menu relativo 

alle impostazioni Wi-Fi e connettersi alla rete 

"Celestron-xx". Attendere la conferma del dispositivo 

dell'avvenuto collegamento. 

Aprire l'app Celestron SkyPortal e selezionare 

“Connect to Telescope” (Connetti al telescopio). 

Appariranno sullo schermo frecce per SU/GIÙ e 

SINISTRA/DESTRA. Utilizzare queste frecce per 

spostare il telescopio. Una guida di scorrimento sul 

fondo dello schermo consente di regolare la velocità 

del motore. NOTA: La montatura Astro Fi deve 

essere spostata mediante l'app SkyPortal. L'asse su/

giù può essere spostato manualmente mediante la 

frizione antisaltellamento. Ciò consente di spostare 

il telescopio a mano verso il basso per agevolare lo 

stoccaggio. L'asse sinistra/destra non è dotato di 

frizione antisaltellamento e non può essere spostato 

manualmente. In caso di forzatura, potrebbero 

verificarsi danni agli ingranaggi.  

CENTRARE L'OGGETTO NELL'OCULARE 

Guardare attraverso il telescopio utilizzando l’oculare 

con minore ingrandimento. Muovere il telescopio fino 

a quando l’oggetto prescelto si trova al centro del 

campo visivo. Se l’immagine è sfocata, ruotare con 

delicatezza le manopole di messa a fuoco a lato del 

telescopio fino a quando l’immagine non è nitida. 
NOTA: L’immagine del telescopio potrebbe apparire 

capovolta. Ciò è perfettamente normale per un 

telescopio astronomico.

Allineamento del 

cercatore

Il cercatore è uno dei componenti più importanti del 

telescopio. Aiuta a localizzare gli oggetti e a centrarli 

nell'oculare. Al primo assemblaggio del telescopio 

è necessario allineare il cercatore con le ottiche 

principali del telescopio. È preferibile eseguire questa 

operazione durante il giorno*.

*  AVVERTENZA SOLARE! Non tentare mai 

di osservare il Sole attraverso un telescopio 

senza un filtro solare adeguato.

SCEGLIERE UN OGGETTO DA OSSERVARE

Portare il telescopio all’esterno durante il giorno e 

individuare un oggetto facilmente riconoscibile, 

come ad esempio un semaforo, la targa di un’auto o 

un cartello. L’oggetto dovrebbe trovarsi il più lontano 

possibile, minimo a 400 metri.

Oculare da 25 mm

Manopole della messa a fuoco

Summary of Contents for 22206

Page 1: ...d bolt in the center leg brace through the bottom of the accessory tray to secure it in place Place the motorized fork arm over the top of the tripod head and use the large captive knob between the tripod legs to lock the mount in place Attach the telescope optical tube by positioning the dovetail into the dovetail holder on the fork arm Make sure the bottom of the dovetail is flat against the dov...

Page 2: ...d manually using the slip clutch This allows you to move the scope by hand to a downward facing position for storage The left right axis does not have a slip clutch and cannot be moved manually Damage to the gears may occur if this is forced 16 14 11 12 13 CENTER THE TARGET IN THE EYEPIECE Look through the telescope using your lower powered eyepiece Move the telescope until the object you chose li...

Page 3: ...he eyepiece into the eyepiece holder and tighten the screws to secure the eyepiece in place Using the Smartphone Adapter Lift the bungee straps and slide your smartphone between the straps and the adapter body so that the camera is looking through the camera opening The straps should give plenty of tension to hold the device against the adapter 1 2 Activate your camera app on your smartphone and a...

Page 4: ...cuser and remove the 25mm eyepiece Replace it with your 10mm eyepiece and tighten the set screws to secure it in place The 10mm eyepiece will give you significantly more magnification making the Moon appear much larger NOTE To make sure you are getting the sharpest image possible you may need to adjust the focus knobs when you change eyepieces CONGRATULATIONS YOU HAVE NOW OBSERVED YOUR FIRST CELES...

Page 5: ...fixer en place Vissez le boulon imperdable situé au centre de l entretoise par le dessous du plateau à accessoires pour le fixer Placez le bras à fourche motorisé sur le dessus de la tête du trépied et utilisez la grande molette imperdable située entre les pieds du trépied pour la fixer Attachez le tube optique du télescope en positionnant la queue d aronde dans le rail situé sur le bras à fourche...

Page 6: ...uellement en desserrant le frein de mouvement Cela vous permet d orienter le télescope à la main verticalement vers le bas pour le rangement L axe gauche droite n est pas équipé de frein de mouvement et ne peut être réglé manuellement Vous risqueriez d endommager le mécanisme en le forçant Aligner le chercheur Oculaire de 25 mm Molettes demise au point CENTRER LA CIBLE DANS L OCULAIRE Regardez dan...

Page 7: ... l oculaire mais en observant l image qui apparaît sur l écran NOTE Vérifiez que le flash du téléphone est désactivé Tenez maintenant l adaptateur avec le téléphone et l oculaire tous deux installés et insérez le barillet chromé de l oculaire dans le système de mise au point du télescope Fixez le en place en serrant les vis de fixation sur le système de mise au point AJUSTER LE CHERCHEUR Sans dépl...

Page 8: ...ers la Lune Regardez dans l oculaire de 25 mm dans le télescope Faites tourner doucement la molette de mise au point pour ajuster le netteté de l image Pour obtenir une meilleure vue de la Lune desserrez les vis de fixation du système de mise au point et retirez l oculaire de 25 mm Remplacez le par l oculaire de 10 mm et serrez les vis de fixation pour le maintenir en place L oculaire de 10 mm per...

Page 9: ...ben Sie die selbstsichernde Schraube durch den Boden des Zubehörfachs in die mittlere Beinstrebe um es zu sichern Platzieren Sie den motorgesteuerten Gabelarm über dem Stativkopf und fixieren Sie die Montierung mit dem großen Feststellknopf zwischen den Stativbeinen BefestigenSiedasTeleskop Okularrohr indemSieden Schwalbenschwanz in den Schwalbenschwanzhalter am Gabelarm einsetzen Stellen Sie sich...

Page 10: ...e Aufwärts Abwärts Achse kann auch manuell über die Rutschkupplung bewegt werden Auf diese Weise können Sie das Teleskop zur Aufbewahrung von Hand nach unten bewegen Die Nach links Nach rechts Achse hat keine Rutschkupplung und kann nicht manuell bewegt werden Wenn dies mit Gewalt erfolgt können die Zahnräder beschädigt werden ZENTRIEREN SIE DAS ZIEL IM OKULAR Schauen Sie mit Ihrem Okular bei nied...

Page 11: ...m Bildschirm Ihres Telefons angezeigt wird HINWEIS Achten Sie darauf dass der Blitz des Telefons ausgeschaltet ist Nehmen Sie jetzt den Adapter mit dem Telefon sowie dem befestigten Okular und schieben Sie die verchromte Steckhülse des Okulars in den Fokussierer des Teleskops Sichern Sie ihn durch Anziehen der Stellschrauben am Fokussierer STELLEN SIE DAS SUCHERFERNROHR EIN Ohne das Teleskop zu be...

Page 12: ...ungefähr auf den Mond zeigt Schauen Sie durch das 25 mm Okular des Teleskops Drehen Sie die Fokussierknöpfe langsam um das Bild scharfzustellen Um den Mond näher heranzuholen lösen Sie die Stellschrauben am Fokussierer und entfernen Sie das 25 mm Okular Ersetzen Sie es durch Ihr 10 mm Okular und ziehen Sie die Stellschrauben fest um es zu sichern Das 10 mm Okular hat eine deutlich höhere Vergrößer...

Page 13: ...izione Avvitare il bullone imperdibile nel supporto centrale delle gambe dalla parte inferiore del vassoio porta accessori per fissarlo in posizione Sistemare il braccio a forcella motorizzato in cima alla testa del treppiede e utilizzare la grande manopola imperdibile tra le gambe del treppiede per bloccare la montatura in posizione Fissare il tubo ottico del telescopio sistemando la coda di rond...

Page 14: ...anualmente mediante la frizione antisaltellamento Ciò consente di spostare il telescopio a mano verso il basso per agevolare lo stoccaggio L asse sinistra destra non è dotato di frizione antisaltellamento e non può essere spostato manualmente In caso di forzatura potrebbero verificarsi danni agli ingranaggi CENTRARE L OGGETTO NELL OCULARE Guardare attraverso il telescopio utilizzando l oculare con...

Page 15: ...per l oculare questa volta utilizzando l immagine che appare sullo schermo NOTA Assicurarsi che il flash del telefono sia disattivato Prendere quindi l adattatore con il telefono e l oculare montato e inserire il barilotto cromato dell oculare nel focheggiatore del telescopio Fissarlo in posizione serrando le viti di regolazione sul focheggiatore REGOLARE IL CERCATORE Senza spostare il telescopio ...

Page 16: ...he punti approssimativamente verso la Luna Osservare attraverso l oculare da 25 mm del telescopio Ruotare con cura le manopole di messa a fuoco per regolare la nitidezza dell immagine Per avere una visione più ravvicinata della Luna allentare le viti di regolazione sul focheggiatore e rimuovere l oculare da 25 mm Sostituirlo con l oculare da 10 mm e serrare le viti di regolazione per fissarlo in p...

Page 17: ...ara asegurarlas en posición Pase el perno cautivo manual del soporte central de patas por la parte inferior de la bandeja de accesorios para fijarla en posición Ponga el brazo en horquilla motorizado sobre la parte superior del cabezal del trípode y use el mando de gran tamaño entre las patas del trípode para bloquear el soporte en posición Fije el tubo óptico del telescopio colocando la mariposa ...

Page 18: ...l soporte Astro Fi debe moverse con la app SkyPortal El eje arriba abajo puede moverse manualmente con el mando de deslizamiento Así podrá mover el telescopio manualmente a una posición orientada hacia abajo para guardarlo El eje izquierda derecha no tiene mando de deslizamiento y no puede moverse manualmente Podría dañar los engranajes si lo fuerza 11 12 13 1 2 Ocular de 25 mm Mandos de enfoque C...

Page 19: ...lo haría con el ocular usando la imagen que aparece en pantalla del teléfono NOTA Asegúrese de que el flash esté apagado Tome el adaptador con el teléfono y el ocular instalados e introduzca el cañón cromado del ocular en el enfoque del telescopio Asegúrelo en posición apretando los tornillos en el enfoque 3 4 5 1 2 3 4 Uso del adaptador para teléfono SU LOCALIZADOR ESTÁ ALINEADO No debería realin...

Page 20: ...riscos lunares Mueva el telescopio de forma que apunte aproximadamente a la Luna Mire por el ocular de 25 mm del telescopio Gire suavemente los mandos de enfoque para ajustar la definición de la imagen Para obtener una vista más cercana de la Luna afloje los tornillos del enfoque y saque el ocular de 25 mm Cámbielo por el ocular de 10 mm y apriete los tornillos para asegurarlo en posición El ocula...

Reviews: