background image

13

ENGLISH

Power titanium 1000 Black

3. INSTALLATION

1. Clean the measuring cup, lid, and jar (except main body) before using it for the first time.

2. Make sure the appliance is turned off and not connected before proceeding with the installation.

3. First of all, place the sealing ring on the blade base; then, insert the blade base into the jar; finally,
lock it in place with the fixing ring. Make sure that the blades are properly attached to the jar, in
order to avoid leakage that could damage the appliance.

4. Fit the blender glass jar onto the main body, and turn it in clockwise direction until it clicks into
place. Fill the jug with the desired foodstuffs. Please, make sure water does not spill from the jar.
(Maximum water capacity: 1500 ml)

5. Place the lid on top of the jar and push it down. Place the measuring cup on the centre of the lid 
and lock it into place.

DO NOT USE THE APPLIANCE WHEN IT IS EMPTY

4. OPERATION

1. Plug the appliance to the mains supply. Make sure the selector 

knob is in position 0 before plugging in the appliance.

2. This appliance has a safety system that does not allow it to work, 

unless the jar is properly installed on the main body.

3. Turn the knob to position 0, in order to turn the blender off.

4. Fill the jar with the desired foodstuffs.

5. Close and fix the lid on the jar. Place the measuring cup on the 

centre of the lid and turn it to lock it.

6. Place the glass jar onto the main body and turn it slightly in 

clockwise direction to lock it.

7. Select the desired speed with the knob (1-2).

8. Hold the knob in position (P/Turbo) to work at maximum speed. Ideal to crush ice.

9. While working, the blue light around the knob will be on.

10. When the desired result is achieved, turn the knob to the position 0 to stop the blender.

11. Remove the jar from the main body when the blades stop rotating and serve its content.

Summary of Contents for 43347

Page 1: ...Manual de instrucciones Bedienungsanleitung Інструкція з експлуатації Руководство по эксплуатации Power Titanium 1000 Black Блендер стаціонарний Блендер стационарный ...

Page 2: ...rranty 15 ЗМІСТ 16 18 19 19 20 21 1 Інструкція з безпечної експлуатації 2 Компоненти пристрою 3 Встановлення пристрою 3 Експлуатація пристрою 4 Очищення та обслуговування пристрою 5 Технічні характеристики 7 Сервісне обслуговування і гарантія 21 СОДЕРЖАНИЕ 24 26 27 27 28 29 1 Инструкция по безопасной эксплуатации 2 Компоненты устройства 3 Установка устройства 4 Эксплуатация устройства 5 Очистка и ...

Page 3: ...nchufe muestra daños ni si la batidora cae al suelo o ha sufrido cualquier tipo de daño Nunca intente reparar el producto por sí mismo Podría sufrir una descarga eléctrica Evite que el cable de alimentación cuelgue sobre bordes afilados Manténgalo alejado de objetos calientes y fuentes de calor No tire del cable para desconectarlo en su lugar tire del enchufe con cuidado Asegúrese de que nadie tro...

Page 4: ... dañar las cuchillas o el motor No introduzca objetos de metal madera cristal o plástico dentro de la jarra Su uso está destinado exclusiva mente a la alimentación Atención Apague y desconecte la batidora antes de limpiarla para evitar posibles descargas eléctricas y otros peligros No use el producto si presenta daños en el cable de alimentación o el enchufe No desmonte el producto por sí mismo co...

Page 5: ...ck 2 PIEZAS 1 Vaso medidas tapón dosificador 2 Tapa 3 Jarra de cristal 4 Base de la jarra 5 Junta de sellado 6 Cuchillas 7 Aro de sujección 8 Cuerpo principal 9 Panel frontal 10 Rueda selectora 11 Aro luminoso 12 Patas antideslizantes ...

Page 6: ...dor en la abertura y fíjelo NO USE LA BATIDORA CUANDO SE ENCUENTRE VACÍA 4 FUNCIONAMIENTO 1 Enchufe el producto a la red eléctrica Asegúrese de que la rueda selectora está en posición 0 antes de enchufarlo 2 Este producto está equipado con un sistema de seguridad que no permite su funcionamiento a menos que la jarra esté correctamente instalada en el cuerpo principal 3 Ponga la rueda selectora en ...

Page 7: ...e detergente Encienda la batidora a velocidad 1 hasta que la jarra esté limpia Gire la jarra en sentido contrario a las agujas del reloj para separarla de la base Retire las cuchillas y la junta de sellado y límpielas con cuidado Precaución Las cuchillas están muy afiladas lock unlock Limpie la jarra la tapa el vaso medidor las cuchillas y la junta de sellado con agua caliente y detergente Séquelo...

Page 8: ...r personas no autorizadas por nuestro Servicio de Asistencia Técnica Cuando el problema haya sido causado por el desgaste normal de sus componentes debido al uso 3 Si en alguna ocasión detecta una incidencia con el producto debe contactar con el Servicio de Asistencia Técnica oficial de Cecotec y hacer llegar la factura de compra del producto vía e mail sat cecotec es Reciclaje de electrodoméstico...

Page 9: ...een damaged in any way In such cases send the appliance for repairs Do not ever try to repair the unit by yourself You could be in danger of electrical shock Do not let the power cord hang over sharp edges Keep it away from hot objects and heat sources Do not pull from the power cord to unplug the appliance instead carefully pull from the plug Make sure that no one trips over the power cord or ext...

Page 10: ...s frozen meats etc which could damage either the blades or the motor Do not put metallic wooden glass or plastic objects in the jar This product is specifically designed for food Caution Switch off and unplug the appliance before cleaning it in order to avoid electrical shocks and other dangers Do not use the appliance if the plug or power cord present damages Do not disassemble it by yourself con...

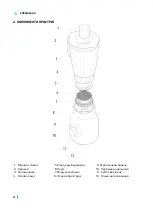
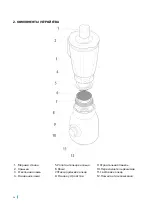
Page 11: ...2 ENGLISH Power titanium 1000 Black 2 COMPONENTS 1 Measuring cup 2 Lid 3 Glass jar 4 Jar base 5 Sealing ring 6 Blades 7 Fixing ring 8 Main body 9 Frontal panel 10 Selector knob 11 Light ring 12 Slip legs ...

Page 12: ...the centre of the lid and lock it into place DO NOT USE THE APPLIANCE WHEN IT IS EMPTY 4 OPERATION 1 Plug the appliance to the mains supply Make sure the selector knob is in position 0 before plugging in the appliance 2 This appliance has a safety system that does not allow it to work unless the jar is properly installed on the main body 3 Turn the knob to position 0 in order to turn the blender o...

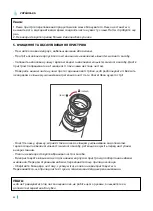
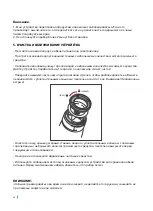
Page 13: ...ittle detergent Let the appliance run on speed 1 until the jug is clean Turn the bottom of the jar in counterclockwise direction to unlock it Take out the blades together with the sealing ring and clean them carefully Caution The blades are very sharp lock unlock Clean the jar lid measuring cup and blades with sealing ring with hot water and some detergent dry before use Never use abrasive cleanin...

Page 14: ...authorized by our official Technical Support Service Whenever the problem is caused by the normal wear and tear of its components If at any time a problem with the product is detected you should contact the official Technical Support Service from Cecotec and send the purchase invoice of the product via e mail to the following address sat cecotec es Disposal of old electrical appliances The Europea...

Page 15: ...не згинайте не напружуйте і не пошкоджуйте кабель живлення будь яким способом Захищайте його від гострих кутів і джерел тепла Не дозволяйте йому торкатися гарячих поверхонь Не дозволяйте кабелю звисати з краю робочої поверхні або стільниці Не тягніть за кабель живлення для відключення пристрою з розетки Якщо використовується довгий подовжувач його напруга повинна відповідати напрузі мережі В іншом...

Page 16: ...або двигун пристрою Не ставте металеві дерев яні скляні або пластикові предмети в чашу Цей пристрій спеціально розроблений для харчових продуктів Увага Перед чищенням вимкніть і відключіть прилад від мережі щоб уникнути ураження електричним струмом та інших небезпек Не використовуйте пристрій якщо вилка або шнур живлення пошкоджено Не розбирайте його самостійно зверніться в авторизований сервісний...

Page 17: ... ПРИСТРОЇ 1 Мірний стакан 2 Кришка 3 Скляна чаша 4 Основа чаші 5 Кільце ущільнювача 6 Ножі 7 Фіксуюче кільце 8 Основа пристрою 9 Фронтальна панель 10 Перемикач режимів 11 Світлове кільце 12 Ніжки антиковзання УКРАЇНСЬКА ...

Page 18: ... ВІН ПОРОЖНІЙ 4 ЕКСПЛУАТАЦІЯ ПРИСТРОЮ 1 Підключіть пристрій до електромережі Переконайтеся що перемикач знаходиться в положенні 0 перш ніж підключати прилад 2 Цей пристрій має систему безпеки яка не дозволяє йому працювати якщо чаша не встановлена належним чином на основний корпус 3 Поверніть перемикач в положення 0 щоб вимкнути блендер 4 Заповніть чашу потрібними продуктами Закрийте і закріпі 5 З...

Page 19: ...и годинникової стрілки щоб розблокувати її Вийміть леза разом з кільцем ущільнювача і ретельно очистіть їх Увага Леза дуже гострі lock unlock Очистіть чашу кришку мірний стакан і леза з кільцем ущільнювача за допомогою гарячої води і невеликої кількості миючого засобу ретельно висушіть перед наступним використанням Ніколи не використовуйте абразивні чистячі засоби Використовуйте вільне місце під о...

Page 20: ...мання інформації щодо правильної утилізації старих приладів і або їх батарей СЕРВІСНЕ ОБСЛУГОВУВАННЯ І ГАРАНТІЯ На даний продукт надається гарантія протягом 2 років з дати покупки за умови надання документа що підтверджує покупку знаходження продукту в відмінному фізичному стані і правильному користуванні як описано в цьому посібнику з експлуатації Гарантія не поширюється на наступні ситуації Прод...

Page 21: ...не повреждайте кабель питания любым способом Защищайте его от острых углов и источников тепла Не позволяйте ему касаться горячих поверхностей Не позволяйте кабелю свисать с края рабочей поверхности или столешницы Не тяните за кабель питания для отключения устройства из розетки Если используется длинный удлинительный кабель его напряжение должно соответствовать напряжению сети В противном случае эт...

Page 22: ...еталлические деревянные стеклянные или пластиковые предметы в чашу Это устройство специально разработано для пищевых продуктов Внимание Перед чисткой выключите и отключите прибор от сети чтобы избежать поражения электрическим током и других опасностей Не используйте устройство если вилка или шнур питания повреждены Не разбирайте его самостоятельно обратитесь в авторизованный сервисный центр для ре...

Page 23: ...ТВА 1 Мерный стакан 2 Крышка 3 Стеклянная чаша 4 Основание чаши 5 Уплотнительное кольцо 6 Ножи 7 Фиксирующее кольцо 8 Основа устройства 9 Фронтальная панель 10 Переключатель режимов 11 Световое кольцо 12 Ножки антискольжения ...

Page 24: ...Е 4 ЭКСПЛУАТАЦИЯ УСТРОЙСТВА 1 Подключите устройство к электросети Убедитесь что переключатель находится в положении 0 прежде чем подключать прибор 2 Это устройство имеет систему безопасности которая не позволяет ему работать если чаша не установлена должным образом на основной корпус 3 Поверните переключатель в положение 0 чтобы выключить блендер 4 Заполните чашу нужными продуктами 5 Закройте и за...

Page 25: ...отать на 1 скорости пока чаша не станет чистой Поверните нижнюю часть чаши против часовой стрелки чтобы разблокировать ее Выньте лезвия вместе с уплотнительным кольцом и тщательно очистите их Внимание Лезвия очень острые lock unlock Очистите чашу крышку мерный стакан и лезвия с уплотнительным кольцом с помощью горячей воды и небольшого количества моющего средства тщательно высушите перед следующим...

Page 26: ...рмации относительно правильной утилизации старых приборов и или их батарей СЕРВИСНОЕ ОБСЛУЖИВАНИЕ И ГАРАНТИЯ На данный продукт предоставляется гарантия в течение 2 лет с даты покупки при условии предоставления документа подтверждающего покупку нахождения продукта в отличном физическом состоянии и правильном пользовании как описано в этом руководстве по эксплуатации Гарантия не распространяется на ...

Page 27: ......
Reviews: