I-210
Each output, consisting of a relay, has a separate program with a maximum capacity of 120 steps. To enter the program
each output from the job screen, press the Enter key and while pressing it, then press the button on the relay (output),
which want to access. See Fig. 3
Figure 3 - Example of access to
the program relay 1
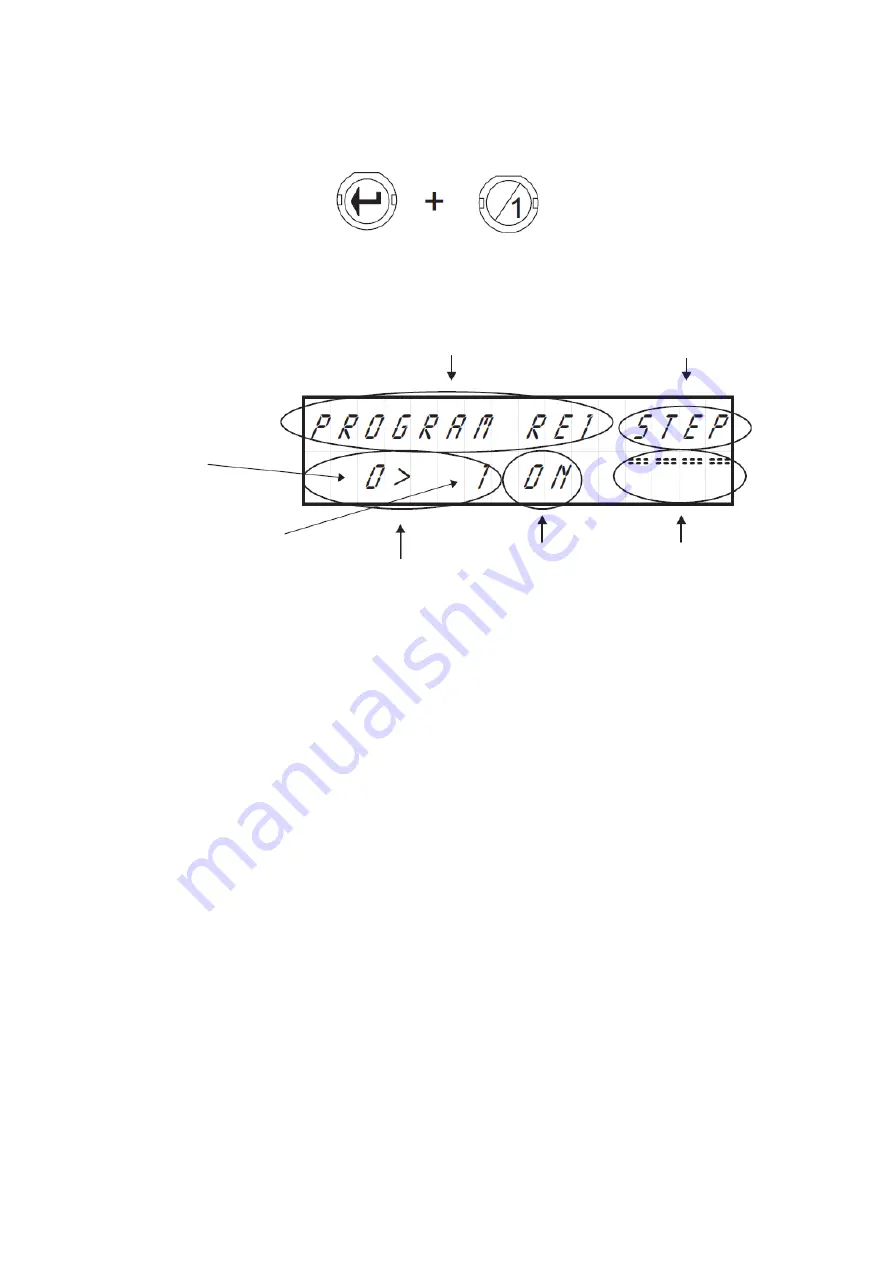
The display shows the indicator relay program and the sequence indicator, the indicator of steps, the status indicator
output and graphics performance. See Fig. 4.
Figure 4 - Description of the screen "programming"
Program Indicator
Sequential Indicator
Step sequence starting
The final step sequential
Step indicator
Exit Status
Performance indicator
graphs
To facilitate understanding of the programming of I-210, illustrate the description of this, the graphical programming operation
of FIG. 1. Please follow the instructions indicated below.
Press the Enter key and relay 1 "to enter the program relay. By accessing the programming screen the cursor is placed in the
display of steps. The indicator will always show steps to the left of the symbol ">" the initial step after which the order will begin
on the start, and right, the final step where this will end, making a "Sequence."
For each click on the "Up" and "Down" may increase or decrease the final step in the sequence. If you hold these keys increase
or decrease will take place faster.
Now press the "Up" until the final step sequence is equal to 4.
Then you must tell the module as you want to act out during that sequence. The module supports three possible output states:
ON, OFF, and EX, included in the indicator of "State of Exit." If you select ON, during the sequence, the output is connected, if
you select OFF, the output on the other hand, remain disconnected. If you select EX, the output function on
input state of "Confirmation or stop" question. This output mode is detailed in "Confirmation Check or Stop."
To move the cursor to the "State of Exit", press "Pause." Each press on this key cyclically rotate the location of the cursor
between indicators of Sequence, Step and output status.
Stand on the indicator of state of the output. Using the Up and Down keys to select one of the three output state. Select the ON
state.
After composing the sequence, and assign an output state, the module will indicate if this is the last, being the end of the
program, or if you want to link to the next. To perform this operation must be in the Sequence Indicator. Press the Pause button
to stand on it.
By default, the circuit will always display the word "STEP". If you press the Up or Down will rotate among the four possible
functions of Sequence Indicator: Step, End, End * and Del.
The "Del", is described in paragraph Delete Program.
End option, completes and records in memory the program.
End * The option performs the same function End, but making the cyclic program. Thus, in the normal operation of the circuit,
when it reaches the last step etching, the module will restart the program continuously, or by default until you remove the
program.
Step option, record the sequence performed, and link to the next, allowing the configuration of a new program continuity.
Press the Up or Down until the display shows the option Sequence Step. Then press the Enter key.
Next, the steps change indicator, showing the final step in the above sequence to the left of the symbol ">" and the first of the
new right.
If changing sequence, an output change, the performance graph will reflect it.
Press the Up key until the final step remains at 12. Then press the Pause key to select the output indicator. As default, the new
footage shows off the form provided and in this case coincides with the state that we want to assign to the output, not make any
changes on it, press the Pause key.
The cursor will change to the sequence indicator. Step select the option, and press the Enter key to record the sequence made
and start a new one.
3


