background image

Instruction Manual  |  

7

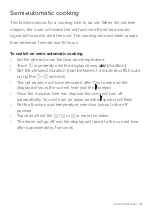
Semi-automatic cooking

This function allows for a cooking time to be set. When the set time 
elapses, the oven will switch the set function off and an acoustic 
signal will sound to alert the user. The cooking time available ranges 
from between 1 minute and 10 hours. 

To switch on semi-automatic cooking

•   Set the desired oven function and temperature
•   Touch   repeatedly until the display shows 

dur 

(duration) 

•   Set the desired duration from between 1 minute and 10 hours 

using the   /   sensors

•   The set duration will be memorised after 7 seconds and the 

display will show the current time and the   symbol

•   Once the duration time has elapsed the oven will turn off 

automatically. You will hear an alarm and the   symbol will flash

•  Set the function and temperature selection knobs to the off       


position

•  Touch and hold the   /   or   to mute the alarm
•  The alarm will go off and the display will revert to the current time 

after approximately 7 seconds

Summary of Contents for SC300SS

Page 1: ...SC360SS Thirteen function electric pyrolytic oven with timer Use and maintenance ...

Page 2: ...light bulb 23 Installation 25 Mains electrical connection 26 Technical assistance 27 Specifications 28 Product fiche 29 Product information Contents IMPORTANT Please read the user instructions carfeully before using the appliance for the first time and before installing it Failure to install the oven or to have it installed as per the instruction manual could invalidate the warranty Any service ca...

Page 3: ... aged from 8 years and above Persons with reduced physical sensory or mental capabilities must be given instruction or supervision concern ing safe operation of the appliance and understand the hazards involved Do not allow anyone unfamiliar with the contents of this instruction manual to operate the oven Do not use harsh cleaning agents or sharp metal objects to clean the door as they can scratch...

Page 4: ... 35 EU Electromagnetic Compatibility Directive 2014 30 EU ErP Directive 2009 125 EU IMPORTANT INFORMATION FOR CORRECT DISPOSAL OF THE PRODUCT IN ACCORDANCE WITH EC DIRECTIVE 2012 19 EU At the end of its working life the product must be taken to a special local authority waste collection centre or to a dealer providing appliance recycling services Disposing of a household appliance separately avoid...

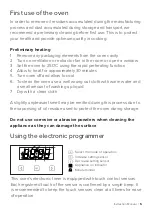
Page 5: ...ff and allow to cool 6 To clean the oven use a well wrung out cloth with warm water and a small amount of washing up liquid 7 Dry with a clean cloth A slightly unpleasant smell may be emitted during this process due to the vaporising of oil residue used to protect the oven during storage Do not use corrosive or abrasive powders when cleaning the appliance as they can damage the surface Using the e...

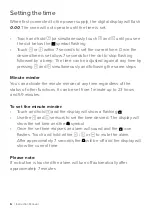
Page 6: ...sly and following the same steps Minute minder You can activate the minute minder at any time regardless of the status of other functions It can be set from 1 minute up to 23 hours and 59 minutes To set the minute minder Touch and hold and the display will show a flashing Use the and sensors to set the time desired The display will show the set time and the symbol Once the set time elapses an alar...

Page 7: ...uch repeatedly until the display shows dur duration Set the desired duration from between 1 minute and 10 hours using the sensors The set duration will be memorised after 7 seconds and the display will show the current time and the symbol Once the duration time has elapsed the oven will turn off automatically You will hear an alarm and the symbol will flash Set the function and temperature selecti...

Page 8: ...ws End Using the set the end time of the cycle up to a maximum of 23 hours and 59 minutes Set the function selector knob and temperature selector knob to the desired settings The symbol will be illuminated on the display and is now active The appliance will now switch on at the end time minus the duration set Once the duration time has elapsed the oven will turn off automatically The alarm will be...

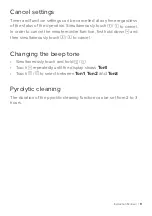
Page 9: ...ouch to cancel In order to cancel the minute minder function first hold down and then simultaneously touch to cancel Changing the beep tone Simultaneously touch and hold Touch repeatedly until the display shows Ton1 Touch to select between Ton1 Ton2 and Ton3 Pyrolytic cleaning The duration of the pyrolitic cleaning function can be set from 2 to 3 hours ...

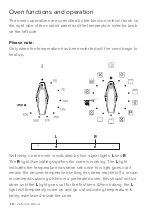
Page 10: ...ching on the oven is indicated by two signal lights L and R The R light illuminating signifies the oven is working The L light indicates the temperature has been set once this light goes out it means the desired temperature setting has been reached If a recipe recommends placing dishes in a preheated oven this should not be done until the L light goes out for the first time When baking the L light...

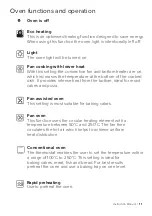
Page 11: ...perature at the bottom of the cooked dish It provides intense heat from the bottom ideal for moist cakes and pizza Fan assisted oven This setting is most suitable for baking cakes Fan oven This function uses the circular heating element with a temperature between 50 C and 250 C The fan then circulates the hot air which helps to achieve uniform heat distribution Conventional oven The thermostat ena...

Page 12: ...ber making it suitable for browning and roasting larger portions of food Fanned full grill This function radiates heat from the grill element and the top element but also uses the fan to circulate the hot air The hot air is distributed over and under the food that you are grilling This fully temperature variable grill is ideal for grilling fish or other foods where the appearance could be spoiled ...

Page 13: ...l you need to Set the function selector knob to the desired grill setting Heat the oven for approximately 5 minutes with the oven door shut Insert a tray on to the appropriate cooking level if you are grilling food directly on the wire shelf place a tray on the level immediately below Close the oven door When using the half grill or full grill functions the maximum temperature that can be set is 2...

Page 14: ...the display shows 0 00 Touch again the display will flash Pdur Touch the sensors to select the duration You can choose 2 hours 2 and a half hours or 3 hours Once you have made your choice wait for the beep which confirms the duration has been set The cleaning process will start and the oven will be locked P0 00 will show on the display once cleaning is complete The door will remain locked until th...

Page 15: ...0 Depending on the time you interrupt the process the oven may still be hot and must first cool down to 160 C before the door will unlock Opening the door in an emergency If the oven has sufficiently cooled down yet the door remains locked the door can be unlocked as follows Set the function selector knob to Wait 4 minutes Set the function selector knob to 0 and the oven door will unlock after 10 ...

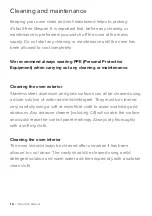
Page 16: ...oven exterior Stainless steel aluminium and glass surfaces can all be cleaned using a dilute solution of water and mild detergent They must be cleaned very carefully using a soft or microfibre cloth to avoid scratching and abrasions Any abrasive cleaner including Cif will scratch the surface and could erase the control panel markings Always dry thoroughly with a soft dry cloth Cleaning and mainten...

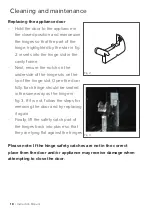
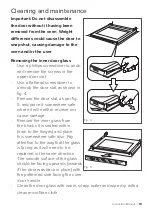
Page 17: ... allow easier access into the oven cavity for cleaning it is possible to remove the door Before removing the door ensure that you have an area prepared in which you can place the removed door This area should ideally be protected by something like a folded dirt free towel to help prevent damage to surfaces and the door Open the door fully Lift and tilt the safety catch part of the hinge Fig 1 so t...

Page 18: ...nderside of the hinge sits on the lip of the hinge slot Open the door fully Each hinge should be seated in the same way as the hinge in fig 3 If it is not follow the steps for removing the door and try replacing it again Finally lift the safety catch part of the hinges back into place so that they are lying flat against the hinges Please note If the hinge safety catches are not in the correct plac...

Page 19: ... as shown in fig 4 Remove the door slat as per fig 5 and place it somewhere safe where it will neither receive nor cause damage Remove the inner glass from the blocks it is seated within near to the hinges and place this somewhere safe also Pay attention to the way that the glass is facing as it will need to be replaced in the same direction The smooth surface of the glass should be facing upwards...

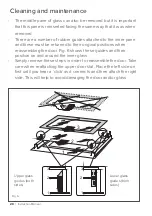
Page 20: ...der to reassemble the door Take care when reattaching the upper door slat Place the left side on first until you hear a click as it connects and then attach the right side This will help to avoid damaging the door and or glass 1 2 3 1 2 3 1 2 3 Upper glass guides both sides Lower glass guides both sides Fig 6 Cleaning and maintenance The middle pane of glass can also be removed but it is important...

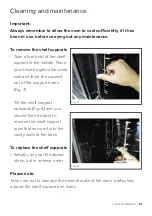
Page 21: ...against the oven wall and lever the support out of the support holes Fig 7 Tilt the shelf support outwards Fig 8 and you should then be able to remove the shelf support arms that secure it into the cavity walls at the back To replace the shelf supports Simply carry out the above steps but in reverse order Please note Take care not to damage the enamel walls of the oven particularly around the shel...

Page 22: ... cover This could damage the enamel of the oven or the lamp holder Remove only by hand Never replace the bulb with bare hands as contamination from your fingers can cause premature failure Always use a clean cloth or gloves Old bulbs may also be hot Changing the bulb Fig 9 Unscrew the protective cover Carefully extract and replace the bulb with the new one suitable for high temperatures 300ºC havi...

Page 23: ...f the unit is not installed as it could restrict ventilation Ensure that air can flow freely around the housing area If the oven is being installed into a fully enclosed built under oven housing unit it may be necessary to cut a small slot in the top of the plinth fitted under the unit Cut a section 400mm wide and a minimum of 15mm high to allow air to pass under the unit Alternatively cut a secti...

Page 24: ...n units but you must ensure that it is properly ventilated In the diagram below the built in oven is ventilated by means of a space at the top of the kitchen cabinet There are many other methods of ventilating your oven consult a qualified engineer for advice Lift the oven carefully into position on the shelf taking care NOT to lift it by the door handle If you lower the oven door you will see 4 s...

Page 25: ...coloured markings identifying the terminals in your spur box proceed as follows We recommend that the appliance is connected by a qualified electrician who is a member of the N I C E I C and who will comply with the I E T and local regulations The wires in the mains lead are coloured in accordance with the following code 1 The wire which is coloured green and yellow must be connected to the termin...

Page 26: ...the back or side of the exterior of the oven Problem Reason Solution The appliance does not work No power Check the fuse replace if blown Oven lighting does not work Loose or damaged bulb Replace bulb if blown see page 22 Electronic programmer display shows 0 00 The oven was disconnected from the mains or there was a power cut Set the current time see page 6 Fan does not work Risk of overheating U...

Page 27: ...C60350 1 These values are defined with a standard workload with the following functions active Bottom and top elements conventional heating and fan assisted heating forced air heating if these functions are available The energy efficiency class was assigned depending on the function available in the product in accordance with the priority below Forced air circulation ECO ring heater fan Forced air...

Page 28: ...vens and range hoods Supplier name CDA Model identifier SC360SS 10247 3eETsPrDJX Energy efficiency index EEI cavity 95 1 Energy efficiency class A Energy consumption per cycle EC electric cavity Conventional mode kWh fan forced mode kWh 0 99 0 78 Number of cavities 1 Heat source electricity or gas Electric Cavity volume L 65 In order to determine compliance with the eco design requirements the mea...

Page 29: ...lectric Appliance weight kg 32 4 Number of cavities 1 Heat source electricity or gas Electric Cavity volume L 65 Energy consumption needed to heat a standard charge in an electric oven cavity during a single cycle in conventional mode for each cavity final electric energy consumption EC electric cavity kWh cycle 0 99 Energy consumption needed to heat a standard charge in an electric oven cavity du...

Page 30: ...30 Instruction Manual This page has been left intentionally blank ...

Page 31: ...Instruction Manual 31 This page has been left intentionally blank ...

Page 32: ...The CDA Group Harby Road Langar Nottinghamshire NG13 9HY Sales Department Phone 01949 862010 Email sales cda eu Customer Care Department Phone 01949 862012 Email customer care cda eu 2019 CDA Group Ltd ...

Reviews: