background image

SUPER HIGH RESOLUTION WDR CAMERA

OSD Instruction

8) EFFECTS

2. Image Freeze : To hold the image to analyze precisely.
3. D-Effect

: Change the video direction. Vertical Flip, Mirror, Rotate are supported.

4. Color

: Set the video mode color or B/W.

5. Contrast : Adjust Contrast Level that you desired.
6. Sharpness : Adjust Sharpness Level. Increasing this value, the picture outline becomes

6. Sharpness : Adjust Sharpness Level. Increasing this value, the picture outline becomes

stronger and clear.

7. CR Gain : Adjust “Red Color Portion” in the video
8. CB Gain : Adjust “Blue Color Portion” in the Video
9. Initial Set : To return the default setting , which is defined in “EFFECT” Menu
10. Previous : Go back to “Main Menu”.

Remark :

The picture may be distorted or noise may appear if SHARPNESS level is increased too high.
If the V-FLIP or MIRROR mode is enabled, the text on the screen does not flip.

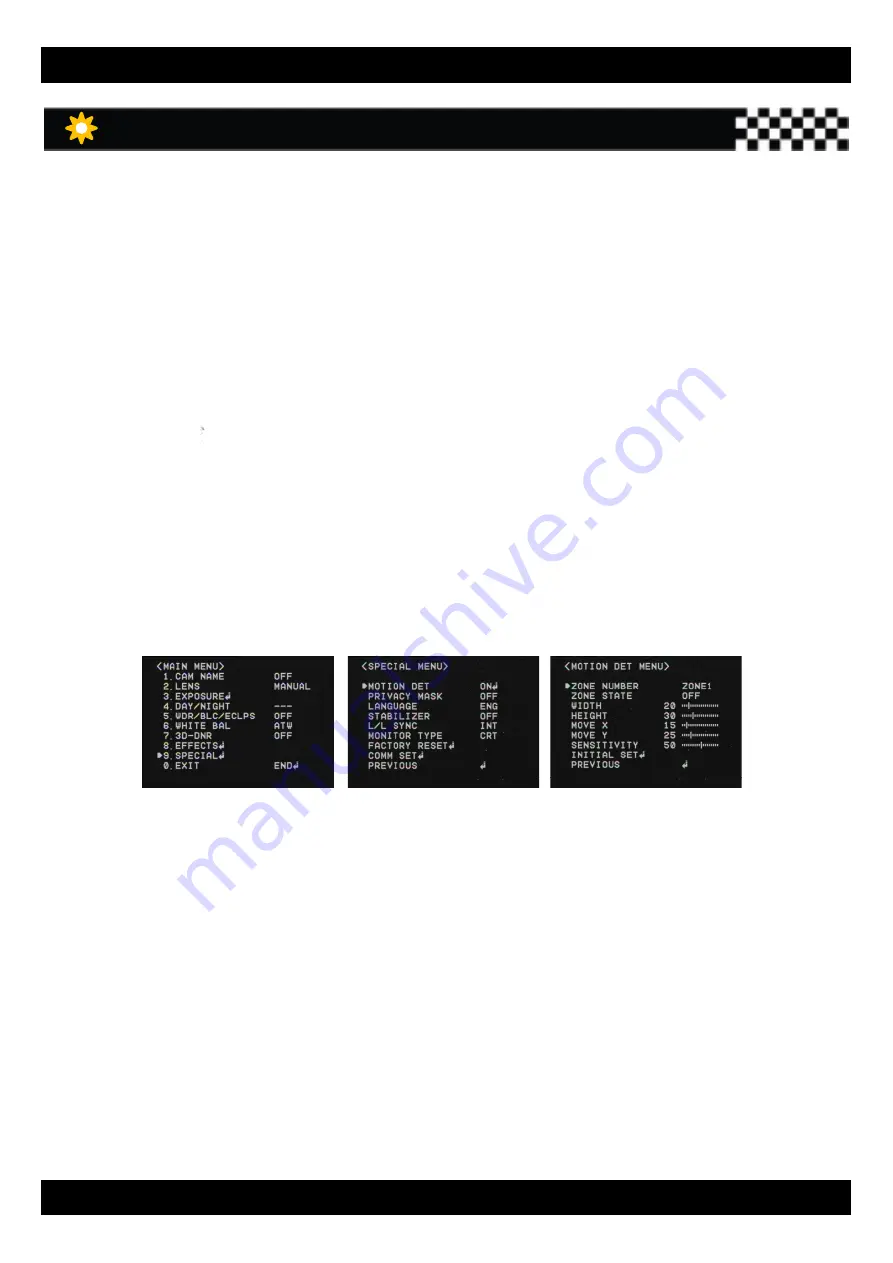
9) SPECIAL

- Select “SPECIAL” by using Joystick S/W with Up / Down Direction.
- Press “ Set Button” to enter “SPECIAL. ” Select the desired mode for your purpose.

Press Set Button to enter SPECIAL. Select the desired mode for your purpose.

1. MOTION DET.

:

A signal is generated by the camera whenever motion is detected.

- Zone Number : Select MD area to activate. 8 Areas can be programmable.
- Zone STAT

: Determine MD area selected.

- Width / Height : Set the size of MD

Move X/Y

: Determine the coordinate of Horizontal / Vertical Axis for MD Position

- Move X/Y

: Determine the coordinate of Horizontal / Vertical Axis for MD Position

- Sensitivity

: 8 areas can be activated. When Sensitivity number is high, motion

detection sensitivity is increased to recognize even small movement.

- Initial Set

: To return the default setting , which is defined in “Motion DET” Menu

- Previous

: Go back to “Main Menu”.

13

Summary of Contents for AP-C4323ART

Page 1: ...SUPER HIGH RESOLUTION WDR CAMERA Super High Resolution WDR Camera USER S MANUAL Please read this instruction manual carefully before connecting or operating this product Keep it for future use...

Page 2: ...TENS SPECIFICATION 1 WARNING AND CAUTION 2 CAMERA OSD CONTROL 3 GENERAL FEATURES 4 OSD MENU TREE 5 OSD INTRODUCTION CAMERA NAME 6 LENS 7 EXPOSURE 7 8 DAY NIGHT 8 9 WDR BLC ECLPS 9 10 WHITE BALANCE 11...

Page 3: ...LT IN AGC Off Low Middle High g Shutter OFF A FLK 1 160 1 90000 X512 X2 AUTO Selectable Sens Up OFF AUTO X2 X512 Day Night DAY NIGHT EXT AUTO Selectable WDR On Off Level Adjustable More than 72dB with...

Page 4: ...th limits for a class a digital device Pursuant to part 15 of the FCC rules These limits are designed to provide reasonable protection against harmful interference When the equipments operated in a co...

Page 5: ...ttom cap to access OSD A Video Test Connector B Joystick OSD S W Press Joystick to enter OSD C IR LED Level S W Only IR LED version Adjust IR LED volume Open the bottom cap to access OSD A B C B DOME...

Page 6: ...mask strong light from the designated areas and make other areas visible day or night and automatically switches to the appropriate mode depending on its environment By day the camera switches to colo...

Page 7: ...Y NIGHT EXT AUTO WHITE BAL WDR BLC ECLPS WDR BLC ECLPS WHITE BAL ATW COLOR ROLL AWC SET MANUAL 3D DNR ON OFF DAY NIGHT DAY NIGHT COLOR B W AUTO EXTERN EFFECTS DZOOM IMAGE FREEZE D EFFECT COLOR CONTRAS...

Page 8: ...g Joystick S W with Left Right di ti Down direction direction 1 CAM NAME Entitle Camera Name ID and it will be appeared on the screen Select CAM Name by using Joystick S W with Up Down direction Set i...

Page 9: ...ol The higher gain level the brighter pictures but the higher noise Off Deactivate AGC function Low Middle High Set the desired AGC Level 2 Shutter Auto Manual Shutter can be selectable A FLK Select t...

Page 10: ...which is defined in Exposure Menu 5 PREVIOUS Go to Mani Menu Remark If you press the SET button in AUTO mode you can adjust brightness by increasing or decreasing the shutter speed X2 X512 The higher...

Page 11: ...mode allows you to apply a desired filter to External signals Remark Day Night will not be activated when AGC in the EXPOSURE menu is OFF 5 WDR BLC ECLPS 1 WDR Wide Dynamic Range WDR illuminates dark...

Page 12: ...sub menu C S O C S O ECLPS Masking Area AREA SETTING Select the desired area where you want to activate this feature ALL AREA SET Enable to set all areas as ON or OFF MASK COLOR TONE Change the color...

Page 13: ...and press the SET Button If the environment changes readjust it Manual Select this to fine tune white balance manually Set White Balance first by using ATW or AWC mode After that switch to Manual mode...

Page 14: ...light situation It overrides the general brightness slider If 3D DNR level and the Destination Level is high an after image symptom Ghost Effect will be occurred GLOBAL MOVEMENT Option Operates the f...

Page 15: ...evel is increased too high If the V FLIP or MIRROR mode is enabled the text on the screen does not flip 9 SPECIAL Select SPECIAL by using Joystick S W with Up Down Direction Press Set Button to enter...

Page 16: ...defined in PM Menu Previous Go back to Main Menu 3 Language You can select the menu language according to your requirements 4 Stabilizer Digital Image Stabilizer Mitigate any picture movement by exter...

Page 17: ...p the camera communication status when controlling the camera with external control device 1 PROTOCOL Pelco D protocol is supported as default 2 Camera ID You can give Camera ID from 0 255 with your d...

Page 18: ...the camera is exposed to too strong light change the camera position Adjust the lens focus properly Adjust the lens focus properly The image on the screen is dark Adjust the contrast feature of the m...

Page 19: ...SUPER HIGH RESOLUTION WDR CAMERA Memo 17...

Page 20: ...SUPER HIGH RESOLUTION WDR CAMERA This Manual is based on the data shown in Specifications are subject to change without prior notice for quality improvement...

Reviews: