background image

recommandations d'installation du manuel. 

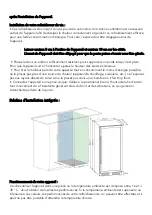
- L’appareil ne doit pas être placé à proximité de 

radiateurs, de plats chauds, de plaques chauffantes ou de 

brûleurs

.  

- Vérifiez que les prises électriques restent accessibles 

lorsque l'appareil est installé. 


Économie d’énergie 

Pour limiter la consommation d'électricité de votre 

appareil : 

- Installez l'appareil dans un endroit frais, à l’écart 

d’appareils produisant de la chaleur et à l'abri du soleil. 

- Assurez-vous que l'appareil soit correctement ventilé et 

ne bloquez jamais les bouches d'aération. 

- N’ouvrez pas la porte si ce n’est pas nécessaire. 

- Inspectez régulièrement les joints de la porte et assurez-

vous qu'ils soient toujours hermétiques.  


Dépannage 

- Toute intervention électrique doit être effectuée par un 

technicien qualifié. 

- L’appareil doit être réparé dans un service technique 

agréé, en utilisant uniquement des pièces de rechange 

d’origine. 


L'appareil est conçu pour un usage domestique uniquement. Le fabricant décline toute 

responsabilité en cas d’autre utilisation. 

Summary of Contents for 149

Page 1: ...ilisation Gebruachsanweisung Gebruiksaanwijzing Manual de Usuario Manuale d uso CAVIST149 Cave à vin 149 bouteilles Wine cellar 149 bottles Weinkeller 149 flaschen Wijnkelder 149 flessen Cantina 149 bottiglie Bodega 149 botellas 149 ...

Page 2: ......
Page 3: ...ce should be fully familiar with its operation and safety functions Keep these recommendations close to the appliance for future reference and ensure that the document is transferred with the appliance if it is sold or in the case of moving This will ensure optimum operation of the appliance Warnings To prevent damage on the door gasket make sure the door is fully opened when pulling shelves out o...

Page 4: ...rvised Keep all packaging out of the reach of children as there is a risk of suffocation If you decide to scrap the appliance disconnect it from the wall socket cut the connection cable as close to the appliance as possible and remove the door in order to prevent children playing with it with the resulting risk of electric shock or being trapped inside If an appliance with a magnetic door seal is ...

Page 5: ...mage the refrigerating circuit WARNING Do not use electrical appliances inside the compartment unless they are tolerated by the manufacturer WARNING The refrigerating and insulating systems containinflammable gases When the appliance is scrapped it should be deposited at an accredited collection centre Do not expose the appliance to fire Refrigerating fluid R600a The refrigerating circuit in the a...

Page 6: ...n extension cable or adapter or multi way socket Check that the wall socket is not damaged A wall socket in poor condition may cause the appliance to overheat and explode Check that the wall socket used for the appliance is properly accessible Never pull on the main power cable Ensure that the appliance is always electrically earthed If the wall socket is loose do not connect the cable as there is...

Page 7: ...ce cream etc When disconnecting the appliance grip the plug firmly and do not pull on the cable Do not expose the appliance to direct sunlight Keep the appliance away from candles luminaries and open flames in order to avoid fire risk This appliance is only designed to store wines and drinks The appliance is heavy Be careful when moving it If your appliance is equipped with castors remember that t...

Page 8: ... Inform your retailer or point of sale of any damage In such a case keep the packaging It is recommended that the appliance be allowed to settle for at least 4 hours before connecting the electrical power supply so that the compressor fluid feed is correct Proper air circulation is necessary to avoid overheating To ensure sufficient ventilation observe the installation recommendations Provided In ...

Page 9: ...vents Don not open the door if not necessary Regularly inspect the door seals and ensure that they are still closing properly Trouble shooting Any electrical work should be carried out by a qualified and skilled technician The appliance should be repaired by an accredited repair centre using only original spare parts The appliance is designed for home use only The manufacturer declines any liabili...

Page 10: ... the best from your appliance with the lowest energy consumption do not place the appliance close to a heat source heater cooker etc do not expose it to direct sunlight and do not place it in a room which is too cold Plug the appliance into an exclusively easily accessible plug socket Any questions power and or grounding should be directed toward a certified electrician or an authorized service ce...

Page 11: ...rneath To get the best from your appliance with the lowest energy consumption do not place the appliance close to a heat source heater cooker etc do not expose it to direct sunlight and do not place it in room which is too cold Connect the appliance to a single socket Be careful to support it so that your wine cooler is perfectly leveled This will prevent any movement due to instability generating...

Page 12: ...in this mode LCD screen will display and light will always be on Press and to adjust the temperature of the appliance and each press on the button will alter the temperature by 1 C buttons at left of LCD screen will control the temperature of upper zone at right of the LCD screen will control the temperature of lower zone Important note after selecting the desired temperature the display will cont...

Page 13: ...6 hours it will beep to alarm and left side of LCD screen will display When lower zone temperature is above 25 C for over 6 hours it will beep to alarm and right side of LCD screen will display press any key to stop the beeping alarm 4 Low humidity alarm When upper zone humidity is less than 40 for over 3 hours the left side of LCD screen will display when lower zone humidity is lower than 40 for ...

Page 14: ...e for you to reverse the door please follow below instructions 1 Unscrew the two screws which fix the door axis onto the lower hinge at the bottom of hinge then remove the door 2 Remove the door axis from door axis hole at the left bottom of the door 3 Remove right upper hinge by unscrewing three screws ...

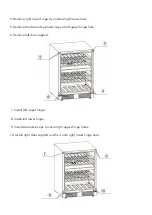
Page 15: ...e the decorative plastic caps at left upper hinge hole 6 Remove left door support 7 Install left upper hinge 8 Install left lower hinge 9 Insert decorative caps to cover right upper hinge holes 10 Install right door support and fix it onto right lower hinge hole ...

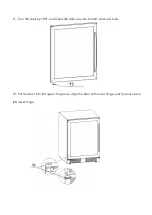
Page 16: ...11 Turn the door by 180 and insert the door axis into bottom door axis hole 12 Put the door into left upper hinge axis align the door with lower hinge and fix door axis to left lower hinge ...

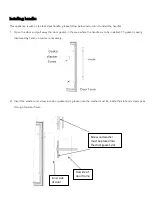
Page 17: ... gasket in the area where the handles is to be installed Th gasket is easily displaced by hand no tools are necessary 2 Insert the washer and screw into door gasket slot please note the washer must be inside the slot and screws pass through the door frame Screw and washer must be placed into the door gasket slot Inner side of door frame Outside of door frame ...

Page 18: ...ishes the appliance s refrigerated surfaces are defrosted automatically The defrost water is channeled into a condensates evaporation tray which is located in the back of the appliance near the compressor The heat produced by the compressor then evaporates the condensates collected in the tray 5 LOADING The maximum recommended loading quantities for bottles are given as guidelines and are indicati...

Page 19: ...eel shelves with a mild detergent solution and then dry with a soft cloth Wooden shelves require no particular maintenance When the appliance is switched on for the first time there may be a residual odour In that case run the appliance empty for a few hours at the coldest possible temperature The cold will kills any odours 7 STORING YOUR WINE COOLER If you will not be using your appliance for sho...

Page 20: ...isconnect your appliance Remove all bottles and secure any loose parts To avoid damaging the levelling screws on the feet screw them tightly into the base Move the appliance in an upright position preferably or note the direction in which the appliance may be laid down by looking at its packaging 10 IN THE EVENT OF A BREAKDOWN Despite the care we take during production a breakdown can never be tot...

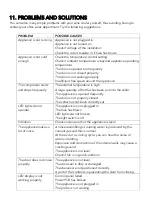
Page 21: ...put into the cellar The appliance is opened frequently The door is not properly closed The cellar has not been correctly set LED lights do not operate The appliance is not plugged in The fuse has blown LED lights are not broken The light switch is off Vibration Check and ensure that the appliance is level The appliance makes a lot of noise A noise resembling circulating water is produced by the co...

Page 22: ...ll need to inform your local authorities about the places where you can return this product In fact electrical and electronic products contain hazardous substances that have harmful effects on the environment or human health and should be recycled The symbol here indicates that electrical and electronic equipment should be chosen carefully a wheeled waste container is marked with a cross Adeva SAS...

Page 23: ... ses fonctionnalités de fonctionnement et de sécurité Conservez ces recommandations en lieu sûr pour pouvoir vous y référer ultérieurement et assurez vous que le document soit joint avec l appareil s il est vendu ou en cas de déménagement Cela garantira un fonctionnement optimal de l appareil Avertissements Pour éviter d endommager le joint de la porte assurez vous que la porte soit complètement o...

Page 24: ...sont surveillés Gardez tous les emballages hors de la portée des enfants il y a un risque d étouffement Si vous décidez de mettre l appareil au rebut débranchez le de la prise murale et couper le câble d alimentation aussi près que possible de l appareil et enlevez la porte afin d empêcher les enfants de jouer avec elle et le risque inhérent d électrocution ou de coincement à l intérieur Si un app...

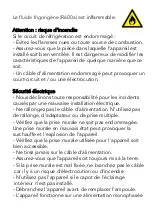
Page 25: ...t encastré dans un mur AVERTISSEMENT ne pas endommager le circuit de réfrigération AVERTISSEMENT n utilisez pas d appareil électrique à l intérieur du compartiment à moins qu il ne soit accepté par le fabricant AVERTISSEMENT les systèmes de réfrigération et d isolation contiennent des gaz inflammables Lorsque l appareil est mis au rebut il doit être déposé dans une déchetterie officielle et ne doi...

Page 26: ...installation électrique Ne rallongez pas le câble d alimentation N utilisez pas de rallonge d adaptateur ou de prise multiple Vérifiez que la prise murale ne soit pas endommagée Une prise murale en mauvais état peut provoquer la surchauffe et l explosion de l appareil Vérifiez que la prise murale utilisée pour l appareil soit bien accessible Ne tirez jamais sur le câble d alimentation Assurez vous...

Page 27: ...plosion N utilisez pas d autre équipement électrique à l intérieur de l appareil mélangeurs rotors pour glaces etc Lorsque vous débranchez l appareil saisissez fermement la fiche et ne tirez pas sur le câble N exposez pas l appareil au soleil direct Éloignez l appareil des bougies des luminaires et des flammes nues afin d éviter tout risque d incendie Cet appareil est uniquement conçu pour stocker...

Page 28: ... bon raccordement électrique suivez les recommandations du manuel Déballez l appareil et vérifiez qu il ne soit pas endommagé Ne branchez pas un appareil endommagé Informez le revendeur ou le point de vente de tout dommage Dans ce cas conservez l emballage Il est recommandé de laisser l appareil au minimum 4 heures avant de le brancher de sorte que le compresseur soit bien alimenté Une bonne circu...

Page 29: ... chaleur et à l abri du soleil Assurez vous que l appareil soit correctement ventilé et ne bloquez jamais les bouches d aération N ouvrez pas la porte si ce n est pas nécessaire Inspectez régulièrement les joints de la porte et assurez vous qu ils soient toujours hermétiques Dépannage Toute intervention électrique doit être effectuée par un technicien qualifié L appareil doit être réparé dans un s...

Page 30: ...areil tout en consommant le moins d énergie possible ne le placez pas près d une source de chaleur appareil de chauffage cuisinière etc ne l exposez pas aux rayons directs du soleil et ne le placez pas dans une chambre où il fait trop froid Branchez l appareil à une prise de courant exclusive et facilement accessible Toute question au sujet de la puissance et de la mise à la terre doit être adress...

Page 31: ... tirer le meilleur parti de votre appareil tout en consommant le moins d énergie possible ne le placez pas près d une source de chaleur appareil de chauffage cuisinière etc ne l exposez pas aux rayons directs du soleil et ne le placez pas dans une chambre où il fait trop froid Connectez l appareil à une prise unique Veillez à le positionner bien à l horizontal afin d éviter tout mouvement dû à l i...

Page 32: ...ichera le symbole et la lumière restera allumée Appuyez sur et pour régler la température de l appareil Chaque fois que vous appuyez sur l une des touches vous modifiez la température d 1 C Les boutons situés à gauche de l écran LCD contrôlent la température de la zone supérieure ceux à droite de l écran LCD celle de la zone inférieure Remarque importante après avoir sélectionné la température sou...

Page 33: ... un bip retentit pour alerter et le côté gauche de l écran affichera Lorsque la température de la partie basse est supérieure à 25 C pendant plus de 6 heures une sonnerie retentit et le côté droit de l écran affichera Appuyez alors sur n importe quelle touche pour arrêter l alarme 5 Alarme Basse humidité lorsque l humidité de la partie haute est inférieure à 40 pendant plus de 3 heures le côté gau...

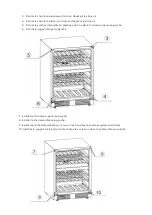
Page 34: ...re gauche et une charnière inférieure gauche pour que vous puissiez inversez la porte Suivez bien les instructions ci dessous 1 Dévissez les deux vis qui fixent l axe de la porte sur la charnière inférieure au bas de la charnière puis retirez la porte 2 Retirez l axe de la porte du trou situé en bas à gauche de la porte ...

Page 35: ...en plastique du trou de la charnière supérieure gauche 6 Retirez le support de porte gauche 7 Installez la charnière supérieure gauche 8 Installer la charnière inférieure gauche 9 Insérez les caches décoratifs pour recouvrir les trous des charnières supérieures droites 10 Installez le support de la porte droite et fixez le sur le trou de la charnière inférieure droite ...

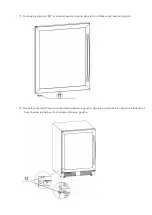
Page 36: ...ez l axe de la porte dans le trou inférieur de l axe de la porte 12 Placez la porte dans l axe de la charnière supérieure gauche alignez la porte avec la charnière inférieure et fixez l axe de la porte sur la charnière inférieure gauche ...

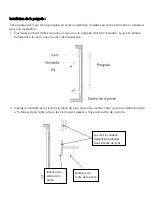
Page 37: ...it être installée Le joint s enlève facilement à la main aucun outil n est nécessaire 2 Insérez la rondelle et la vis dans la fente du joint de porte veuillez noter que la rondelle doit être à l intérieur de la fente et que les vis doivent passer à travers le cadre de la porte Intérieur du cadre de la porte La vis et la rondelle doivent être placées dans la fente du joint de porte Extérieur du cad...

Page 38: ...ent terminé les surfaces réfrigérées de l appareil sont automatiquement dégivrées L eau de dégivrage est acheminée vers un bac d évaporation des condensats situé à l arrière de l appareil à proximité du compresseur La chaleur produite par le compresseur évapore ensuite les condensats recueillis dans le bac 5 CHARGEMENT Les quantités de chargement maximales recommandées pour les bouteilles sont don...

Page 39: ...on détergente douce puis séchez avec un chiffon doux Les étagères en bois ne nécessitent aucun entretien particulier Lorsque l appareil est allumé pour la première fois il peut y avoir une odeur résiduelle Dans ce cas faites fonctionner l appareil à vide pendant quelques heures à la température la plus froide possible Le froid supprimera toutes les odeurs 7 RANGEMENT DE VOTRE REFROIDISSEUR DE VIN ...

Page 40: ... par débrancher votre appareil Retirez toutes les bouteilles et sécurisez les éléments amovibles Pour ne pas endommager les pieds réglables vissez les fermement Déplacez l appareil verticalement de préférence ou notez le sens dans lequel l appareil peut être incliné en regardant son emballage 10 DANS LE CAS D UNE PANNE Malgré les précautions que nous prenons lors de la fabrication une panne ne peu...

Page 41: ...efroidisseur L appareil est ouvert fréquemment La porte n est pas complètement fermée L appareil n a pas été réglé correctement Les lampes ne marchent pas L appareil n est pas branché Le fusible a sauté Les lampes LED sont cassées L appareil est éteint Vibrations Vérifiez et assurez vous que l appareil soit à niveau L appareil fait beaucoup de bruit Un bruit ressemblant à de l eau en circulation e...

Page 42: ...par les communes vous devez vous renseigner auprès de votre mairie afin d en connaître les emplacements En effet les produits électriques et électroniques peuvent contenir des substances dangereuses qui ont des effets néfastes sur l environnement ou la santé humaine et doivent être recyclés Le symbole ci contre indique que les équipements électriques et électroniques font l objet d une collecte sé...

Page 43: ...u vermeiden müssen sich die Personen die das Gerät benutzen mit den Bedienungsbesonderheiten und seinen Sicherheitsfunktionen auskennen Halten Sie diese Empfehlungen in der Nähe des Gerätes für künftige Referenz und vergewissern Sie sich dass diese mit dem Gerät übergeben werden wenn es verkauft oder umgestellt wird Dies wird eine optimale Bedienung des Gerätes gewährleisten WARNUNGEN Um eine Besc...

Page 44: ...ie verbundenen Gefahren versteht Kinder dürfen mit dem Gerät nicht spielen Die Reinigung und Wartung dürfen nicht von Kindern durchgeführt werden es sei denn sie sind älter als 8 Jahre und werden beaufsichtigt Halten Sie alle Verpackungen außer Reichweite von Kindern da eine Erstickungsgefahr besteht Wenn Sie entscheiden das Gerät zu verschrotten trennen Sie dieses von der Steckdose schneiden Sie ...

Page 45: ...Flüssigkeiten auslösen können WARNUNG Ein beschädigtes Kabel muss unverzüglich von dem Hersteller oder einem qualifizierten Händler ersetzt werden um jegliches Risiko eines Stromschlages zu vermeiden WARNUNG Halten Sie die Lüftungsöffnungen frei von Hindernissen und stellen Sie sicher dass die Luft zirkulieren kann besonders wenn das Gerät in der Wand vertieft ist WARNUNG Beschädigen Sie den Kälte...

Page 46: ...ng Brandgefahr Wenn der Kältemittel Kreislauf beschädigt ist Vermeiden Sie offene Flammen oder jegliche Zündquellen Vergewissern Sie sich dass das Zimmer in dem das Gerät installiert ist gut belüftet ist Es ist gefährlich die Spezifikationen des Gerätes in jeglicher Weise zu verändern Die Beschädigung des Stromkabels kann eine Kurzschluss und oder einen Stromschlag verursachen ELEKTRISCHE SICHERHE...

Page 47: ... Risiko eines Stromschlages oder eines Brandes besteht Benutzen Sie das Gerät nicht wenn die Innenbeleuchtungsabdeckung nicht installiert ist Trennen Sie das Gerät von Netz bevor Sie die Glühbirne austauschen Das Gerät arbeitet an einer einphasigen 220 240 V 50 Hz Stromversorgung Das Gerät muss an einer geerdeten Steckdose eingeschlossen sein gemäß den gültigen Empfehlungen Versuchen Sie nicht ein...

Page 48: ... geeignet Weine und Getränke zu lagern Das Gerät ist schwer Seien Sie vorsichtig wenn Sie dieses bewegen Wenn Ihr Gerät mit Rädern ausgestattet ist denken Sie daran dass diese dafür da sind um kleine Bewegungen zu erleichtern Bewegen Sie das Gerät über lange Strecken nicht Lehnen Sie sich nicht auf das Gerät oder seine Komponente und besteigen Sie diese nicht Um das Fallen von Gegenständen zu verm...

Page 49: ...ändler oder die Verkaufsstelle über jegliche Beschädigung In diesem Fall bewahren Sie die Verpackung auf Es wird empfohlen das Gerät für mindestens 4 Stunden sich absetzen zu lassen bevor Sie dieses an die Stromversorgung anschließen so dass die Kompressorflüssigkeits Zufuhr richtig ist Eine ordnungsgemäße Belüftung ist notwendig um eine Überhitzung zu vermeiden Um eine ausreichende Belüftung zu g...

Page 50: ... blockieren Sie nicht die Lüftungsschlitze Öffnen Sie die Tür nicht wenn es nicht nötig ist Untersuchen Sie regelmäßig die Türdichtungen und stellen Sie sicher dass diese ordnungsgemäß schließen FEHLERBEHEBUNG Jegliche elektrischen Arbeiten müssen von einem qualifizierten und geschulten Techniker durchgeführt werden Das Gerät muss von einem akkreditierten Reparaturzentrum instandgesetzt werden mit...

Page 51: ... mit einem niedrigsten Energieverbrauch zu ermöglichen platzieren Sie das Gerät nicht in der Nähe von Hitzequellen wie z B Heizkörper Herd usw setzen Sie dieses nicht direkter Sonneneinstrahlung aus und stellen Sie es nicht in einem zu kalten Raum ab Schließen Sie das Gerät an einer alleinstehenden einfach erreichbaren Steckdose an Jegliche Fragen bezüglich Energie und oder Erdung müssen an einen ...

Page 52: ... einem niedrigsten Energieverbrauch zu ermöglichen platzieren Sie das Gerät nicht in der Nähe von Hitzequellen wie z B Heizkörper Herd usw setzen Sie dieses nicht direkter Sonneneinstrahlung aus und stellen Sie es nicht in einem zu kalten Raum ab Schließen Sie das Gerät an einer alleinstehenden einfach erreichbaren Steckdose an Befestigen Sie dieses vorsichtig so dass der Weinkühler gut nivelliert...

Page 53: ...n Sie für 3 Sekunden gedrückt um den Licht an Modus zu betreten in diesem Modus wird der LED Display anzeigen und das Licht wird immer an sein Drücken Sie auf und um die Temperatur des Gerätes einzustellen bei jedem Drücken der Taste wird sich die gewählte Temperatur um 1 C erhöhen verringern Tasten auf der linken Seite von dem LED Display kontrollieren die Temperatur der oberen Zone Tasten auf de...

Page 54: ...C für mehr als 6 Stunden befindet wird der Alarm ertönen und werden links von dem LED Display angezeigt Wenn die Temperatur der unteren Zone sich über 25 C für mehr als 6 Stunden befindet wird der Alarm ertönen und werden rechts von dem LED Display angezeigt Drücken Sie auf eine beliebige Taste um den Alarm auszumachen 4 Niedrige Feuchtigkeit Alarm Wenn die Feuchtigkeit in der oberen Zone weniger ...

Page 55: ...eres Scharnier damit Sie die Tür umstellen können befolgen Sie bitte die unten angegebenen Anweisungen 1 Drehen Sie die zwei Schrauben heraus die die Tür Achse auf dem unteren Scharnier von unten festhalten dann entnehmen Sie die Tür 2 Entnehmen Sie die Tür Achse aus dem Achsen Loch auf der linken Unterseite der Tür ...

Page 56: ...die dekorativen Kunststoffkappen auf dem linken oberen Scharnierloch 6 Entfernen Sie die linke Tür Stütze 7 Montieren Sie das linke obere Scharnier 8 Montieren Sie das linke untere Scharnier 9 Setzen Sie die dekorativen Kappen ein um die rechten oberen Scharnierlöcher abzudecken 10 Montieren Sie die rechte Tür Stütze und befestigen Sie diese auf dem rechten unteren Scharnierloch ...

Page 57: ...d setzen Sie die Tür Achse in das untere Türachsen Loch ein 12 Setzen Sie die Tür in die linke untere Scharnierachse ein gleichen Sie die Tür an das untere Scharnier an und befestigen Sie die Türachse an dem linken unteren Scharnier ...

Page 58: ...werden soll Die Dichtung kann einfach mit der Hand entfernt werden kein Werkzeug ist notwendig 4 Setzen Sie die Unterlegscheibe ein und schrauben Sie diese in den Türdichtungs Schlitz beachten Sie bitte dass die Unterlegscheibe in dem Schlitz sein muss und die Schrauben durch die Türzarge passen müssen Innere Seite der Türzarge Die Schraube und die Unterlegscheibe müssen in dem Türdichtungs Schlit...

Page 59: ...hen des Gerätes automatisch entfrostet Das Abtauwasser wird in den Kondenswasser Verdunstungsbehälter geleitet der sich auf der Rückseite des Gerätes in der Nähe von dem Kompressor befindet Die von dem Kompressor erzeugte Hitze verdunstet dann das in dem Behälter angesammelte Kondenswasser 5 BELADUNG Die maximale zur Beladung empfohlene Flaschenanzahl ist in den Leitlinien angegeben und stellt led...

Page 60: ...den Edelstahl Regalen mit einer milden Reinigungslösung und trocknen Sie diese mit einem weichen Tuch ab Die Holzregale benötigen keine besondere Pflege Wenn das Gerät zum ersten Mal angeschaltet ist kann es einen verbleibenden Geruch haben In diesem Fall lassen Sie das Gerät für ein paar Stunden auf der möglichst niedrigen Temperatur leerlaufen Die Kälte wird jegliche Gerüche entfernen 7 IHREN WE...

Page 61: ...EWEGEN MÜSSEN Zuerst trennen Sie Ihr Gerät vom Netz Entfernen Sie alle Flaschen und befestigen Sie alle losen Teile Um eine Beschädigung der Nivellierschrauben auf den Füßen zu vermeiden schrauben Sie diese fest an der Grundlage Bewegen Sie das Gerät vorzugsweise in der aufrechten Position oder merken Sie sich die Richtung in die das Gerät abgelegt werden kann indem Sie auf die Verpackung gucken 1...

Page 62: ...en wurde in dem Weinkeller platziert Die Tür wird zu oft geöffnet Die Tür ist nicht richtig geschlossen Der Weinkeller wurde nicht korrekt eingestellt LED Leuchten funktionieren nicht Das Gerät ist nicht angeschlossen Die Sicherung ist durchgebrannt LED Leuchten sind defekt Der Leuchtschalter ist aus Vibrationen Vergewissern Sie sich dass das Gerät eben platziert ist Das Gerät macht viel Lärm Ein ...

Page 63: ...ie müssen Ihre lokalen Behörden über die Orte wo man dieses Produkt zurückgeben können zu informieren In der Tat enthalten elektrische und elektronische Produkte gefährliche Stoffe die schädliche Auswirkungen auf die Umwelt oder die menschliche Gesundheit haben und sollte recycelt werden Das Symbol hier darauf hinweisen dass elektrische oder elektronische Geräte sollten sorgfältig ausgewählt werde...

Page 64: ... gebruiks en veiligheidsregels Bewaar deze aanbevelingen dicht bij het apparaat voor toekomst gebruik en zorg dat het document meegaat met het apparaat als deze wordt verkocht of verplaatst Dit zal het optimale gebruik van het apparaat verzekeren Waarschuwingen Om beschadigingen aan de deurafdichting te vermijden controleer dat de deur helemaal open is bij het verwijderen van de schappen Niet het ...

Page 65: ...ingsmateriaal buiten bereik van kinderen omdat er risico is op verstikking Als u besluit het apparaat weg te gooien haal dan de stekker uit het stopcontact snij de stroomkabel door zo dicht mogelijk bij het apparaat en verwijder de deur ter voorkoming dat kinderen ermee gaan spelen met het risico op een elektrische schok of er opgesloten in te raken Als een apparaat met een magnetische deur wordt ...

Page 66: ...apparaat bij een muur wordt geplaatst WAARSCHUWING Niet het koelcircuit beschadigen WAARSCHUWING Gebruik geen elektrische apparaten in het compartiment tenzij deze zijn toegestaan door de fabrikant WAARSCHUWING De koel en isolatiesystemen bevatten ontbrandbare gassen Als het apparaat wordt weggegooid moet het worden weggebracht naar een bevoegd inzamelpunt Stel het apparaat niet bloot aan vuur Koe...

Page 67: ... bij incidenten veroorzaakt door een slechte elektrische installatie Niet de stroomkabel verlengen Gebruik geen verlengkabel adapter of verdeelstekker Controleer dat het stopcontact onbeschadigd is Een kapot stopcontact kan zorgen dat het apparaat oververhit raakt en explodeert Controleer dat het stopcontact dat gebruikt wordt voor het apparaat goed bereikbaar is Trek nooit aan de stroomkabel Zorg...

Page 68: ...en ander elektrisch gereedschap in het apparaat mixers menger voor roomijs etc Bij het eruit halen van de stekker uit het stopcontact de stekker stevig vastpakken en trek niet aan de kabel Stel het apparaat niet bloot aan direct zonlicht Houd het apparaat verwijderd van kaarsen verlichting en open vuur om risico op vuur te vermijden Dit apparaat is alleen ontworpen voor opslag van wijn en drank Di...

Page 69: ...ding te verzekeren volg de aanbevelingen op die in deze handleiding staan Pak het apparaat uit en kijk of er geen beschadigingen zijn Sluit geen beschadigd apparaat aan Informeer uw verkoper over enige beschadigingen In dat geval dient u de verpakking te bewaren Het wordt aanbevolen het apparaat minimaal 4 uur te laten rusten voordat u deze aansluit op het lichtnet zodat de vloeistoffen zich kunne...

Page 70: ...troleer dat het apparaat voldoende ventilatie heeft blokkeer nooit de ventilatieopeningen Niet de deur openen als het niet nodig is Controleer regelmatig dat de deurafdichting en verzeker dat deze nog steeds goed sluit Probleemoplossing Al het elektrische werk dient te worden uitgevoerd door een gekwalificeerde en bekwame elektricien Het apparaat dient te worden gerepareerd door een bevoegd repara...

Page 71: ...apparaat zo min mogelijk energie te laten verbruiken moet het apparaat niet worden geplaatst nabij een warmtebron kachel fornuis etc niet blootstellen aan direct zonlicht en niet plaatsen in een kamer die te koud is Steek de stekker van het apparaat in een apart goed bereikbaar stopcontact Vragen wat betreft stroom en of aarding moeten worden gesteld aan een gecertificeerde elektricien of reparati...

Page 72: ... u de poten die eronder zitten Om uw apparaat zo min mogelijk energie te laten verbruiken moet het apparaat niet worden geplaatst nabij een warmtebron kachel fornuis etc niet blootstellen aan direct zonlicht en niet plaatsen in een kamer die te koud is Steek de stekker van het apparaat in een apart stopcontact zorg dat het apparaat stevig staat en dat deze helemaal vlak staat Dit voorkomt beweging...

Page 73: ...e modus toont het LCD scherm en zal de verlichting altijd aan zijn Druk op en om de temperatuur aan te passen in het apparaat elke druk op de knop zal de temperatuur veranderen met 1 C De knoppen links van het LCD scherm zullen de temperatuur aanpassen van de bovenste zone rechts van het LCD scherm passen de temperatuur aan van de onderste zone Belangrijke opmerking na het kiezen van de gewenste t...

Page 74: ... de linkerkant van het LCD scherm toont dan Als de onderste temperatuurzone boven 25 C komt gedurende 6 uur klinkt er een alarm en toont de rechterkant van het LCD scherm druk op een willekeurige knop om het alarm te laten stoppen 4 Lage luchtvochtigheid alarm Als de luchtvochtigheid in de bovenste zone lager is dan 40 gedurende 3 uur toont het LCD scherm links als de onderste zone een luchtvochti...

Page 75: ...ren voor linksboven en onder om de deur om te draaien volg de onderstaande instructies 1 Schroef de schroeven los die de as fixeren op het onderste scharnier onderin het scharnier verwijder vervolgens de deur 2 Verwijder de as door deze uit het gat te halen linksonder in de deur ...

Page 76: ...e schroeven 5 Verwijder de decoratieve plastic kapjes bij het gat voor het scharnier linksboven 6 Verwijder links de deursteun 7 Plaats het scharnier linksboven 8 Plaats het scharnier linksonder 9 Plaats de decoratieve plastic kapjes bij de scharniergaten rechtsboven 10 Plaats de deursteun en zet deze vast in het scharniergat rechtsonder ...

Page 77: ...11 Draai de deur 180 en plaats de deuras door het asgat onderin 12 Plaats de deur in het scharnier linksboven stel de deur af met het onderste scharnier en zet de as vast in het scharnier linksonder ...

Page 78: ...g weg bij het stuk waar de handgreep moet komen De afdichting kan makkelijk met de hand worden verplaatst er is geen gereedschap nodig 2 Plaats het plaatje met de schroef door het gat zorg dat het plaatje goed zit en de schroeven door het deurframe gaan Binnenkant van het frame De schroef en het plaatje moeten achter de afdichting komen Buitenkant van het frame ...

Page 79: ...variaties in temperatuur en houdt het rekening met de gevoeligheid van grand cru wijnen Het anti vibratie systeem De koelingscompressor is voorzien van speciale dempers stilteblokken en de binnenruimte is geïsoleerd van de behuizing met een dikke laag polyurethaanschuim Deze karakteristieken voorkomen het doorgeven van vibraties aan uw wijnen Ontdooien Uw apparaat is voorzien van een automatisch o...

Page 80: ...sche aspect beperkt de capaciteit Daarom zult u waarschijnlijk minder flessen plaatsen dan de aanbevolen hoeveelheid 6 ONDERHOUD Voor het schoonmaken van uw apparaat iets dat regelmatig dient te gebeuren haal de stekker uit het stopcontact of haal de stroom van het stopcontact Voor het eerste gebruik en regelmatig daarna raden we aan de binnenkant en buitenkant voorkant zijkanten en bovenkant scho...

Page 81: ...ratuur en de getoonde temperatuur niet overeenkomen Dit is normaal Het zal een paar uur duren voor dit gestabiliseerd is 9 ALS U UW WIJNKOELER MOET VERPLAATSEN Haal eerst de stekker uit het stopcontact Verwijder alle flessen en haal alle losse dingen eruit Om beschadiging aan de verstelbare poten te vermijden dient u deze er helemaal in te draaien Verplaats het apparaat rechtop bij voorkeur of kij...

Page 82: ...n is in de koeler geplaatst Het apparaat is vaak geopend De deur is niet goed gesloten De koeler staat niet correct De LED verlichting werkt niet De stekker zit niet in het stopcontact Een stop is gesprongen De LED verlichting is niet kapot De verlichting is uitgeschakeld Vibratie Controleer dat het apparaat vlak staat Het apparaat maakt veel geluid Een geluid dat lijkt op stromend water wordt ver...

Page 83: ...erwijdert worden U kunt bij de gemeente een indiceerde plaats aanvragen Elektrisch en elektronische producten kunnen gevaarlijke stoffen inhouden die schadelijk zijn voor mensen en het milieu en moet recycled worden Het symbool aan de kant geeft aan dat het een elektrisch en elektronisch toestel is en zijn dus artikelen van een selectieve collectie Het beeld geeft een afvalbak met een X teken aan ...

Page 84: ...en el mismo y o lesiones personales Mantenga este manual de instrucciones cerca del refrigerador de vinos para consultas futuras En caso de ventas asegúrese de que el documento se transfiera junto con el refrigerador para asegurar el óptimo funcionamiento de este Advertencias Para prevenir el deterioro de la junta de la puerta asegúrese de que la puerta esté completamente abierta antes de mover lo...

Page 85: ...guo apáguelo y desconéctelo del tomacorriente Corte el cable directamente detrás del aparato y retire la puerta para asegurarse de que los niños no queden atrapados dentro del mismo Si un refrigerador con una junta magnética en la puerta está siendo reemplazado por otro que tiene un pestillo en la puerta o en la junta asegúrese de que el pestillo esté desactivado antes de vender o desechar el mism...

Page 86: ...ricante Advertencia Los refrigeradores y congeladores viejos contienen gases aislantes y refrigerantes deben desecharse adecuadamente Póngase en contacto con su autoridad local o su distribuidor si tiene alguna pregunta Asegúrese de no dañar la unidad antigua antes de ser recogida por el servicio de eliminación de residuos correspondiente No exponga el aparato al fuego Gas refrigerante R600a Este ...

Page 87: ...a deficiente No utilice extensiones eléctricas adaptadores o tomacorrientes múltiples Compruebe que el tomacorriente de pared no esté dañado Un tomacorriente en mal estado puede hacer que el aparato se sobrecaliente y explote El refrigerador debe colocarse de manera que el enchufe sea de fácil acceso No tire tuerza o dañe el cable de alimentación Asegúrese de que el aparato esté siempre conectado ...

Page 88: ...ea riesgos de explosión No opere otros equipos eléctricos dentro del refrigerador mezcladoras molinete giratorio para helados etc Para desconectar su refrigerador sujete firmemente el enchufe y no tire del cable No exponga el refrigerador a la incidencia directa de la luz solar Mantenga el refrigerador alejado de velas luminarias y llamas para evitar riesgos de incendio Este aparato está diseñado ...

Page 89: ... presente manual Desembale el aparato y compruebe visualmente que no esté dañado Si presenta algún daño no lo conecte Conserve el embalaje e informe a su distribuidor o punto de venta de cualquier daño Se recomienda no conectar el aparato a la corriente durante al menos 4 horas El gas refrigerante necesita tiempo para asentarse luego de haber sido agitado durante la transportación si no se hace el...

Page 90: ... esté expuesta a la luz solar directa y lejos de estufas hornos y otros núcleos de calefacción No obstruya las aberturas de ventilación del refrigerador y asegúrese de que tenga una ventilación adecuada No abra la puerta si no es necesario Inspeccione regularmente las juntas de las puertas y asegúrese de que estén en buen estado Solución de problemas Cualquier trabajo eléctrico debe ser realizado ...

Page 91: ...para nivelar el refrigerador Para obtener mejor rendimiento de su refrigerador con el menor consumo de energía no lo coloque cerca de una fuente de calor calefactor cocina etc no lo exponga a la luz solar directa y no lo instale en una habitación demasiado fría Conecte el refrigerador a un tomacorriente de fácil acceso Cualquier pregunta o duda sobre la conexión a tierra debe dirigirse a un electr...

Page 92: ...stale cerca de fuentes de calor cocina radiador etc ni en una habitación demasiado fría Conecte el aparato a un tomacorriente independiente Asegúrese de esté perfectamente nivelado Esto evitará cualquier movimiento debido a la inestabilidad generando ruido o vibraciones y asegurará que la puerta se selle perfectamente Diagrama para instalación incorporada Estos refrigeradores para vinos pueden ser...

Page 93: ...en este modo la pantalla LED mostrará y la luz siempre estará encendida Para configurar la temperatura presione los botones o La temperatura aumentará o disminuirá en 1 C hasta alcanzar el ajuste deseado Los botones y a la izquierda de la pantalla LED controlarán la temperatura de la zona superior y a la derecha de la pantalla LED controlarán la temperatura de la zona inferior del refrigerador Not...

Page 94: ...or a 25 C sonará un pitido de alarma y se mostrará en la parte izquierda de la pantalla LED Cuando la temperatura de la zona inferior se mantiene durante más de 6 horas superior a 25 C sonará un pitido de alarma y se mostrará en la parte derecha de la pantalla LED Pulse cualquier botón para detener la alarma 4 Alarma de humedad baja cuando la humedad de la zona superior se mantiene durante más de ...

Page 95: ... bisagra superior izquierda y una inferior para que invierta la puerta siga las instrucciones a continuación 1 Retire los dos tornillos de fijación que mantienen la bisagra inferior derecha acoplada al conjunto del eje de la puerta luego retire la puerta 2 Retire el eje del orificio que está en la parte inferior izquierda de la puerta ...

Page 96: ...ástico decorativas del orificio de la bisagra superior izquierda 6 Retire el soporte izquierdo de la puerta 7 Instale la bisagra superior izquierda 8 Instale la bisagra inferior izquierda 9 Inserte tapas decorativas para cubrir los orificios de la bisagra superior derecha 10 Instale el soporte derecho de la puerta y fíjelo en el orificio de la bisagra inferior derecha ...

Page 97: ...serte el eje en el orificio inferior de la puerta 12 Coloque la puerta en el soporte de la bisagra superior izquierda alinee la puerta con la bisagra inferior y fije la bisagra inferior izquierda al conjunto del eje de la puerta ...

Page 98: ...no no se necesitan herramientas 2 Inserte la arandela y el tornillo en el orificio que se encuentra debajo de la junta de la puerta tenga en cuenta que la arandela debe estar dentro del orificio y los tornillos pasan a través del marco de la puerta Junta de la puerta Arandela Tornillo Manija Marco de la puerta Lado interno del marco la puerta El tornillo y la arandela deben colocarse en el orifici...

Page 99: ...bandeja de evaporación que se encuentra en la parte posterior del aparato cerca del compresor El calor producido por el compresor evapora el agua recolectada en la bandeja 5 ABASTECIMIENTO DEL REFRIGERADOR La cantidad máxima de botellas recomendada es solo indicativa para proporcionar una estimación rápida del tamaño del refrigerador similar a la capacidad expresada en litros de un refrigerador co...

Page 100: ...n en poco tiempo Un corte de energía de 1 o 2 horas no afectará la temperatura de su bodega Para proteger sus vinos durante un corte de energía evite abrir la puerta lo más posible Durante cortes de energía muy largos tome las medidas necesarias para proteger su vino Si el refrigerador está desconectado o si hay un corte de energía debe esperar de tres a cinco minutos antes de volver a encenderlo ...

Page 101: ...so 3 El problema no está descrito en la tabla al final de este manual IMPORTANTE Si el cable de alimentación suministrado está dañado debe ser reemplazado por el fabricante su agente de servicios técnicos o un especialista similar para evitar riesgos SI LOS PROCEDIMIENTOS DESCRITOS ANTERIORMENTE NO REVELAN NADA PÓNGASE EN CONTACTO CON EL DEPARTAMENTO DE VENTA POSTVENTA DE SU LOCALIDAD PRECAUCIÓN D...

Page 102: ...cantidad de alimentos en el refrigerador La puerta se mantiene abierta por mucho tiempo o se abre con mucha frecuencia La puerta no está bien cerrada Las luces LED no funciona El refrigerador no está enchufado El fusible está fundido Las luces LED están rotas El interruptor de luz está apagado Vibración excesiva Compruebe que el refrigerador esté sobre una superficie nivelada y revise si está pega...

Page 103: ...informarse en su ayuntamiento acerca de los lugares en los que puede depositar este producto De hecho los productos eléctricos y electrónicos pueden contener substancias peligrosas que tienen efectos nefastos para el medio ambiente o para la salud humana y deben ser reciclados El símbolo aquí presente indica que los equipos eléctricos o electrónicos deben de ser cuidadosamente seleccionados repres...

Page 104: ...omandazioni in prossimità dell apparecchio per riferimenti futuri e assicurarsi che il manuale venga trasferito con l apparecchi 2o se quest ultimo viene venduto o ceduto Ciò garantirà il funzionamento ottimale dell apparecchio Per evitare danni alla guarnizione della porta assicurarsi che la porta sia completamente aperta quando si tirano fuori le mensole Non spostare l apparecchio quando contien...

Page 105: ...rottamare l apparecchio scollegarlo dalla presa a muro tagliare il cavo di collegamento il più vicino all apparecchio possibile e rimuovere la porta al fine di evitare che i bambini vi giochino con il rischio di scosse elettriche o di rimanere intrappolati all interno Se un apparecchio con una guarnizione magnetica viene sostituito da un apparecchio con un chiavistello sulla porta o sulla guarnizi...

Page 106: ... ben aperte e garantire che l aria possa circolare specialmente se l apparecchio è incassato in una parete AVVERTIMENTO Non danneggiare il circuito refrigerante AVVERTIMENTO Non utilizzare apparecchi elettrici all interno del vano a meno che non siano consigliati dal produttore AVVERTIMENTO Gli impianti frigoriferi e isolanti contengono gas infiammabili Quando l apparecchio viene smaltito dovrebbe...

Page 107: ...ezza elettrica Si declina ogni responsabilità per quanto riguarda gli incidenti causati da una erronea installazione elettrica Non allungare il cavo di alimentazione Non utilizzare una prolunga o un adattatore o prese multiple Assicurarsi che la presa non sia danneggiata Una presa in cattive condizioni può causare il surriscaldamento dell apparecchio e farlo esplodere Assicurarsi che la presa a mu...

Page 108: ...DIANO Non conservare sostanze infiammabili o fluidi all interno dell apparecchio Questo creerebbe un rischio di esplosione Non conservare altri apparecchi elettrici all interno dell apparecchio Miscelatori macchine per gelato ecc Per scollegare l apparecchio afferrare saldamente la spina ed estrarla senza tirare il cavo Non esporre l apparecchio alla luce solare diretta Tenere l apparecchio lontan...

Page 109: ...lastica Informazioni importanti per l installazione Per garantire un collegamento elettrico appropriato seguire le raccomandazioni indicate nel presente manuale Rimuovere l imballaggio dall apparecchiatura e controllare visivamente che non sia danneggiata Non utilizzare un apparecchio danneggiato Informare il vostro rivenditore o punto vendita Di qualsiasi In tal caso conservare l imballaggio È co...

Page 110: ...apparecchio Installare l apparecchio nella zona fredda della stanza lontano da fonti di calore e dalla luce solare diretta Garantire all apparecchio una adeguata ventilazione non ostruire le prese d aria Non aprire la porta se non necessario Ispezionare regolarmente le guarnizioni e assicurarsi che consentano una chiusura corretta Soluzione dei Problemi Qualsiasi lavoro elettrico deve essere esegu...

Page 111: ...o consumo di energia non posizionare l apparecchio vicino ad una fonte di calore riscaldamento cucina ecc non esporlo alla luce solare diretta e non metterlo in una stanza troppo fredda Collegare l apparecchio ad una presa esclusiva facilmente accessibile Qualsiasi uccio o domanda sul collegamento elettrico e la mesa a terra deve essere rivolta ad un elettricista certificato o un centro di assiste...

Page 112: ...nere il meglio dal vostro apparecchio con il più basso consumo di energia non posizionare l apparecchio vicino ad una fonte di calore riscaldamento cucina ecc non esporlo alla luce solare diretta e non posizionarlo in una stanza troppo fredda Collegare l apparecchio ad una presa singola ed assicurarsi che sia livellato correttamente Ciò impedirà qualsiasi movimento dovuto all instabilità che può g...

Page 113: ...uce rimarrà accesa Premere e per regolare la temperatura dell apparecchio e ogni pressione sul pulsante si alterala temperatura di 1 C I pulsanti e a sinistra dello schermo LCD controllerà la temperatura della zona superiore i pulsanti e a destra dello schermo LCD controlleranno la temperatura della zona inferiore Importante dopo aver selezionato la temperatura desiderata il display continuerà a m...

Page 114: ...mette un segnale acustico di allarme e il lato sinistro dello schermo LCD visualizza Quando la temperatura della zona inferiore è superiore a 25 C per oltre 6 ore emette un segnale acustico di allarme e il lato destro dello schermo LCD mostra premere un tasto per interrompere l allarme acustico 4 Allarme bassa umidità Quando zona superiore ha un umidità è inferiore al 40 per oltre 3 ore il lato si...

Page 115: ...re ed una inferiore Per invertire la porta si prega di seguire le istruzioni qui sotto 1 Svitare le due viti che fissano l asse della porta sulla cerniera superiore e inferiore della cerniera quindi rimuovere la porta 2 Rimuovere l asse della porta dal foro in basso a sinistra della porta ...

Page 116: ...imuovere i tappi in plastica decorativi dalla cerniera superiore 6 Rimuovere il supporto porta a sinistra 7 Installare la cerniera superiore 8 Installare la cerniera inferiore 9 Inserisci le coperture fori delle cerniere superiori 10 Installare il supporto porta a destra e fissarlo sulla parte inferiore destra del foro ...

Page 117: ... la porta di 180 e inserire l asse delle porte in fondo all asse della porta 12 Mettere la porta sulla cerniera superiore sinistra allineare la porta con la cerniera inferiore e fissare l asse inferiore sinistro ...

Page 118: ...a guarnizione può facilmente essere spostata a mano non sono necessari attrezzi 2 Inserire la rondella e la vite nella fessura della guarnizione della porta si prega di notare la rondella deve trovarsi all interno della fessura e che le viti passano attraverso il telaio della porta lato interno del telaio della porta Vite e rondella devono essere collocati nello slot guarnizione della porta Estern...

Page 119: ...ici refrigerate dell apparecchi vengono scongelate automaticamente L acqua di sbrinamento viene convogliata in un vassoio di evaporazione che si trova nella parte posteriore dell apparecchio in prossimità del compressore Il calore prodotto dal compressore fa evaporare la condensa raccolta nel vassoio 5 Carico ll carico massimo per le bottiglie è solo indicativo prevedono una stima della dimensione...

Page 120: ...prodotto di pulizia delicato Risciacquare con acqua pulita e lasciare asciugare prima di ricollegare Non usare solventi o abrasivi Lavare il rivestimento in plastica sui ripiani in acciaio con una soluzione detergente e poi asciugare con un panno morbido I ripiani in legno non richiedono particolare manutenzione Quando l apparecchio viene acceso per la prima volta ci può essere un odore residuo In...

Page 121: ...o un arresto prolungato è possibile che inizialmente la temperature selezionate e quelle visualizzate non siano le stesse Questo è del tutto normale Ci vorranno un paio d ore prima che si ristabilizzino 9 SE AVETE BISOGNO DI SPOSTARE LA CANTINETTA In primo luogo scollegare l apparecchio Rimuovere tutte le bottiglie e fissare eventuali parti semoventi Per evitare di danneggiare le viti di livellame...

Page 122: ... elevata Troppe bottiglie all interno della cantinetta L apparecchio viene aperto frequentemente La porta non è chiusa correttamente La cantina non è stata montata correttamente Le luci a LED non funzionano L apparecchio non è collegato Il fusibile è bruciato Le luci a LED sono rotei L interruttore luce è spento Vibrazioni Controllare e verificare che l apparecchio sia livellato L apparecchio fa m...

Page 123: ...ed è quindi un dovere informarsi per conoscere il giusto smistamento del rifiuto Infatti i prodotti elettrici ed elettronici possono contenere sostanze pericolose che hanno effetti dannosi sull ambiente o sulla nostra salute e quindi devono essere riciclati Il simbolo al lato indica che le apparecchiature elettriche ed elettroniche fanno parte di una raccolta selettiva e differenziata rappresentat...

Reviews: