


-24-
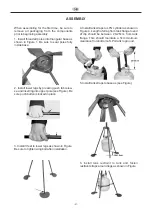
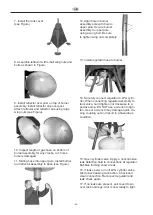
1. Allow at least 45 minutes for heater to cool
down after using.
2. Disassemble heater in reverse order that it
was assembled.
3. Place all hardware in provided tool bag.
4. Store unit in bag until ready to use again.
To assure safety, proper function and longevity
of the heater, regular maintenance is required.
The frequency of maintenance will depend on
the usage of the unit. Review the following con-
cerning the criteria for a properly functioning
heater. Failing to follow proper, regular mainte-
nance will void warranty. A hazardous condition
may result if a heater is used that has been modi-
fied or is not functioning properly. When the hea-
ter is working properly:
• The flame is contained within the heater.
• The flame is essentially blue with some yellow
tipping.
• There is no strong disagreeable odor, eye bur-
ning or other physical discomfort.
• There is no smoke or soot internal or external
to the heater.
• If your heater will not light or stay lit, contact a
qualified service person
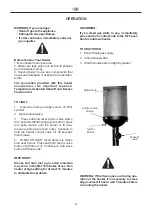
The parts lists and wiring diagram show the hea-
ter as it was constructed. Do not use a heater
which is different from that shown. In this regard,
use only the hose, regulator and cylinder con-
nection fitting (called a QCC fitting) supplied
with the heater. IMPORTANT Do not use alter-
nates. For this heater, the regulator must be set
as shown in Specifications. page2. If there is
any uncertainty about the regulator setting,
have it checked.
WARNING: Use only original replacement part-
s. This heater must use design-specific parts.
Do not substitute or use generic parts. Improper
replacement parts could cause serious or fatal
injuries. This will also protect your warranty
coverage for parts replaced under warranty.
All service work must be carried out by qualified service technicians.
STORAGE
&
SERVICING
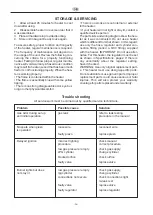
Trouble shooting
Problem
Possible cause
Solution
Gas odor during set up
gas leak
refer to leak testing
and initial operation
procedure in the manual
No spark when piezo
loose wire
reconnect wire
is operated
faulty piezo
replace piezo
Delayed ignition
incorrect lighting
check manual
procedure
correct procedure
low gas pressure / empty
check gas supply,
LPG cylinder
change cylinder
blocked orifice
check orifice
faulty valve
replace valve
Burner lights but does
low gas pressure / empty
check gas supply,
not stay lit
lpg cylinder
change cylinder
connections not secure
check connections tight,
re-leak test
faulty valve
replace valve
faulty regulator
replace regulator
E


