Catler MG 4010 Instruction Manual Download Page 10

8

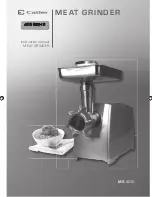
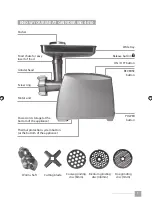
USING YOUR MEAT GRINDER MG 4010

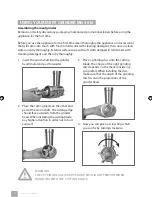
1.  Place the appliance on the fl at and dry 

surface. 

2.  Connect the power cord into the power 

outlet 230 V ~ 50 Hz. 

3.  Press POWER button and ON / OFF and 

REVERSE buttons will highlight in white. 


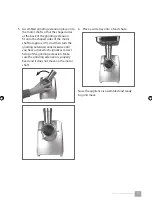
4.  Place meat on the tray. 

5.  Place a bowl or a plate under the grinder 

head into which grinding meat will fall. 

6.  Press ON/OFF button once to turn off  the 

appliance at highest speed. The backlight 
of ON/OFF button will illuminate in read. 
If you press ON/OFF button again, you 
will lower the speed. The backlight of 
ON/OFF button will illuminate in blue. 
Press ON/OFF button again and you will 
turn off  the appliance. 

7.  Using the supplied pusher you can push 

down meat through the food chute. 

WARNING 
DO NOT USE THE MEAT 
GRINDER CONTINUOUSLY 
FOR MORE THAN 
10 MINUTES. 

WARNING
USE ONLY THE SUPPLIED PUSHER TO PUSH INGREDIENTS DOWN THE 
FOOD CHUTE. NEVER USE YOUR FINGERS OR OTHER OBJECTS TO PUSH 
THE INGREDIENTS DOWN WHILE THE APPLIANCE IS RUNNING. 

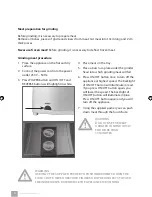
Meat preparation for grinding

Before grinding, it is necessary to prepare meat. 
Remove all bones, pieces of gristle and sinews from meat. Cut meat into 10cm long and 2 cm 
thick pieces. 

Never use frozen meat!

 Before grinding, it is necessary to defrost frozen meat. 

Grinding meat procedure

Summary of Contents for MG 4010

Page 1: ...MEAT GRINDER Instruction manual MEAT GRINDER MG 4010...

Page 2: ...MEAT GRINDER...

Page 3: ...CONTENT 2 Congratulations 3 Catler recommends safety first 5 Know your meat grinder MG 4010 6 Using your meat grinder MG 4010 11 Tips for using meat grinder 12 Care and cleaning 1 CONTENT...

Page 4: ...Congratulations on purchasing your Meat Grinder MG 4010 2 CONGRATULATIONS...

Page 5: ...table during operation Ensure that the surface is level clean and free of water Do not place the appliance on or near a hot gas burner electric element or where it could touch a heated oven Do not ope...

Page 6: ...may damage the power cord or the power outlet Disconnect the power cord from the power outlet by gently pulling the plug of the power cord Do not immerse the power cord plug or the appliance into wat...

Page 7: ...mm Medium grinding disc 4 8mm Fine grinding disc 3mm Pusher Food chute for easy insert of food Grinder head Screw ring Motor unit Power cord storage at the bottom of the appliance Thermal protection s...

Page 8: ...then dry thoroughly 1 Insert the worm shaft into the grinder head metal end part forwards 2 Place the cutting blade on the other end part of the worm shaft The cutting edge should face outwards from t...

Page 9: ...the shaped sides of the motor shaft at approx 45 And then turn the grinding extension anticlockwise until you hear a click which signalizes correct fixing of the grinding extension Make sure the grind...

Page 10: ...cklight of ON OFF button will illuminate in blue Press ON OFF button again and you will turn off the appliance 7 Using the supplied pusher you can push down meat through the food chute WARNING DO NOT...

Page 11: ...steak tartar it is recommended to mince meat twice using the medium grinding disc TIP Reverse function The reverse function serves to remove stuck meat in the grinder head At first turn off the appli...

Page 12: ...mble the grinding extension in the sink in order not to make the working surface dirty NOTE 1 Remove the tray 2 To remove the grinding extension press the release button and turn the extension clockwi...

Page 13: ...minced steaks burgers forcemeat At the same time using this disc you can prepare minced meat for chilli con carne musaka or stuffing for Mexican tacos This grinding disc is also suitable for mincing...

Page 14: ...ion in the kitchen sink or in a big bowl in order not to get the working surface dirty The meat rests which may stay in the grinder head throw away The parts which have come in touch with meat clean s...

Page 15: ...ow these instructions 1 Press ON OFF button to turn off the appliance Press POWER button and unplug the power cord from the power outlet 2 Let the appliance cool down for 60 minutes 3 Connect the powe...

Page 16: ...ing the potential negative impact on the environment and human health which could be caused as a result of improper liqui dation of waste Please ask your local authorities or the nearest waste collect...

Page 17: ...NOTES...

Page 18: ...NOTES...

Page 19: ...ZST151033...

Page 20: ...o continued product improvement the products illustrated photographed in this brochure may vary slight ly from the actual product MEAT GRINDER W W W C A T L E R E U CUSTOMER SERVICE I N F O C A T L E...

Reviews: