7
Setting up the
computer
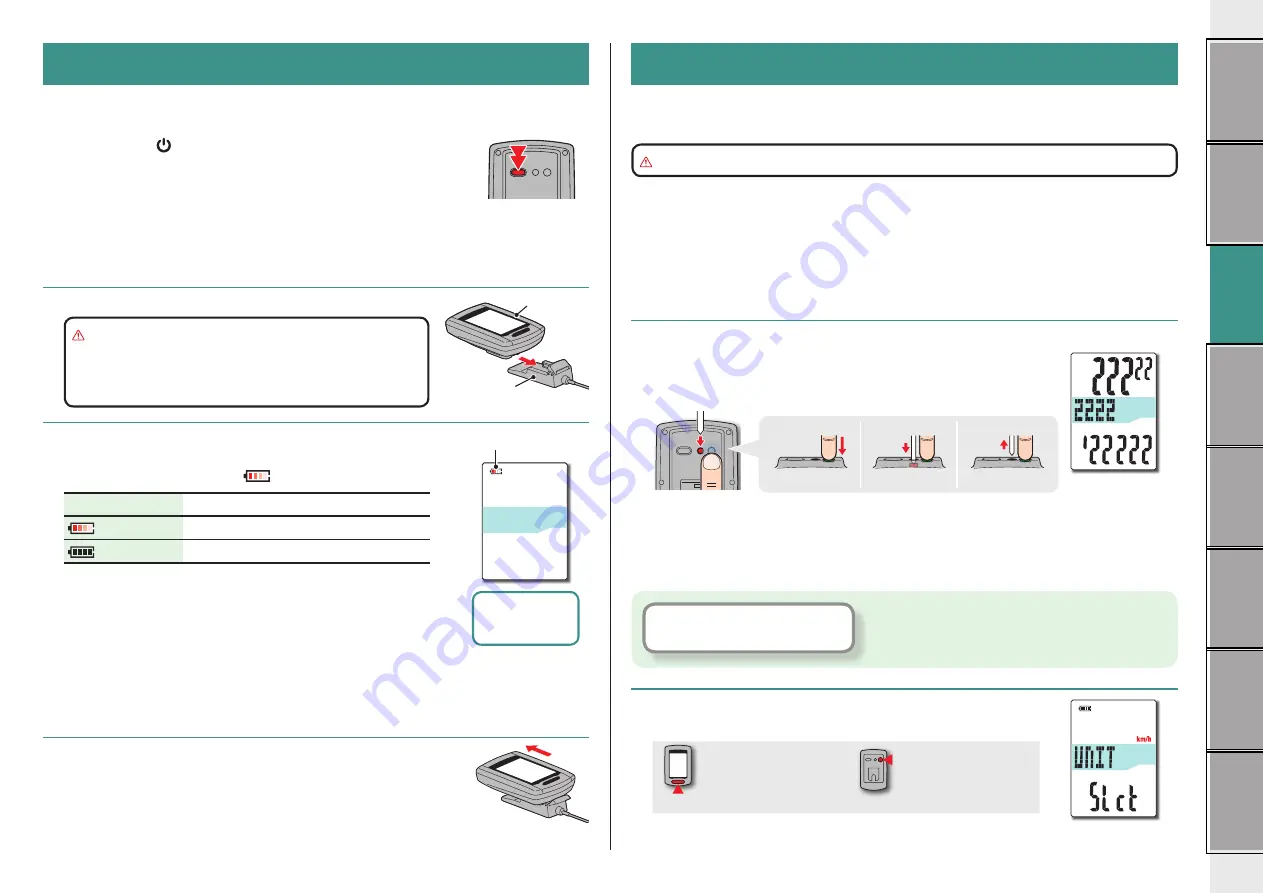
Perform the following formatting operation, when you use the unit for the first time or re-
store the unit to the condition before shipment.
Caution:
All data are deleted, and the computer is reset to the factory default.
* Complete setting up the computer without modification, even if you make a mistake in en-
tering or fail in pairing (*1) with any sensor while setting up the computer. You can change
the setting later, from the dedicated application “CATEYE Sync™” or from the menu screen
of the computer.
For details, see “Changing the computer configuration” (page 27).
*1: Pairing can be performed only from the menu screen of the computer.
For details, see “Pairing the sensor” on the menu screen (page 32).
1
Format (initialize)
Press the
MENU
button on the back of the computer and the
AC
button simultaneously. Release the
MENU
button when a test
pattern is displayed on the screen.
MENU
MENU
AC
AC
MENU
AC
MENU
AC
MENU
AC
1
2
3
* When all screen items light up without any test pattern dis-
played on the screen, the formatting operation has not been
completed properly. Perform the formatting operation again.
2
Select the speed unit
Select “
km/h
” or “
m/h
”.
MODE
km/h
↔
m/h
MENU
Register the setting
(Back)
Click the button, then a browser will open and a
video will be played back.
Setting up the computer
How to turn on/off the power / how to charge the battery
Power ON/OFF
Press and hold the button on the back of the computer for 2 seconds.
* Set up the computer when you turn on the power for the first time.
For details, see “Setting up the computer” (on the right of this page).
* When the remaining battery capacity is small, charge it according to
the following instructions.
How to charge
1
Set the computer to the cradle
Caution:
Do not set wet computer to the cradle, for
example after ride in the rain. It may cause
short circuit and damage the computer or
the data.
2
Insert the USB plug in your PC or a commercial
USB battery charger
Once charging is started, only
(battery icon) is displayed.
Icon
Description
(Animation)
Charging
(Light up)
Charging is completed
* When the computer is connected to your PC, the battery can-
not be charged with the PC in sleep state.
* With USB1.0, it takes time to charge.
* The battery charges to about 80% after approximately 90
minutes
* The standard charging time may change according to the
environment for use.
* The computer can be used for 10 hours on a full charge.
3
Remove the computer after charging is completed
Disconnect the USB plug from your PC or a USB battery char-
ger, and then remove the computer from the cradle.
* To remove the computer, press it out by hand while holding
the cradle.
Standard
charging time
Approx. 5 h
Test pattern
Battery icon
Cradle
Computer
(press & hold)


