background image


Page 9 of 14                                                                                 EQ2006  R.1.5                                                                         Rev. 02 dated 09/11/2007 

6.3)   SETTING  WORKS TIME-BREAK 

Inside the planning menu, press the push button PS3 to go in the parameter Works time-break

 
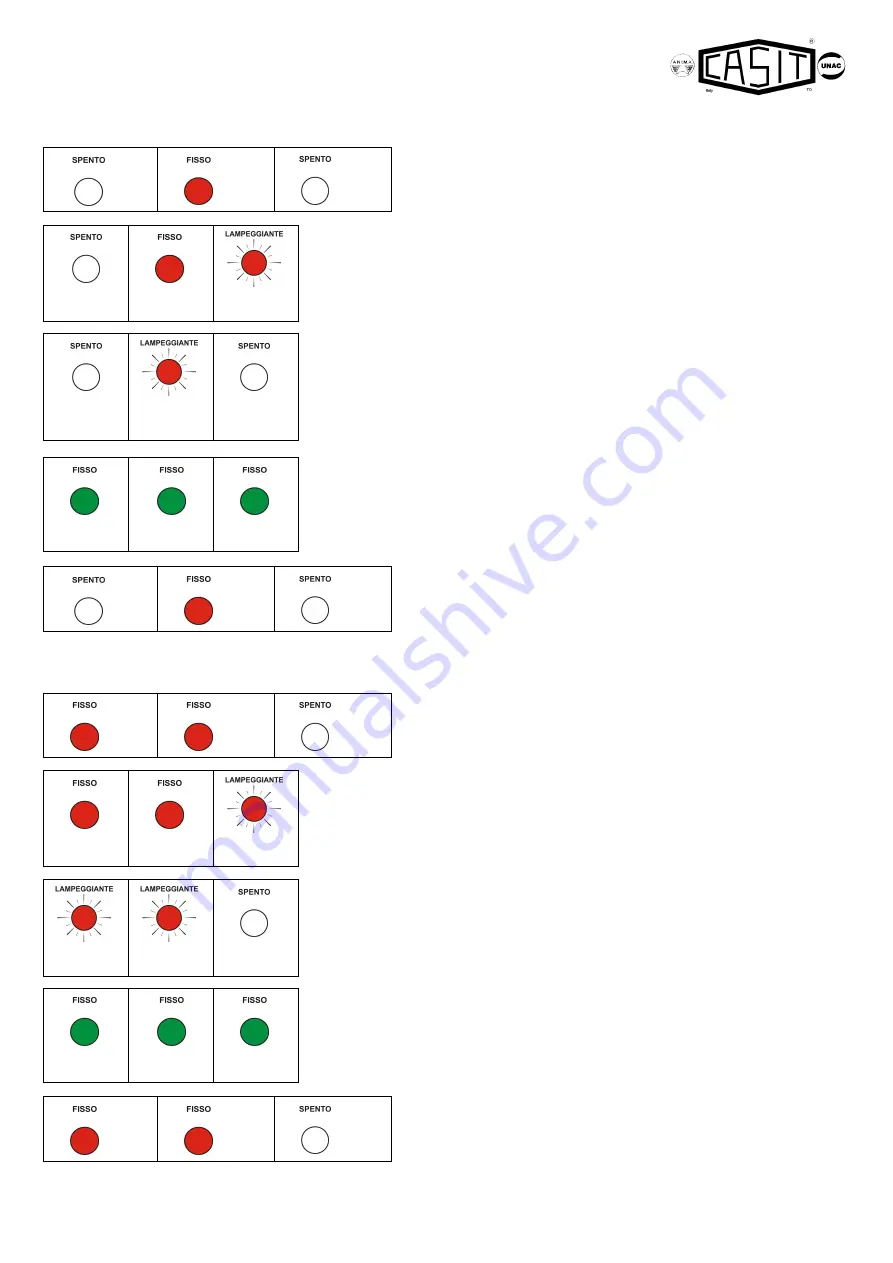
The state of the leds represented to the left side points out that it is 
in the menu related to the works time-break. 


Press and hold pressed the key PS1 for the time that you want to plan as break to open 
gate after a complete opening. The led SET will flash red every second during the 
calculation of the time. 


Send a short impulse with the key PS2. 
the led REV 2 flash asking the confirmation of the time of planned work. 
WARNING! If you want to repeat the setting of the time of work to this point press the key 
PS1 to go to the beginning conditions. 


To confirm, send a short impulse with the key PS2; the 3 leds switch on green fixed light 
for 2 seconds pointing out the memorization of the time of work 


Subsequently the control panel will be ready again in the initial  
planning  menu turning on fix red light the led REV 2. 


6.4)   SETTING OF THE PEDESTRIAN TIME-BRAK  

Inside the planning menu, press the push button PS3 to go in the parameter Pedestrian time-break  

 
The state of the leds represented to the left side points out that it is 
in the menu related to the Pedestrian time-break. 


Press and hold pressed the key PS1 for the time that you want to plan as break to open 
gate after a pedestrian opening. The led SET will flash red every second during the 
calculation of the time. 


Send a short impulse with the key PS2; 
the led REV1 and REV 2 flash asking the confirmation of the time of planned work. 
WARNING! If you want to repeat the setting of the time of work to this point press the key 
PS1 to go to the beginning conditions.. 


To confirm, send a short impulse with the key PS2; the 3 leds switch on green fixed light 
for 2 seconds pointing out the memorization of the time of Pedestrian time-break 


Subsequently the control panel will be ready again in the initial  
planning  menu turning on fix red light the led REV1 and REV 2. 


REV 1 


REV 2 

(red) 


SET 

REV 1 

REV 2 

(red) 

SET 

(red) 

REV 1 

REV 2 

(red) 

SET 

REV 1 

(green) 

REV 2 

(green) 

SET 

(green) 


REV 1 


REV 2 

(red) 


SET 


REV 1 

(red) 


REV 2 

(red) 


SET 

REV 1 

(red) 

REV 2 

(red) 

SET 

(red) 

REV 1 

(red) 

REV 2 

(red) 

SET 

REV 1 

(green) 

REV 2 

(green) 

SET 

(green) 


REV 1 

(red) 


REV 2 

(red) 


SET 

Summary of Contents for EQ2006

Page 1: ...F DIP 2 ON S1 DIP 1 ON DIP 3 ON ON When the contact of the timer is released the gate close after the time selected SLOW DOWN MOTORS it is possible to set the slow down motor in opening and closing du...

Page 2: ...common to the clamp 9 closing to the clamp 10 M6 11 12 Light of courtesy clean contact N O max 230V 4 Amp see S3 dip 8 M7 13 14 Output 12Vdc max 200 mA 14 15 Input N C SAFETY EDGE 1 In opening it arre...

Page 3: ...o the intervention of the safety edge 1 The flashing led L2 points out the condition of triac TH1 pilot motor 1 in damage L3 SAFETY EDGE 2 it switch on to the intervention of the safety edge 2 The fla...

Page 4: ...en the gate is closed and foto 1 obscurated the gate not open during the closing and foto 1 obscurated the gate stop and reopen when the foto1 is liberated in this operation is activated also the elec...

Page 5: ...e memorization involves to repeat the procedure of the first setting because the times of work and the setting of the reverse changes S2 dip 9 according to the used motors ON two motors OFF one motor...

Page 6: ...nal portion of the stroke in deceleration release the key PS1 in the point in which you desire to continue with the low speed If you want to effect the whole stroke with normal speed maintain pressed...

Page 7: ...aintain pressed PS1 and release it just at the end of the opening when limit switch is working FCA 1 Hold pressed the key PS1 to plan the last portion of opening for motor 1 in deceleration and releas...

Page 8: ...motor 1 WARNING If you want to plan the final portion of the stroke in deceleration release the key PS1 in the point in which you desire to continue with the low speed If you want to effect the whole...

Page 9: ...TIME BRAK Inside the planning menu press the push button PS3 to go in the parameter Pedestrian time break The state of the leds represented to the left side points out that it is in the menu related t...

Page 10: ...onnect the positive pole of the leds to the source of feeding and the negative pole of every leds to the clamp F of the relative terminal block Naturally the negative one of the source of feeding must...

Page 11: ...celeration ON strength range high OFF strength range low respectively on motors 1 and 2 During the reverse intervention a short flash red is gotten on the led REV 1 if it intervenes on the motor 1 or...

Page 12: ...the bridge The motors limit switches are missing of is not present the bridge among the input 20 21 23 24 and the commune Verify the limit switches of the motor or the presence of the bridge A key se...

Page 13: ...th several wires and always separate the power from the low tension Connect wires to the control box from the bottom through pass cables only MAINTENANCE To ensure product efficiency it is essential t...

Page 14: ...Page 14 of 14 EQ2006 R 1 5 Rev 02 dated 09 11 2007...

Reviews: