background image

EN-12

Power Requirements

Remove the battery compartment cover located in 

the center of TRACKFORMER’s bottom panel, and 

load six AA-size batteries into the battery 

compartment. Make sure the plus and minus ends of 

the batteries are facing as shown in the illustration.

Low Battery Indication

The following shows the amount of operating time that 
can be expected under battery power.

Approximately 4 hours

Using a high volume setting, low ambient 

temperature, and certain performance styles can 

shorten battery life.

IMPORTANT!

• General guidelines concerning battery life are 

provided above. Note that actual battery life depends 
on the type of battery being used.

• Replace batteries at least once a year. In particular, 

leaving dead rechargeable (eneloop, EVOLTA) 
batteries loaded in the product creates the risk of 
deterioration of the rechargeable batteries. Remove 
batteries from TRACKFORMER as soon as possible 
after they go dead.

• Be sure to turn off TRACKFORMER before replacing 

batteries.

• When replacing batteries, be sure to load a full set of 

six new AA-size batteries, or a set of fully charged 
AA-size rechargeable batteries (eneloop or 
EVOLTA). Using batteries other than those specified 
or mixing old and new batteries can greatly shorten 
battery life and result in malfunction.

Low battery power is 
indicated when the 12 
buttons of the EFFECT/
AUTO LOOP area flash. 
Replace batteries with new 
ones as soon as possible.

While TRACKFORMER is connected to a computer 
with a USB cable, it can be operated on the power 
supplied over the cable.

IMPORTANT!

• Incorrect connections can make normal operation 

impossible. Connect TRACKFORMER to a computer 
as described by the procedure below.

• Once you are able to connect successfully, you can 

leave the USB cable connected when you turn off 
your computer and/or TRACKFORMER.

• Use a USB 2.0 cable.
• TRACKFORMER does not charge rechargeable 

batteries. (Use the specified charger for charging.)

1.

Turn off TRACKFORMER and then start up 
your computer.

Do not start up your computer’s music software yet!

2.

Use a commercially available high-speed 
USB 2.0 cable to connect TRACKFORMER 
to your computer.

3.

Turn on TRACKFORMER.

For information about how to connect with a computer, 
see the separate Tutorial Manual.

4.

Start up music software on your computer.

IMPORTANT!

• Be sure to turn on TRACKFORMER before starting 

up your computer’s music software.
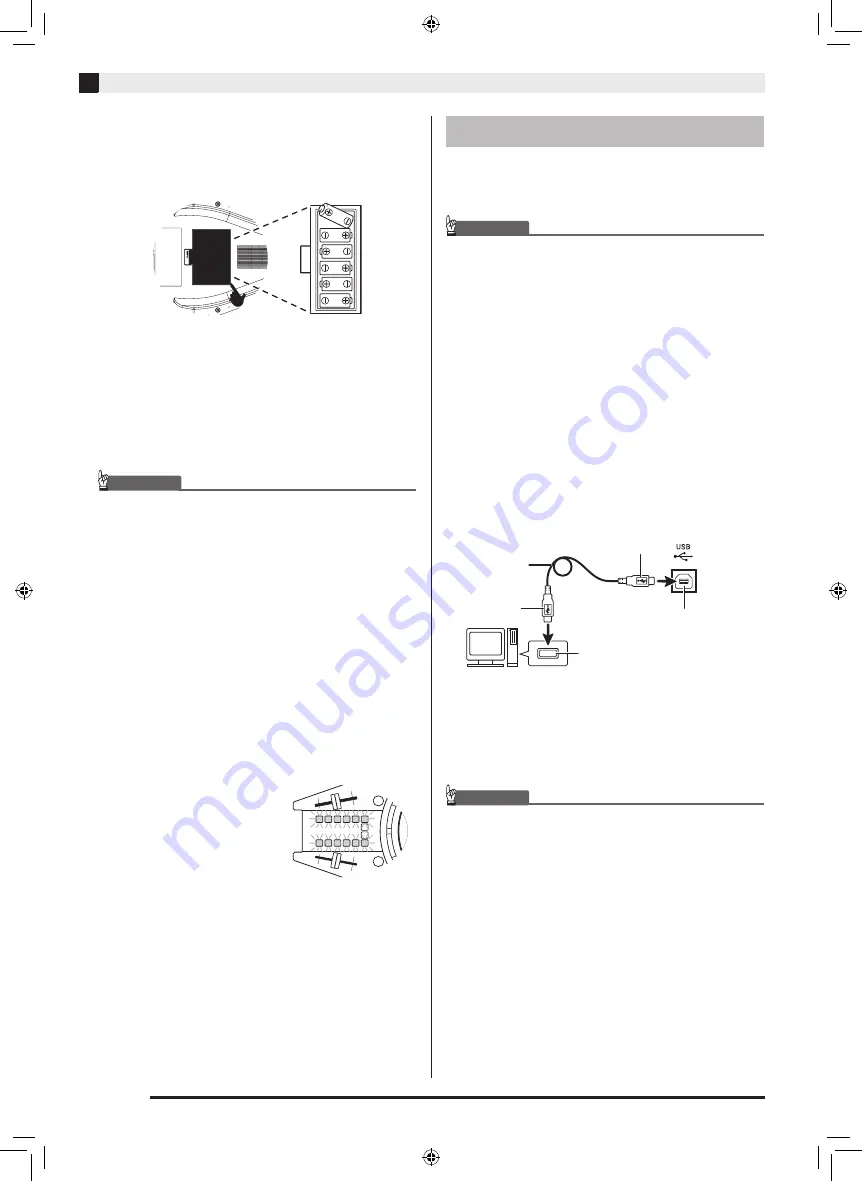
Using USB Bus Power

USB cable

(A-B type)

USB

A connector

Computer USB port

TRACKFORMER USB port

B connector

XWDJ1-ES-1A.indd   14

2014/11/28   17:15:49

Summary of Contents for Trackformer XW-DJI

Page 1: ...p world casio com Para la Gu a del usuario Tutorial por separado visite el sitio web de CASIO en la siguiente URL http world casio com Gu a del usuario Referencia de operaciones b sicas Please keep al...

Page 2: ...or has been dropped The apparatus shall not be exposed to dripping or splashing and that no objects filled with liquids such as vases shall be placed on the apparatus The P POWER indicator being unli...

Page 3: ...manual without the consent of CASIO is prohibited under copyright laws IN NO EVENT SHALL CASIO BE LIABLE FOR ANY DAMAGES WHATSOEVER ARISING OUT OF THE USE OF OR INABILITY TO USE THIS MANUAL OR PRODUCT...

Page 4: ...onal Accessories Use only accessories that are specified for use with this product Use of unauthorized accessories creates the risk of fire electric shock and personal injury Weld Lines Lines may be v...

Page 5: ...hem with water 2 Contact your physician immediately Leaving alkaline battery fluid in your eyes can lead to loss of sight Warning Smoke Strange Odor Overheating and Other Abnormalities Continued use o...

Page 6: ...d over the head or ingested Never place the plastic bag this product comes in over your head or in your mouth Doing so creates the risk of suffocation Particular care concerning this precaution is req...

Page 7: ...r documentation and precautions that come with them Connections Connect only specified devices and equipment to the product s connectors Connecting anything else creates the risk of fire and electric...

Page 8: ...hanges effect parameters 6 FILTER knob Rotating to the right results in high pass filter treble only output function while rotating to the left results in low pass filter bass only output function 7 M...

Page 9: ...LOOP 1 SHIFT 4L or 4R CUE 1 10 CUE POINT area Deletes CUE 1 POINT SHIFT 4L or 4R CUE 2 10 CUE POINT area Deletes CUE 2 POINT SHIFT 4L or 4R CUE 3 10 CUE POINT area Deletes CUE 3 POINT SHIFT 4L or 4R P...

Page 10: ...d positioned to allow CROSSFADER 5R 5L operations by either right handed or left handed DJs RIGHT SCRATCH selected LEFT SCRATCH selected Left hand fader operation Right hand JOG operation Right hand f...

Page 11: ...o mini plug This terminal outputs the playback of the deck whose sound is cut by the DJ software crossfader Initial default setting 21 AC adaptor terminal Connect the supplied AC adaptor Use of the AC...

Page 12: ...ER volume as far as it will go before connecting headphones and then adjust to the desired volume level after connecting XW DJ1 iOS Device XW DJ1 Mac Windows Connection Examples XW DJ1 iPad iPhone iPo...

Page 13: ...se the supplied power cord with any other device About the AC adaptor that comes with TRACKFORMER Plug the AC adaptor into a power outlet that is located close to TRACKFORMER Should you ever notice an...

Page 14: ...other than those specified or mixing old and new batteries can greatly shorten battery life and result in malfunction Low battery power is indicated when the 12 buttons of the EFFECT AUTO LOOP area f...

Page 15: ...ing down the A button while you press the P Power button to turn on TRACKFORMER IMPORTANT TRACKFORMER supports operation using one of three different power supplies Note however that the amount of pow...

Page 16: ...djay2 for iPad iPhone app djay2 for iPad iPhone will automatically recognize TRACKFORMER and the CASIO logo should appear on the startup screen IMPORTANT If the CASIO logo does not appear on the start...

Page 17: ...R channels of MASTER OUT and the L and R channels of HEADPHONE OUT for pre cueing output z Sound output from TRACKFORMER MASTER OUT can be selected by changing the position of the djay2 for iPad iPho...

Page 18: ...und to be output from MASTER OUT 2 Press the deck B PLAY button At this time the deck B track which is the next one to be mixed will be output to the headphones 3 Move the JOG platter that is specifie...

Page 19: ...ack a section of a track Loops can be woven together for virtually unlimited DJ mixing creativity z Pressing the LOOP button in the AUTO LOOP area creates a loop a specified number of beats long z Pre...

Page 20: ...y computer does not recognize TRACKFORMER For information about how to connect with a computer see the separate Tutorial Manual Confirm that the specifications of your computer satisfy the TRACKFORMER...

Page 21: ...fe AC adaptor Auto Power Off 3 way power system 5V 500mA 6 AA size manganese or alkaline batteries or Panasonic Group AA size rechargeable eneloop batteries or AA size rechargeable EVOLTA batteries Ap...

Page 22: ...lectrical load output to exceed the label rating 12 Make sure the surrounding area is dry before plugging into a power source 13 Make sure the product is oriented correctly 14 Unplug the product durin...

Page 23: ...p world casio com Para la Gu a del usuario Tutorial por separado visite el sitio web de CASIO en la siguiente URL http world casio com Gu a del usuario Referencia de operaciones b sicas Please keep al...

Reviews: