background image

– 51 –

Deleting Data

Use these procedures to delete data.

 Deleting a Single Data Item

This procedure can be used in the Telephone Directory, Memo, Schedule, Re-
minder, To Do, and Expense Manager modes.

To delete a single data item

1. Enter the mode that contains the data you want to delete, and recall the data

(page 48).

If you are using the index display (page 26), move the data item into the first line
of the index display.

If you are using the data display (page 26), simply display the item.

2. Press 

DEL

 and the message “DELETE RECORD (Y/N)?” appears on the

screen.

Instead of pressing 

DEL

, you could press 

FUNC

 and then input the correct number

of select “Delete record” (“Delete selected record” in the Expense Manager Mode).

3. Press 

Y

 to delete, or 

N

 to abort.

 Deleting All Data Items In a Mode

The procedure you should use depends on whether the mode whose data items you
are deleting has multiple files (Telephone Directory, Memo, To Do, Expense
Manager) or not (Schedule, Reminder).

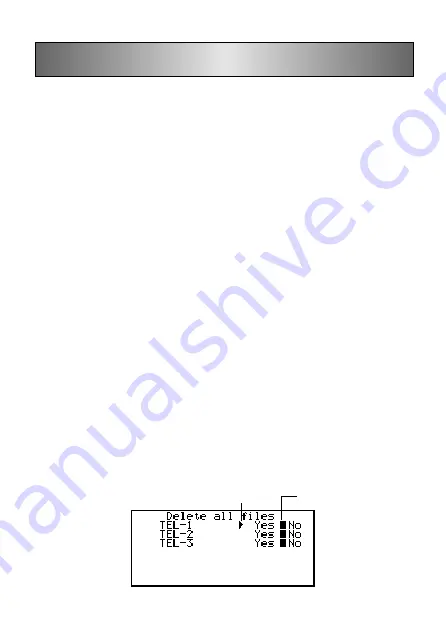
To delete all data items from a multiple file mode (Telephone
Directory, Memo, To Do, Expense Manager)

1. Display the initial screen of the mode that contains the data you want to delete.

You can display the initial screen for any file.

2. Press 

FUNC

 and then select “Delete all files”.

Marker (current setting)

Pointer (selected file)

Summary of Contents for SF-5580

Page 1: ...Q SF 5580 SF 5780 SF 5980 Owner s Manual ...

Page 2: ...ient or relocate the receiving antenna Increase the separation between the equipment and receiver Connect the equipment into an outlet on a circuit different from that to which the receiver is connected Consult the dealer or an experienced radio TV technician for help FCC WARNING Changes or modifications not expressly approved by the party responsible for compliance could void the user s authority...

Page 3: ... cover in place and open the cover RESET 2 Load two new batteries into the battery compartment Make sure that the positive and negative ends are facing correctly RESET 3 Replace the battery compartment cover and secure it with its screw Take care that you do not overtighten the screw 4 Pull the insulating tape from the back up battery by pulling in the direction indicated by the arrow printed on t...

Page 4: ...econds the Home Time screen appears 8 Press FUNC select Time set and then use the procedure on page 18 to set the Home Time If you turn power off without setting the Home Time the SET TIME message appears the next time you turn power on The Digital Diary will not operate properly until you set the Home Time Important Turn on the unit at least once a month to check the current condition of the batt...

Page 5: ...on the display when you turn on power it means that the main batteries are low Replace the batteries page 13 and press the RESET button to resume normal operation Be sure to press the RESET button page 2 after loading main batteries for the first time or if the previous set of batteries went dead ...

Page 6: ...ewhere 8 Important Precautions 8 Getting Started 9 General Guide 9 Display 10 All Reset 11 Power Supply 12 Turning Power On and Off 15 Function Menus 16 System Language 16 Display Contrast 16 Key Input Sound 16 Destructive Backspace 17 Home Time Mode 18 Using the Daily Alarm 19 World Time Mode 21 Zone Information Screen 22 Data Bank Operations 24 Inputting Text 24 ...

Page 7: ...ment Markers 31 Highlighting Calendar Dates 32 Working Day Count 33 Weekly Schedule Screen 33 Schedule Keeper 34 Maneuvering Around Schedule Keeper Dates 34 Schedule Alarms 36 How Schedule Keeper Data is Sorted 36 Schedule Type Labels and Icons 36 Daily Schedule Screen 38 Reminder Mode 39 Reminder Alarms 40 To Do Mode 41 Record Summary 42 How To Do Data is Sorted 43 Priority Icons 43 ...

Page 8: ...ial Character Search 48 Wild Card Search 49 Date Search 49 Editing Data 50 Deleting Data 51 Deleting a Single Data Item 51 Deleting All Data Items In a Mode 51 Deleting Marked Data Items Only 52 Deleting All Data Items In Specific Modes 53 Secret Function 54 Conversion Modes 56 Metric Conversions 57 Currency Conversions 57 Game Modes 59 Poker Game 59 Blackjack Game 61 Calculator Mode 63 ...

Page 9: ... 66 Setting Up for Data Communications 66 Sending Data 68 Sending All Data Items In a Mode 69 Technical Appendix 71 Memory Capacity 71 How the Digital Diary sorts data 72 Error Messages 73 Message Table 73 Specifications 74 ...

Page 10: ...irt and dust Avoid dropping the Digital Diary and otherwise subjecting it to strong impact Never bend or twist the Digital Diary Never try to take the Digital Diary apart Do not use a pen pencil or other sharp object to press keys To clean the exterior of the Digital Diary wipe it with a soft cloth dampened in a weak solution of a mild neutral detergent and water Be sure to wring out any excess mo...

Page 11: ...e sure you read this part of the manual General Guide Function key Cursor keys ESC key Alpha keyboard Scroll Search keys ON OFF key Mode keys Light key 10 key pad Operator keys Display Change key Memory keys Mode key Display ...

Page 12: ...ry life Press the LIGHT key again to manually turn off the backlight when you are finished using it Display Indicators C DATA SNOOZE INDEX NEW EDIT CODE CAPS SHIFT DAILY KEY K L w f 2 1 3 4 5 6 7 8 9 0 q 1 Telephone Directory Mode 2 Memo Mode 3 To Do Mode 4 Reminder Mode 5 Schedule Keeper Mode 6 Calendar Mode 7 Expense Manager Mode 8 Home Time World Time Mode 9 Calculator Mode 0 Conversion Modes q...

Page 13: ...the all reset operation 1 Turn power off 2 Press the RESET button on the back of the Digital Diary with a thin pointed object 3 Now you should press Y for yes or N for no in accordance with the conditions described below When to press Y for yes When this is the first time you are using the unit When you want to reset the unit and clear all data and settings When you are resetting the unit after a ...

Page 14: ...procedure on page 18 to set the Home Time If you turn power off without setting the Home Time the SET TIME message appears the next time you turn power on The Digital Diary will not operate properly until you set the Home Time Following are the initial settings of the unit after you perform the all reset operation Home Time New York JAN 1 1996 MON 12 00 AM 12 hour format World Time London Daily Al...

Page 15: ... the Digital Diary Battery Precautions Incorrectly using batteries can cause them to burst or leak possibly damaging the interior of the Digital Diary Note the following precautions Be sure to use alkaline batteries only to power this Digital Diary Be sure that the positive side of each battery is facing in the correct directions Never mix batteries of different types Never mix old batteries and n...

Page 16: ...ss the ON key 1 Press OFF to turn power off 2 Remove the screw that holds the battery compartment cover in place and open the cover RESET 3 Remove both old batteries and replace them with new ones Make sure that the positive and negative ends are facing correctly 4 Replace the battery compartment cover and secure it with its screw Take care that you do not overtighten the screw 5 Press the RESET b...

Page 17: ...ts positive side is facing up so you can see it 5 Replace the battery compartment cover and secure it with its screw Take care that you do not overtighten the screw Turning Power On and Off Press ON OFF to turn power on and off Important If nothing appears on the display when you turn on power it means that the main batteries are low Replace the batteries page 13 and press the RESET button to resu...

Page 18: ...NC and then select Language 2 Press the number key that corresponds to the language that you want to use To select English you would press 1 The system language automatically changes to English whenever you perform the RESET operation page 11 Note In this manual all display messages are shown in English Display Contrast Use the following procedure to make the figures on the display darker or light...

Page 19: ...while the key input sound is on 3 Press OK to quit Destructive Backspace When destructive backspace is turned on the character at the cursor position is deleted when you press the BS key To turn destructive backspace on and off 1 Press SHIFT FUNC and then select Backspace 2 Use H and J to turn destructive backspace on and off 3 Press OK to quit Currently selected setting ...

Page 20: ...e zone later if you like When you do only the zone changes without affecting the time or date setting To set the time and date 1 In the Home Time Mode press FUNC and then select Time set The hour setting flashes on the display Use H and J to move the flashing selection around the display 2 Input numbers for the year month day hour and minutes Input the year as four digits in the range of 1901 thro...

Page 21: ...want to use The following shows and example of each format 1 Month Date Year JAN 1 1996 MON 2 Date Month Year 1 JAN 1996 MON 3 Year Month Date 1996 1 1 MON The date format you select is applied in all modes Using the Daily Alarm The Daily Alarm it sounds at the same time every day for 20 seconds and the Daily Alarm screen appears To change the Daily Alarm time 1 In the Home Time Mode press FUNC an...

Page 22: ...es In this case you do not press any key the alarm sounds a total of three times and then stops Pressing the SPACE key while an alarm is sounding stops the alarm and resets the snooze feature for three more alarm operations spaced at 10 minute intervals Pressing any key besides the SPACE key while an alarm is sounding stops the alarm and cancels the snooze feature so the alarm does not sound again...

Page 23: ... zone Hold down either button to scroll at high speed To change a World Time zone s settings 1 In the World Time Mode display the zone you want 2 Press FUNC 3 Switch between 12 24 hour page 19 switch between standard and daylight saving time page 19 and set the date format page 19 Timekeeping format and date format settings are applied to all World Time zones and to the Home Time Mode The standard...

Page 24: ... HOME WORLD To change zone information screen content Note If you change the city name of the zone information screen the name you input will also appear on the Home Time and World Time screens 1 In the World Time Mode display the zone you want 2 Press FUNC and select Zone change 3 Change the contents of the screen Use H and J to move the cursor You can input up to 13 characters for the city name ...

Page 25: ... 00 01 02 03 04 05 06 07 08 09 10 11 12 13 14 15 16 17 San Francisco Seattle Las Vegas El Paso Dallas Mexico City Houston Washington D C Boston Montreal Caracas Sao Paulo Buenos Aires Greenwich Mean Time Paris Madrid Amsterdam Berlin Cairo Athens Helsinki Beirut Jeddah Kuwait Nairobi Dubai Jakarta Hanoi Beijing Taipei Singapore Manila Seoul Pyongyang Guam Port Vila Wellington The time difference v...

Page 26: ...y to tell you what entry needs text input To move the cursor around the screen Use K L H and J Note The maximum number of characters you can input for each data item is 255 including newline symbols and separator marks page 25 To input letters and numbers Press the key that is marked with the letter or number To input upper case letters Press CAPS to switch between upper case and lower case letter...

Page 27: ...rator marks Each press of B inputs a newline symbol Don t confuse the newline symbol with the separator mark which is automati cally added at the end of data that you are inputting when you press OK to advance to the next entry Separator marks are not shown when you recall data To change one character to another 1 Move the cursor to the character you want to change 2 Input the character you want t...

Page 28: ... Formats Two display formats data display format and index display format are used Press DISP CHNG to switch between the index and data display formats Data Display Format Telephone Directory The data display format shows all the entries Use K and L to scroll line by line Index Display Format Telephone Directory The index display format shows a list of one or two entries only The item that is in t...

Page 29: ...last name first and press OK 3 Input any telephone numbers company name address e mail address and note or title pressing OK after each one Prompts appear on the display telling you what to input After the last entry pressing OK stores the data and returns to the index display page 26 Data is automatically sorted alphabetically according to the name entry Note You must input a name After that you ...

Page 30: ... select List type 3 Press the number key that corresponds to the entry you want to appear on the index display The unit changes back to the index display showing the data you specified Record Summary The record summary provides an overview of each Telephone Directory file To display the record summary In the Telephone Directory Mode press FUNC and then Select Record summary Press ESC to return to ...

Page 31: ...st line and press B A newline symbol is inserted and the cursor goes down to the next line 3 Input the rest of your memo 4 Press OK to quit and return to the index display page 26 To change a file title Use the same procedure as that described for changing a Telephone Directory file title on page 27 Record Summary The record summary provides an overview of each Memo Mode file To display the record...

Page 32: ...ate according to the Home Time setting is selected by the date cursor Maneuvering Around Calendars The following describes the basic operations for maneuvering around the calendars Use K L H and J to move the date cursor Holding down any of these keys moves the date cursor at high speed Press to move the date cursor to the first of the previous month and to move to the first of the following month...

Page 33: ...o 999 4 Press Y to include holidays or N to exclude holidays A holiday is any highlighted date About the active calendar The calendar on the left side of the display is the active calendar All Calendar Mode operations are performed on the active calendar Appointment Markers Appointment markers appear next to each date that contains data in the Schedule Keeper Mode or Reminder Mode Morning Schedule...

Page 34: ...d the end month 12 and year 97 3 Press OK SUN is flashing because it is selected 4 Use H and J to move the flashing Press SPACE to highlight or unhighlight a day of the week You can specify highlight as many days of the weeks as you like 5 After selecting the days you want press OK You can unhighlight any date by selecting it with the date cursor and pressing SPACE To clear days of the week for mu...

Page 35: ...ursor to a date before the starting date the working day count is negative Weekly Schedule Screen A weekly schedule screen that lets you see everything for an entire week at a glance To display the weekly schedule screen 1 In the Calendar Mode move the date cursor to the week you want to view 2 Press DISP CHNG Use K and Lto move the date cursor day by day or and to jump week by week 3 Press ESC to...

Page 36: ...te To enter the Schedule Keeper Mode Press SCHEDULE to display the initial Schedule Keeper Mode screen Pressing SCHEDULE in the Calendar Mode displays the Schedule Keeper for the date where the date cursor is located inside the calendar or weekly schedule screen Maneuvering Around Schedule Keeper Dates The following describes the basic operations for selecting a date to input Schedule Keeper data ...

Page 37: ...ta on the display simply start inputting the description and the previous data will disappear 3 Press K and the schedule type specification starts to flash Do not press or Doing so will start a search using the text you input page 48 4 Press H or J to display the schedule type selection menu If you do not want to change the default setting of Schedule Type 1 press K again without pressing H or J 5...

Page 38: ...put by pressing OK without inputting anything Schedule Alarms An alarm sounds for 20 seconds and the corresponding Schedule Keeper data appears on the display Note the following important points when you are using a Schedule Alarm The snooze feature is applied to the same day alarm also just like the Daily Alarm See About the snooze feature on page 20 for details The alarm indicator and time are a...

Page 39: ...nd to move between menu screens 7 When the icon you want is selected press OK to register it and return to the schedule type menu 8 Press OK to store all your changes and return to the initial Schedule Keeper Mode display You could change the schedule type label before pressing OK in step 8 if you have not already done so To specify Schedule Keeper Mode index display contents 1 Press SCHEDULE to d...

Page 40: ...an use K L and to scroll to another day 3 Press DISP CHNG to return to the Schedule Keeper data screen To input multiple day schedule data 1 Display the Schedule Mode daily schedule screen 2 Press FUNC and then select Set multi day schedule 3 Input the starting date and the ending date and then press OK 4 Input the description of the appointment page 35 and specify the schedule type page 36 Note t...

Page 41: ...edule Keeper Mode See page 36 for details If you select a previous day alarm alarm setting of 24 00 the alarm sounds at noon the day before date you specified for the Reminder Mode data item 4 After setting the alarm press OK to advance to icon input At this time the icon in the upper right of the display starts to flash 5 Press H or J to display the icon menu If you do not want to change the icon...

Page 42: ... to stop the alarmandreturn to the screen that wasshownbeforethealarmbegantosound Note the following important points when you are using a Reminder Alarm The snooze feature is applied to the same day alarm also just like the Daily Alarm See About the snooze feature on page 20 for details If the alarm time is reached during data communications the alarm does not sound until you complete the communi...

Page 43: ...o file 2 Input the date for the item and then press OK to move to the priority 3 Press Hor J to display a menu of priority levels 4 Input a number from 1 to 8 to assign a priority 5 Press OK to advance to the description and then input text 6 While the cursor is in the description area press OK to store all the data Note You must input a description You can skip any input by pressing OK without in...

Page 44: ...nd then select List type 3 Use K and L to move the pointer next to the priority you want to change and then use H and J to change the setting To Do Mode entries of a priority set to Yes appear in the index display while those with priorities set to No do not 4 Press OK to quit and return to the index display Record Summary Therecordsummaryprovidesaquickviewofhowmanydataitemsarestoredineach To Do M...

Page 45: ... icon you want to use Use and to move between menu screens 6 WhentheiconyouwantisselectedpressOKtoregisteritandreturntothepriority menu 7 Press OK to return to the initial To Do Mode display To check and uncheck a To Do item 1 Display the initial To Do Mode screen and press or to display the index display 2 Move the item you want to check or uncheck in the top line of the display 3 Press OK to che...

Page 46: ...to the expense type You can also start data input while the Expense Manager index display or data display is on the screen by pressing FUNC and then selecting Daily expense 3 Press H or J to display a menu of expense types 4 Select an expense type and then press OK to advance to the amount The icon assigned to the expense type you select appears on the screen 5 Input the amount of the expense and ...

Page 47: ...es 3 Use K and L to move the pointer to the expense type you want 4 Input up to 13 characters for the label Skip this step if you don t want to change the expense type label or if you want to wait until after you change the expense icon 5 Press DISP CHNG to display the menu of expense icons If you do not want to change the icon assigned to this expense type skip steps 5 through 7 6 Use K L H and J...

Page 48: ... change the setting Expense types set to Yes appear in the index display while those set to No do not 4 After you are finished press OK to return to the index display Payment Type Labels Payment type data includes a label that appears on the screen whenever you display the expense data To change these labels use the procedure under To change expense type labels and icons on page 45 The only differ...

Page 49: ...e initial Expense Manager screen and then press K L or to change to the index display 2 Press FUNC and then select Report 3 Input the starting date and the ending date and then press OK Pressing OK produces an expense report like the one shown below 4 Use and to change screens to view other 5 Press ESC to return to the Expense Manager Mode initial display Record Summary Therecordsummaryprovidesaqu...

Page 50: ...e data on the display Initial Character Search Initial character search can be used in the Telephone Directory Memo Schedule Reminder Expense Manager and To Do modes To recall data using initial character search 1 Enter the mode where you want to search for data Initial character search can be started from the initial screen the index display or the data display 2 Input the first few characters of...

Page 51: ...te Smythe etc 4 Use and to scroll between matching data items when there is more than one match Date Search Date search can be used in the Schedule Keeper and Reminder modes To recall data using date search 1 Enter the mode where you want to search for data Date search can be started from the initial screen the index display or the data display 2 Press FUNC to display the function menu and then Se...

Page 52: ...ecall the data page 48 2 Change to the data display 3 Press FUNC and then Select Edit record 4 Make any changes in the data that you want 5 Press OK to quit Notes With Schedule Keeper data you cannot use the above procedure to add start end and alarm times to existing data items You can however change existing start end and alarm times With the Reminder data you can use the above procedure to add ...

Page 53: ... the screen Instead of pressing DEL you could press FUNC and then input the correct number of select Delete record Delete selected record in the Expense Manager Mode 3 Press Y to delete or N to abort Deleting All Data Items In a Mode The procedure you should use depends on whether the mode whose data items you are deleting has multiple files Telephone Directory Memo To Do Expense Manager or not Sc...

Page 54: ...hile the Schedule Keeper Mode index display is on the screen press FUNC and then select Delete listed records At this time the message DELETE LISTED RECORDS Y N appears 3 Press Y to delete or N to abort Pressing Y deletes only the records whose schedule types you have specified in step 1 for display in the index display Important Be sure to specify the contents of the Schedule Mode index display i...

Page 55: ...lete all data items in specific modes 1 From any screen press SHIFT FUNC and then select Delete all 2 Use K and L to move the pointer next to the mode whose setting you want to change and then use H and J to change the setting The files in modes set to Yes will be deleted while those set to No will not If all modes are set to Yes this procedure deletes all data in all modes 3 After you are finishe...

Page 56: ...rotected mode the password input screen will appear and you will have to input the registered password before you can access these modes To access protected modes 1 Turn on Digital Diary power 2 Press the mode key for one of the protected modes INPUT PASSWORD appears on the display If you were in a protected mode the last time you turned power off INPUT PASSWORD appears as soon as you turn on the ...

Page 57: ...hen select Password 4 Select Delete password which causes a confirmation message to appear asking if you really want to delete your password 5 Press Y to delete or N to abort After you delete the password data protected modes can be viewed by anyone To lock memory without turning power off 1 While using the Digital Diary after you have input your password press SHIFT FUNC and then select Password ...

Page 58: ...ter the Conversion Modes 1 Press CONV to display the initial Unit Conversion Mode screen 2 Press CONV again to change to the Currency Conversion Mode page 57 and display the initial Currency Conversion Mode screen Equivalent 1 inch 2 54cm Conversion direction Unit Equivalent Conversion direction Currency Input result area Input result area ...

Page 59: ...nd press OK to display the conversion result 5 If you want to view your original input value press OK again Currency Conversions Use the Currency Conversion Mode to convert between various currencies The following are the default currency names that the unit uses You can change the default currency names to other currency names if you want USD U S Dollar DM Deutsche Mark GBP British Pound ITL Ital...

Page 60: ...at one of the currency rates is normally set to 1 To set up a conversion pair where 1 unit of Currency A equals 100 units of Currency B you could use either of the following Currency A rate 1 Currency B rate 100 Currency A rate 0 01 Currency B rate 1 To leave either currency name or rate unchanged in the above procedure simply press OK without inputting anything To perform a currency conversion 1 ...

Page 61: ... The following describe rules and procedures for playing the poker game Poker Game Rules The game is 5 card draw Unlike standard poker you do not play against other players Instead you try to accumulate points The following table shows how many point are awarded for each type of hand Your points Mode name Game over indicator You win indicator Bet amount Bet indicator Your hand Your points Mode nam...

Page 62: ...amount if you want 3 Press H to start the game The first five cards are dealt 4 Use number keys 1 through 5 to select which cards you want to keep 1 through 5 from left to right Pressing a number key causes the letter H for Hold to appear above the corresponding card To deselect a card press its number button again so the H disappears You can mark anywhere from no cards to all your cards 5 After y...

Page 63: ...re appearing on the display whenever the dealer s first card is an ace Press I to insure when offered Insuring costs you one half of your original bet If the dealer ends up getting a blackjack your insurance bet wins and your original bet loses a push If the dealer does not get blackjack the insurance bet loses and you continue to play your hand You are offered the opportunity to double down by th...

Page 64: ...ess than 21 repeat step 3 6 When you don t want any more cards press S to tell the dealer you want to stand At this time the dealer s hand is completed and the winner is determined If you win the Win indicator appears and the number of points based on your hand and the amount you bet are added to your point total see the table If you lose the Win indicator does not appear and your point total rema...

Page 65: ...er values Press to input a decimal point Use and to specify the arithmetic operation that is marked on each key executes a calculation and displays its result Use MRC M and M for calculator memory operations MRC recalls the content of the memory and clears it when pressed twice successively M subtracts the currently displayed value from the current memory contents M adds the currently displayed va...

Page 66: ...n the mantissa of an intermediate or a final result exceeds 12 digits When the number of digits in the mantissa of a value stored in memory exceeds 12 digits In this case the Digital Diary automatically retains the last value stored that did not exceed 12 digits Division by zero To clear errors Press C AC once to continue with the same calculation If you want to clear the calculation and start aga...

Page 67: ... edit is on the screen make the changes you want 4 After you finish editing the calculation press or OK to recalculate To clear a calculation Press DEL twice to clear a calculation You can also clear a calculation by pressing FUNC and then selecting Clear all steps Calculation Examples 80 9 720 50 6 300 20 3 60 480 0 53 123 63 53q123w63u 113 963 23 56 23w56e963u 31779 56 3 89 5 2 63 56e3w89r5 2 q6...

Page 68: ...ode Setting Up for Data Communications The following describes what you would do to set up for data communications between two Digital Diary units or between a Digital Diary unit and a personal computer To connect to another Digital Diary unit 1 Make sure that the power of both units is turned off 2 Remove the covers from the data communications jacks on the two Digital Diary units 3 Connect the t...

Page 69: ...particular model of personal computer If the proper Data Communication Package is not yet available in your area consult with your dealer to find out when it is scheduled to go on sale For information on how to connect the Digital Diary to a personal computer see the user s manual that comes with the Data Communication Package To set up the Digital Diary to receive data 1 While any screen is displ...

Page 70: ... item described on page 37 One Data Item With this method you can send one data item stored in the Telephone Directory Memo Schedule Keeper To Do Reminder or Expense Manager Mode Note For Calendar Mode data you can send highlight data If an alarm Daily Alarm Schedule Alarm or Reminder Alarm is reached while data is being sent the alarm does not sound until the data send operation is complete To se...

Page 71: ...ay before you started the send operation To send Calendar data highlights 1 In the Calendar Mode press FUNC and then select Send Holidays A message appears asking if you are ready to send 2 Press Y to start the send operation or N to abort To interrupt the send operation at any time press ESC After the send operation is complete the display returns to the screen that was on the display before you ...

Page 72: ...isplay or data display is on the screen press FUNC and then select Send all records This causes the message READY TO SEND Y N to appear so press Y to send or N to abort To send all data items from a single file mode Schedule Keeper Reminder 1 Display the initial screen of the mode that contains the data you want to send 2 Press FUNC and then select Send all records At this time the message READY T...

Page 73: ...000 19 000 8 character name 10 character Phone 1 number 20 character address SF 5580 SF 5780 SF 5980 2 000 4 500 9 500 Memo 20 character memo SF 5580 SF 5780 SF 5980 3 400 7 700 16 000 To Do 20 character description SF 5580 SF 5780 SF 5980 3 200 7 200 15 200 Schedule Keeper 20 character description alarm time setting SF 5580 SF 5780 SF 5980 2 900 6 500 13 500 Reminder 10 character description SF 5...

Page 74: ... 63 64 65 66 67 68 69 70 71 72 73 74 75 76 77 78 79 80 81 82 83 84 85 86 87 88 89 90 91 92 93 94 95 96 97 98 99 100 101 102 103 104 105 106 107 108 109 110 111 112 113 114 115 116 117 118 119 120 121 122 123 124 125 126 127 128 129 130 131 132 133 134 135 136 137 138 139 140 141 142 143 144 145 146 147 148 149 150 31 32 33 34 35 36 37 38 39 40 41 42 43 44 45 46 47 48 49 50 51 52 53 54 55 56 57 58 ...

Page 75: ...u must press Y for Yes when the unit asks ARE YOU USING A NEW UNIT FOR THE FIRST TIME Y N in order to reset the unit after a data error occurs If you still have trouble after trying the RESET operation you may have a hardware problem If so consult with your nearest CASIO dealer Message Table Data specified in search operation does not exist in memory No more room in memory for storage of data Atte...

Page 76: ...age 12 Attempt to set an alarm for a time or date that is already passed Error during data communi cations The reset procedure has started The reset procedure is in progress Data corrupted by strong impact electrostatic charge etc The main batteries are getting weak Specifications Model SF 5580 SF 5780 SF 5980 Main Modes TelephoneDirectory Memo ScheduleKeeper ToDo ExpenseManager Reminder Calendar ...

Page 77: ...lephone Mode approximately 100 hours continuous display approximately 70 hours with 5 minutes operation and 55 minutes continuous display per hour approximately 60 hours with 5 minutes operation and 52 minutes continuous display and 3 minutes backlight operation per hour Back up 5 years if main batteries are replaced as soon as they become weak 6 months if dead main batteries are left in the unit ...

Page 78: ...CASIO ELECTRONICS CO LTD Unit 6 1000 North Circular Road London NW2 7JD U K ...

Page 79: ...MO9606 A Printed in China CASIO COMPUTER CO LTD 6 1 Nishi Shinjuku 2 chome Shinjuku ku Tokyo 163 02 Japan ...

Reviews: