Casio QV-100 Owner'S Manual Download Page 10

37

Playing Back Images

4.

Press the shutter button.

At this time the image is doubled in size. The portion that
appears on the screen is the center of the image.

5.

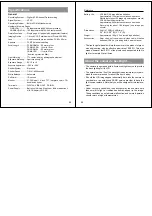
Scroll the image on the screen.

Use [+] and [–] to scroll as shown in the illustration below.

6.

To clear the zoomed display and return to the normal size

display, press any button besides [+], [–], or DISP.

Changing the Location of the Zoom Area

• Pressing [–] moves the zoom area in the opposite direction.

Operation

38

Notes

• If the page number is displayed in the upper right corner of the

screen when you perform a zoom operation, the number is replaced
by a zoom area indicator (

). This indicator shows you what part

of the image is currently enlarged on the display. You can turn the
zoom area indicator on and off by pressing the DISP button.

• Note that turning display of the zoom area indicator on and off dur-

ing a zoom operation also affects the display of the image number
in the Record Mode (page 27), and the memory page number in the
Playback Mode (page 33).

Using Auto Play

Auto play lets you automatically scroll through the camera’s memory
pages quickly and easily. You can specify the speed of the scroll.

Important!

• The camera’s Auto Power Off function (page 16) does not function

while an auto play operation in progress. If you forget to turn the
camera off, there is the danger that auto play will continue until bat-
teries are dead. To avoid this, make sure that you stop the auto play
operation and turn the camera off when you finish viewing.

To start the auto play operation

1.

Enter the Playback Mode and turn on the camera.

2.

Start the auto play operation.

Hold down the [+] and [–] buttons until the message “AUTO
PLAY START” appears.

39

Playing Back Images

Auto play continues to loop through the memory pages. This
means that when it reaches the last page, it starts again
from the first page.

3.

Press the shutter button to stop the auto play operation.

Pressing any button except the MODE button stops the auto
play operation.

Note that the buttons of the camera do not operate while a
page change operation is in progress. Make sure that an
image is shown on the display when you press a button to
stop the auto play operation.

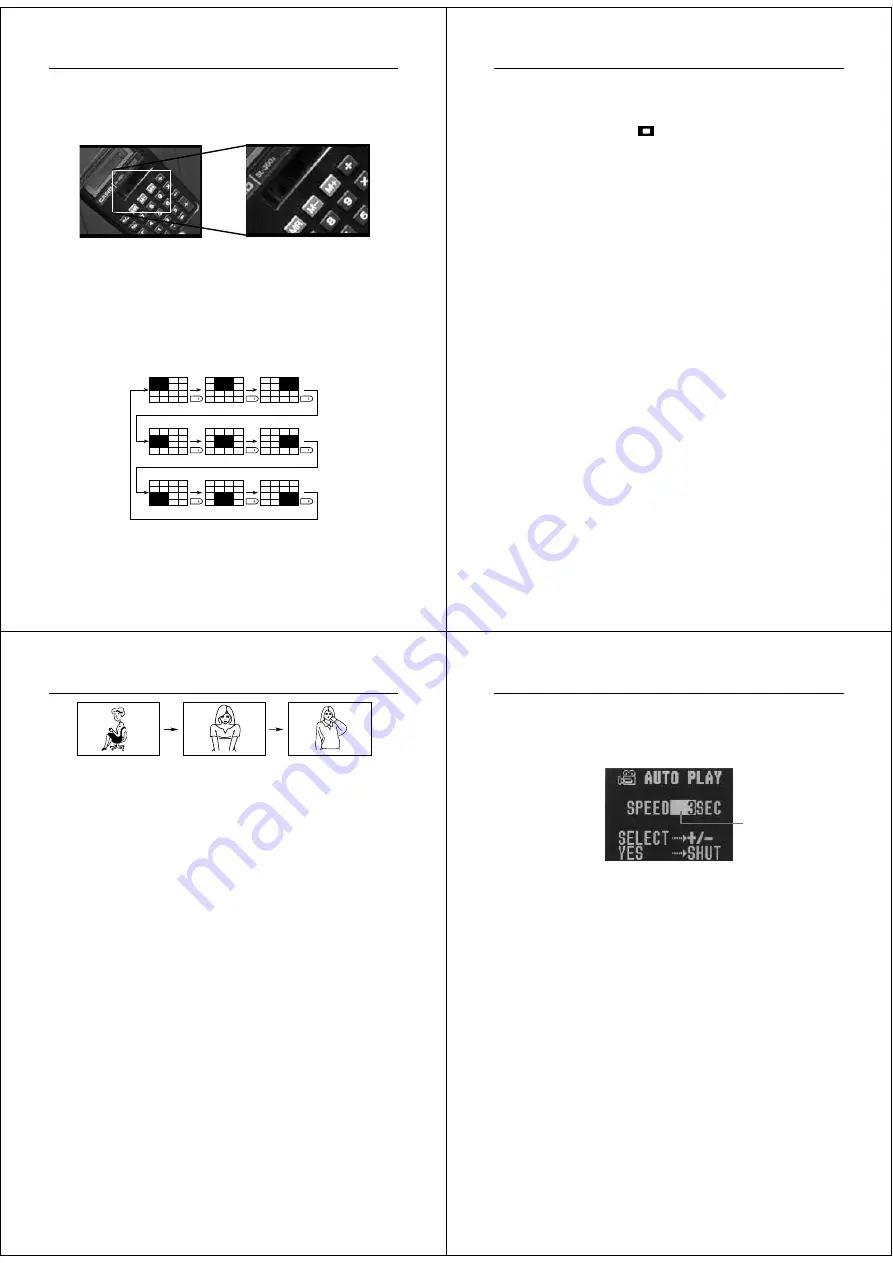
To set auto play speed

Use the following procedure to specify how long each image remains
on the display, within the range of 3 to 30 seconds.

1.

Perform steps 1 and 2 under “To start the auto play opera-
tion” on page 38 to start auto play.

3 seconds

3 seconds

Operation

40

2.

Press MODE to enter the Auto Play Setting Mode.

Be sure to press MODE while an image is stopped on the
monitor, and not while images are changing.

3.

Use [+] (increase) and [–] (decrease) to change the current

speed setting.

You can set the speed within a range of 3 to 30 seconds, in
three-second increments.

4.

To start auto play using your newly set speed setting,

press the shutter button.

To exit the auto play setting mode at any time, change the
function switch position to REC and then back to PLAY, or
turn power off. Either of these methods cancels any settings
you made and returns to the settings in effect when you en-
tered the Auto Play Setting Mode.

You can use auto play in combination with the multi-page
display (page 34). First change to the multi-page format, and
then perform the auto play operation (page 38).

You cannot use auto play in combination with the multi-page
display while protected pages are hidden (page 45).

Speed (number of
seconds each
image is displayed)

Summary of Contents for QV-100

Page 1: ...g the Self Timer 30 Playing Back Images 31 Displaying Images on the Camera s LCD 31 Displaying Images on a TV Screen 32 Page Status Indicators 33 Producing a Multi Page Display 34 Using the Zoom Function 36 4 Using Auto Play 38 Protecting Memory Pages 41 Unprotecting Memory Pages 43 Hiding Protected Memory Pages 45 Deleting Memory Pages 46 Deleting Images From Memory 46 Resolution Conversion 50 Co...

Page 2: ...ll become im possible If this should happen contact your dealer or the nearest CASIO service provider as soon as possible Memory Error Message 2 Memory Error Message 3 Memory Error Message 1 7 Operating conditions This camera is designed for use in temperatures ranging from 0 C to 40 C 32 F to 104 F Do not use or keep the camera in the following areas In areas subject to direct sunlight In areas s...

Page 3: ...e brightness of the image on the LCD The brightness is set at the factory to the optimum setting and nor mally does not need adjustment Opening the Terminal Panel Cover 1 1 1 1 1 2 2 2 2 2 3 3 3 3 3 Terminals Terminal panel cover DIGITAL terminal VIDEO OUT terminal Important Make sure that the terminal panel cover is slid fully away as shown in step 2 above before trying to raise it Forcing the co...

Page 4: ...of explosion Never mix batteries of different types 15 Power Supply Dead batteries are susceptible to leakage which can cause serious damage to your camera Remove batteries from the camera as soon as you notice they are dead The batteries that power this camera normally become warm when they lose power This does not indicate malfunction Standard Battery Life The following shows standard battery li...

Page 5: ...ition 2 Turn on the camera Slide the POWER switch in the di rection indicated by the arrow The POWER switch automatically slides back to its original position when you release it When power comes on the image of the object that is in front of the camera s lens appears on the LCD You can perform steps 1 and 2 in either order 1 then 2 or 2 then 1 3 Set the NORMAL MACRO switch to the NORMAL position ...

Page 6: ...problem is to set the aperture to F8 Changing the Lens Orientation The lens of the camera is built into a lens body that is designed to rotate This means you can change the angle of the lens without mov ing the rest of the camera Rotates up to 90 towards the front Rotates up to 180 towards the back 23 Recording Images DEL ON O FF MODE DISP EFFEC T PROT ECT POWE R REC PLAY Any images recorded while...

Page 7: ...formation about exposure warning indica tors NOMAL MACRO 27 Recording Images Record Mode Displays The following provides details on the images indicators and mes sages that appear on the LCD in the Record Mode Image Display An image of the object that is picked up by the camera s lens appears on the LCD The camera is designed to refresh the image on the LCD about seven times per second Because of ...

Page 8: ...ortant If battery power is low camera power may turn off while a count down is in progress If this happens replace the batteries with new ones 31 Playing Back Images Playing Back Images This section describes how to recall and view images stored in cam era memory Displaying Images on the Camera s LCD Camera memory is divided into pages and each image is assigned to page that is numbered sequential...

Page 9: ... page 45 3 Specify the screen size Use the and buttons to specify the screen size To clear the selection screen and quit this procedure select the EXIT icon 4 Press the shutter button 35 Playing Back Images 5 Scroll through the images Use the and buttons to scroll images forward and back Each press shows a new screen of four or nine new images 1 2 3 4 5 6 7 8 9 10 11 Unused pages are colored gray ...

Page 10: ...ion Hold down the and buttons until the message AUTO PLAY START appears 39 Playing Back Images Auto play continues to loop through the memory pages This means that when it reaches the last page it starts again from the first page 3 Press the shutter button to stop the auto play operation Pressing any button except the MODE button stops the auto play operation Note that the buttons of the camera do...

Page 11: ...s 4 Specify all page protection Use and to select ALL and then press the shutter button A protect indicator appears in the upper left corner of all memory pages when you display the page status indicators Unprotecting Memory Pages You can unprotect specific memory pages or all pages currently stored in memory To unprotect a single memory page 1 In the Playback Mode display the PROTECT Menu Press t...

Page 12: ...mory Note that you cannot delete images if they are protected See page 43 for details on how to unprotect images You cannot delete images from a multi page display a display of an enlarged image or while Auto Playback is operating To delete a single image 1 Select the Playback Mode and turn on power Slide the function switch to the PLAY position Slide the POWER switch in the direction indicated by...

Page 13: ...N terminal of a TV video tape deck video printer or other similar devices Use the special video cable that comes with the camera for such connections Connecting to Other Devices The type of connecting cable you should use depends on the type and shape of the terminals equipped on the digital camera you are connecting to See pages 52 through 58 for details DIGITAL terminal VIDEO OUT terminal DIGITA...

Page 14: ...of both cameras to PLAY 2 Use the and buttons of this camera to find the image you want to send You cannot send images between two cameras while either of their function switches is set to REC You cannot send images while using the multi page display or zoom function 3 Press the shutter button of this camera Return to previous display Receive icon Send icon 55 4 Use the and buttons to move the poi...

Page 15: ...an be connected directly to a personal computer or video capture board that is equipped with a VIDEO IN terminal RCA pin jack It cannot be connected directly to an S VIDEO ter minal 59 Troubleshooting No power Sudden power failure indicator on LCD No recording when shutter b u t t o n i s pressed Power failure during self timer operation indicator on LCD indicator on LCD 1 Batteries not loaded cor...

Page 16: ...e con nection 2 Camera connected to is not turned on 3 Function switch sets to REC Delete opera tion does not start when DEL is pressed All buttons and switches do not operate Very bright or very dark LCD image No buttons or switches oper ate LCD monitor is too bright or too dark C a n n o t e x change data be tween two cam eras Other Deletion 63 Sympton Probable Cause Action Pressing MODE does no...

Page 17: ...scent light source to provide the back lighting for its LCD The normal service life of the backlight is approximately six years when the camera is used for about two hours a day Should the LCD image appear abnormally dark take the camera to your dealer or an authorized CASIO service provider to have the light source replaced Note that you will be charged for this replace ment Under very cold condi...

Reviews: