background image

EN-87

Reference



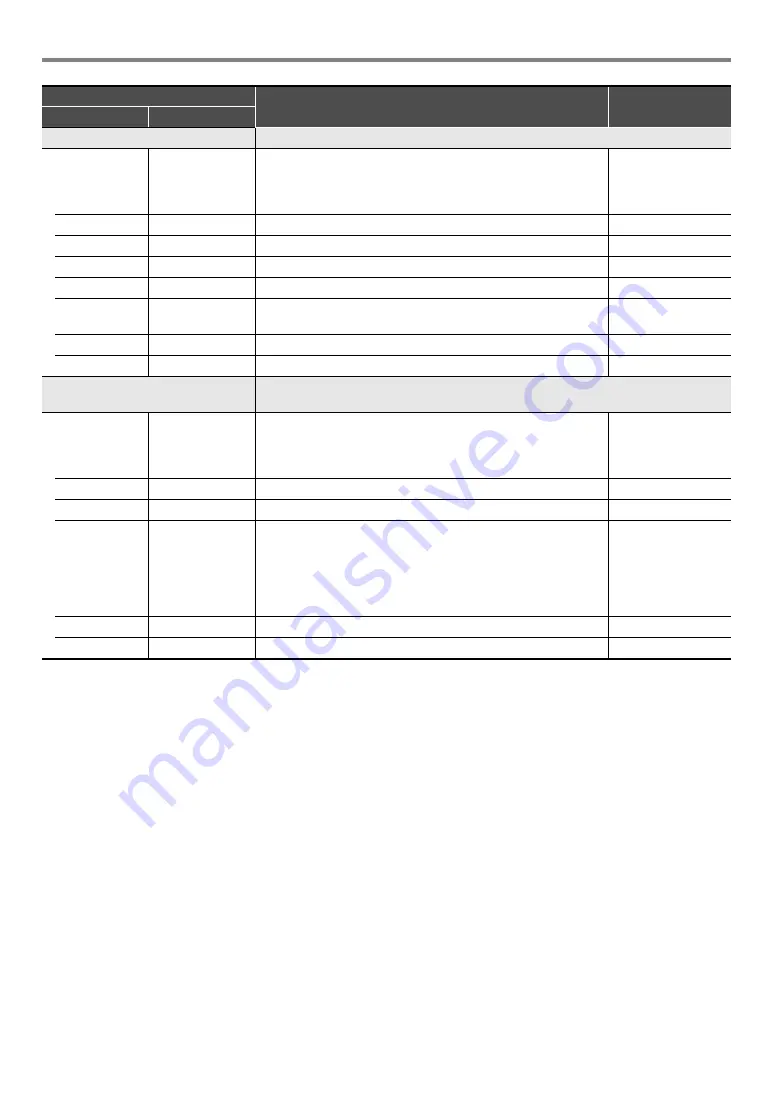
 LFO Wah

This is a “wah” effect that can automatically affect the frequency using an LFO.

In Level

Input Level

Adjusts the input level. The input signal can become distorted 
when the level of the sound being input, the number of chords, or 
the Resonance value is large. Adjust this parameter to eliminate 
such distortion.

000 to 127

Resonanc

Resonance

Adjusts the strength of feedback.

000 to 127

Manual

Manual

Adjusts the wah filter reference frequency.

000 to 127

Rate

LFO Rate

Adjusts the LFO rate.

000 to 127

Depth

LFO Depth

Adjusts the LFO depth.

000 to 127

Waveform

LFO Waveform

Selects the LFO waveform.

Sine, Triangle, 
Random

WetLevel

Wet Level

Adjusts the level of the effect sound.

000 to 127

DryLevel

Dry Level

Adjusts the level of the direct sound.

000 to 127



 Auto Wah

This is a “wah” effect that can automatically shift the frequency in accordance with the 
level of the input signal.

In Level

Input Level

Adjusts the input level. The input signal can become distorted 
when the level of the sound being input, the number of chords, or 
the Resonance value is large. Adjust this parameter to eliminate 
such distortion.

000 to 127

Resonanc

Resonance

Adjusts the strength of feedback.

000 to 127

Manual

Manual

Adjusts the wah filter reference frequency.

000 to 127

Depth

Depth

Adjusts the depth of the wah in accordance with the level of the 
input signal. Setting a positive value causes the wah filter to open 
in direct proportion with the size of the input signal, producing a 
bright sound. Setting a negative value causes the wah filter to 
close in direct proportion with the size of the input signal, 
producing a dark sound.

–64 to 00 to 63

WetLevel

Wet Level

Adjusts the level of the effect sound.

000 to 127

DryLevel

Dry Level

Adjusts the level of the direct sound.

000 to 127

Module Name

Description

Settings

Display

Parameter Data

Summary of Contents for Privia PX-S3000

Page 1: ...d Mode Effects Hall Simulator Reverb and Surround Using a DSP Using Chorus Adjusting Acoustic Piano Sound Characteristics Acoustic Simulator Recording Performances in Real Time Using Auto Accompaniment and Auto Arpeggio Play Using the MIDI Recorder to Record Performances Using the Audio Recorder to Record Performances Using Auto Accompaniment Using the Arpeggiator When the Digital Piano is being o...

Page 2: ...ntirety is prohibited Except for your own personal use any other use of the contents of this manual without the consent of CASIO is prohibited under copyright laws IN NO EVENT SHALL CASIO BE LIABLE FOR ANY DAMAGES WHATSOEVER INCLUDING WITHOUT LIMITATION DAMAGES FOR LOSS OF PROFITS BUSINESS INTERRUPTION LOSS OF INFORMATION ARISING OUT OF THE USE OF OR INABILITY TO USE THIS MANUAL OR PRODUCT EVEN IF...

Page 3: ...nput Synchro Start EN 33 Using the Keyboard to Control the Auto Accompaniment Pattern Keyboard Controller Mode EN 34 Selecting a Chord Input Mode EN 34 Using One Touch Preset EN 36 Using Auto Harmonize EN 37 Changing the Auto Accompaniment and Song Tempo EN 38 Using Music Preset EN 38 Registering and Restoring a Setup Registration EN 40 Registering and Recalling a Setup EN 41 Using a Pedal to Cycl...

Page 4: ...Power button The above illustration shows when all buttons and their text are lit During actual operation only the buttons that are currently enabled and the applicable text are lit or flashing Overview and Setup General Guide cn cm 1 2 3 4 5 6 7 8 9 bp bk bl bm bn bo co bq br bs bt ck cl C1 C2 C3 C4 C5 C6 C7 C8 A0 Front ...

Page 5: ...PART button 5 NORMAL FILL IN s button 6 VARIATION FILL IN d button 7 SYNCHRO ENDING k button 8 START STOP a button 9 Display bk U button bl I button bm TEMPO ENTER button bn SOUND MODE DEMO button bo REC0 button bp EXIT FUNCTION button bq cl TONE category RHYTHM category buttons bq DSP BANK button br TRANSPOSE Area 1 button bs KNOB Area 2 button bt ARPEG Area 3 button ck SPLIT Area 4 button cl LAY...

Page 6: ... the following precautions while the Digital Piano is turned upside down to load batteries Take care to avoid injury due to pinching your fingers under the Digital Piano Do not allow the Digital Piano to tip over or otherwise be subjected to strong impact Impact can damage the volume knob and keyboard keys 1 Open the battery cover on the bottom of the Digital Piano 2 Load six AA size batteries int...

Page 7: ... will cause touch button lights to turn on and off sequentially to remind you that power is on Button lights will return to normal if you touch a button play something on the keyboard or perform some other operation To turn off power hold down the 1P Power button until Bye appears on the display Use FUNCTION parameter 107 Power On Alert to enable or disable Power On Alert For information about FUN...

Page 8: ...table Pedal cr DAMPER PEDAL Switch type pedal 1 cs PEDAL UNIT Separately available SP 34 pedal unit three pedals damper soft and sostenuto dl EXPRESSION ASSIGNABLE Switch type pedal 1 expression pedal 2 DAMPER PEDAL Jack cr DAMPER PEDAL jack Standard jack 6 3mm SP 3 This setting displayed Does this Sustain Sustains notes played while the pedal is depressed even if the keyboard key is subsequently ...

Page 9: ...il the pedal is released Use the dl EXPRESSION ASSIGNABLE jack to connect a commercially available expression pedal or a CASIO sustain pedal included SP 3 or separately available pedal Perform one of the operations below depending on the pedal that is being connected PEDAL UNIT jack Soft Pedal Sostenuto Pedal Damper Pedal EXPRESSION ASSIGNABLE Jack For this type of pedal Perform this operation Swi...

Page 10: ...elow A setting value of 1 to 4 is appropriate for an expression pedal while a value from 5 to 10 is appropriate for a switch type CASIO sustain pedal For information about FUNCTION parameters see Configuring Function Settings FUNCTION Mode page EN 53 Select this setting displayed setting name To connect this type of pedal 1 SW Switch type pedal CASIO sustain pedal 2 Exp Type1 Polarity Type 1 see t...

Page 11: ...ll appear when the operation is complete 9 To exit the FUNCTION mode hold down bp EXIT until FUNCTION disappears from the display Using headphones cuts off output from the built in speakers which means you can practice playing even late at night without disturbing others Be sure to turn down the volume level before connecting headphones Headphones do not come with the Digital Piano Use commerciall...

Page 12: ... text indicating available functions are lit or flashing 1 For information about these modes see Mode Selector Button page EN 12 2 In the illustrations of this manual unlit indicator text above and or below a button is grey Lit indicator text is black When operating a touch button touch it firmly with a bare finger Touch buttons will not respond if you touch them while wearing gloves If a touch bu...

Page 13: ...type Example Buttons bq to cl are configured as shown below when CTRL is selected lit RHYTHM Mode This is the mode for most basic operations In addition to normal keyboard play use this mode to perform most other Digital Piano operations ACCOMP Mode This mode is for playing Auto Accompaniment with chords See Using Auto Accompaniment page EN 30 SONG Mode Use this mode to play back songs See Listeni...

Page 14: ...lection of setting menu items parameters is presented in this manual Example 1 Hold down the bp button until FUNCTION appears on the display This enters the FUNCTION Mode 2 Use the bk U and bl I buttons to select the following menu items in sequence KEYBOARD 3 Touch Response The actual operations performed in step 2 are those below 2 1 Use the bk U and bl I buttons to display KEYBOARD and then tou...

Page 15: ... DEMO indicator to turn off which indicates demo play standby At this time the display will show 1 Demo Song You can also use the bk and bl buttons to switch between songs This operation can be performed while playback is in progress 3 To start demo play touch 8a or bm ENTER After this you can pause and resume demo play by touching 8a or bm ENTER 4 To exit demo play standby touch bp EXIT If Auto P...

Page 16: ...cal instrument such as a guitar glissando fret noise etc to each keyboard key note and velocity For information about the sounds assigned for each versatile tone and velocity see Versatile Tone Map page EN 75 Layering makes it possible to sound with two different tones at the same time The tone that is layered onto another tone is the Upper2 part tone which in this manual is referred to as the Upp...

Page 17: ... ck SPLIT to enable the split function which is indicated by SP on the display 4 Use the bp button to cycle through settings until the TONE indicator to the right of the button is lit Next perform the operation under To select a tone page EN 15 to select the Lower tone To use split and layer at the same time perform the procedure above and then continue with steps 2 through 4 under To layer two to...

Page 18: ...fect or function assigned to the pedal is applied regardless of what is selected here 2 The On Off setting selected here is applied only while the Expression Sustain Sostenuto or Soft setting in the table under To specify the pedal type page EN 9 is selected In all other cases the effect or function assigned to the pedal is applied regardless of what is selected here Configuring Layer and Split Se...

Page 19: ...ode hold down bp EXIT until FUNCTION disappears from the display To adjust volume levels other than the keyboard volume level use the FUNCTION parameters below Auto Accompaniment volume Accomp Volume 74 MIDI song volume MIDI Volume 84 Audio song volume Audio Volume 85 External input volume Audio In Volume 98 For information about FUNCTION parameters see Configuring Function Settings FUNCTION Mode ...

Page 20: ... Use the bp button to cycle through settings until the CTRL indicator to the right of the button is lit 2 Touch br TRANSPOSE The currently selected transpose setting value will be shown on the display 3 Use the bk and bl buttons to change the setting You can change the pitch of the keyboard within the range of 12 to 12 semitones To return to the initial default setting touch bk and bl at the same ...

Page 21: ...layer and split are not being used and octave shift the keyboard tone Upper1 part When layer and or split is being used you can specify separate octave shift settings for each part Upper1 Upper2 Lower For details about the settings of each part see Configuring Layer and Split Settings page EN 17 To octave shift the Upper1 part 1 Disable both layer and split if they are enabled See To unlayer the k...

Page 22: ...nd effects 1 Touch bn SOUND MODE Each touch will cycle between the settings and the current setting is indicated by the LED lights as shown below To specify the Hall Simulator Reverb type 1 Hold down bn SOUND MODE until SOUND MODE appears on the display and then release the button 2 After confirming that Hall Rev Type is displayed touch bm ENTER The name of the currently selected Hall Simulator Re...

Page 23: ... type 1 Hold down bn SOUND MODE until SOUND MODE appears on the display and then release the button 2 Use the bk U and bl I buttons to display Surround Type and then touch bm ENTER The name of the currently selected surround type will be shown on the display 3 Use the bk and bl buttons to select the surround type Type 1 or Type 2 4 After the setting is the way you want touch bp EXIT as many times ...

Page 24: ...page EN 77 For information about DSP modules see Configuring DSP Settings page EN 23 To return to the initial default DSP touch bk and bl at the same time Even if layer and or split is enabled the display that appears in step 3 above shows the name of the DSP assigned to Upper1 tone Configuring DSP Settings The steps below are the general procedure for configuring DSP settings 1 Select the default...

Page 25: ...et DSP 1 the target of any setting changes you configure 1 After confirming that DSP On Off is displayed touch bm ENTER 2 Use the bk and bl buttons to change the setting to On 3 Touch bp EXIT 3 Use the bk U and bl I buttons to select a DSP module and then touch bm ENTER This displays one of the parameters of the DSP module you selected 4 Use the bk U and bl I buttons to display the parameter whose...

Page 26: ...t the characteristics of notes To adjust acoustic piano sound characteristics 1 Hold down the bp button until FUNCTION appears on the display This enters the FUNCTION Mode 2 Use the bk U and bl I buttons to select the following menu items in sequence SOUND 3 ACOUSTIC SIMU 3 Use the bk U and bl I buttons to display the setting item you want to configure and then touch bm ENTER For more information ...

Page 27: ...s all 88 of the strings causing all of the strings that are harmonics of the strings that are played to resonate You can select one of the damper resonance settings in the column to the right Tone Specifies the initial setting of each tone Off Disables Damper Resonance 1 4 The greater the value the stronger the Damper Resonance Damper Noise Damper Noise Damper noise is a slight metallic ringing so...

Page 28: ...ormation about FUNCTION parameters see Configuring Function Settings FUNCTION Mode page EN 53 With the arpeggiator you can play various arpeggios and other phrases automatically by simply pressing keys on the keyboard You can select from a number of different arpeggio options including playing arpeggios from a chord playing various phrases automatically and more A single button is used to control ...

Page 29: ... playing on the left side as the student plays the same song on the right side You can change the ranges of the left and right keyboards in octave units from their initial default settings This comes in handy for example if the initial default range is not enough when one person is playing the left hand part and another person is playing the right hand part For information about the setting operat...

Page 30: ... To use the Duet Mode page EN 29 2 Use the bk U and bl I buttons to display Upper Octave right side keyboard or Lower Octave left side keyboard and then touch bm ENTER 3 Use the bk and bl buttons to change the setting You can specify the right side keyboard octave while Upper Octave is displayed and the left side keyboard octave while Lower Octave is displayed Increasing the setting value by one r...

Page 31: ...e scale and base note selected using the operation under To change the scale page EN 30 to Auto Accompaniments For information about FUNCTION parameters see Configuring Function Settings FUNCTION Mode page EN 53 With Auto Accompaniment simply select an accompaniment pattern Each time you play a chord with your left hand the appropriate accompaniment will play automatically It s like having a perso...

Page 32: ... the rhythm part only The rhythm part is the foundation of each Auto Accompaniment Your Digital Piano comes with a variety of built in rhythms including 8 beat and waltz Use the procedure below to play the basic rhythm part 1 Use the 3 mode selector button to cycle through settings until the RHYTHM RHYTHM Mode indicator is lit 2 Use the procedure under To select a rhythm page EN 31 to select the r...

Page 33: ...o sound Auto Accompaniment using a chord progression based on the music genre you want to perform without inputting chords For details see Using Music Preset page EN 38 Metronome Accompaniment Patterns The accompaniment patterns below produce metronome sounds only without a bass or chord part This is true even if you finger a chord To change the Auto Accompaniment Tempo See Changing the Auto Accom...

Page 34: ...n as you press a keyboard key To trigger Auto Accompaniment play with chord keyboard input 1 While Auto Accompaniment play is stopped touch 7 SYNCHRO ENDING This enters synchro start standby which is indicated by the LEDs above the 8 START STOP button flashing between yellow and red If you want to start with an intro touch 4 INTRO here If you want to start with a variation touch 6 VARIATION FILL I...

Page 35: ...a keyboard key in the range of A0 to F1 including the black keys You can use FUNCTION parameter 75 Chord Mode to select one of the six chord input modes below For information about FUNCTION parameters see Configuring Function Settings FUNCTION Mode page EN 53 Using the Keyboard to Control the Auto Accompaniment Pattern Keyboard Controller Mode Keyboard Key Button A0 3 Mode selector button B0 4 INT...

Page 36: ... Chords Pressing a single accompaniment area key in the CASIO CHORD mode will play the major chord whose name is marked above the key All of the accompaniment area keys that are marked with the same chord name play exactly the same chord Example C C Major Minor Chords To play a minor chord press the accompaniment area key that corresponds to the major chord while also pressing one other accompanim...

Page 37: ...lect the rhythm you want 3 Hold down the cl BALLAD button until the display changes from the rhythm name to the tone name This will automatically apply the One Touch Preset settings in accordance with the rhythm pattern that is currently selected At this time the Digital Piano will go into Auto Accompaniment synchro start standby page EN 33 Chord Type Minor Chords To play a minor chord press the a...

Page 38: ...auto harmonize touch bt ARPEG This will cause AH to disappear from the display To select the Auto Harmonize type 1 Perform steps 1 and 2 under To enable auto harmonize page EN 37 to enable auto harmonize 2 Hold down the bt ARPEG button until A HARMO appears on the display This causes the currently selected auto harmonize type to appear in line two of the display 3 Use bk and bl buttons to select a...

Page 39: ...u can use the above steps to set an approximate tempo and then use the steps under To specify a tempo value to fine tune the setting Note that an expression pedal cannot be used to set a tempo using the above procedure Selecting a Music Preset instantly changes the Digital Piano to a preset setup tone rhythm chord progression etc for play of songs of various genres categories The press of a button...

Page 40: ...paniment keyboard key will start the preset chord progression The accompaniment keyboard cannot be used to specify chords in this case 6 Play along on the keyboard with the Auto Accompaniment 7 To stop Auto Accompaniment touch 8 START STOP or 7 SYNCHRO ENDING 8 To exit the Music Preset Mode display the music preset selection screen and then touch the 3 mode selector button At this time the tone an...

Page 41: ...red in a setup see Knob Set List page EN 76 Saving to an External Device Setups saved using registration can be saved to a USB flash drive in bank units See USB Flash Drive Operations page EN 62 Registering and Restoring a Setup Registration Area 1 Area 4 Bank 1 Setup 1 1 Setup 1 4 Bank 2 Setup 2 1 Setup 2 4 Bank 24 Setup 24 1 Setup 24 4 bq br bs bt ck Setting Items Freeze 1 Rhythm number mode sel...

Page 42: ...appear on the display To exit setup registration at this time touch bk 6 To register the setup touch bl This completes the registration operation and displays Complete To recall a registered setup 1 Use the 3 mode selector button to cycle through settings until the RHYTHM or ACCOMP indicator is lit 2 Use the bp button to cycle through settings until the REG indicator to the right of the button is ...

Page 43: ...egistered with the registration function To specify the pedal for recalling setups 1 Hold down the bp button until FUNCTION appears on the display This enters the FUNCTION Mode 2 Use the bk U and bl I buttons to select the following menu items in sequence REGISTRATION 3 SEQ PED RECALL 3 Use the bk U and bl I buttons to select a pedal jack and then touch bm ENTER 4 Use the bk and bl buttons to chan...

Page 44: ...ong CASIO COMPUTER CO LTD takes no responsibility for any damages lost profits or claims by third parties arising from the deletion of recorded data due to malfunction repair or for any other reason How the Digital Piano records your performances MIDI Recorder Your Digital Piano has two recorders a MIDI recorder and an audio recorder Instead of audio audio data the MIDI recorder described in this ...

Page 45: ...eyboard Operations Scale Settings Accomp Scale On Off Duet Settings Keyboard Volume Hall Simulator Reverb On Off Type Depth Surround Settings Chorus Type Brilliance Acoustic Simulator Settings Keyboard Operations Upper1 Upper2 Lower Auto Harmonize Arpeggiator Tone Number Upper1 Upper2 Lower DSP Pedal Operation 1 Octave Shift 2 Part Volume 2 Fine Tuning 2 Pitch Bend Wheel Operations Pitch Bend Rang...

Page 46: ...t Recording While the MIDI recorder or audio recorder page EN 49 is in record standby any one of the operations below will start recording Playing something on the keyboard Pressing a pedal Operating the cn PITCH BEND wheel cm K1 knob or K2 knob Touching 8 START STOP 5 NORMAL FILL IN 6 VARIATION FILL IN or 4 INTRO Recalling a Registration Memory setup page EN 41 To record to the system track Befor...

Page 47: ...r If necessary you can touch 8a to play back the song and check its contents 3 Configure tone and other settings you want to use for recording For setting items that can be recorded at the beginning of a recording see the Solo column in the table under Recorded Data for Each Track page EN 44 4 Touch bo REC0 This enters record standby indicated by bo REC0 flashing red 5 Hold down the bo REC0 button...

Page 48: ... flashing red 3 Hold down the bo REC0 button until MIDI REC SETTING appears on the display 4 Select the track you want to re record 1 After confirming that Rec Track is displayed touch bm ENTER 2 Use the bk and bl buttons to select a track 3 Touch bp EXIT 5 Select punch in recording as the track recording type 1 Use the bk U and bl I buttons to display Rec Type and then touch bm ENTER 2 Use the bk...

Page 49: ... by touching 8 START STOP recording will start after the pre count along with playback of the rhythm pattern If you start by playing something on the keyboard recording will start after the pre count without playing the rhythm pattern Metronome Specifies whether or not the metronome should sound during recording On Metronome sounds during recording Off Metronome does not sound during recording Bea...

Page 50: ... Audio Recorder recording or playback is in progress Doing so can corrupt the data on the USB flash drive and damage the USB flash drive port For precautions when handling a USB flash drive see USB Flash Drive page EN 60 For information about the USB flash drive formats supported by your Digital Piano see Supported USB Flash Drives page EN 60 To prepare to use the audio recorder 1 Perform the step...

Page 51: ...store the recording as a WAV file to the USB flash drive Files are automatically assigned names in sequence from TAKE01 WAV through TAKE99 WAV The Digital Piano will automatically switch to the SONG Mode with the file it just stored selected for playback 5 To play back the song you just recorded touch 8a To select and playback a file recorded with the audio recorder 1 Perform the procedure under T...

Page 52: ...is in progress Playback ends automatically when the end of the song is reached Listening to Songs MIDI Player Song Type Description User songs You can add up to 10 songs to Digital Piano memory as user songs Song Number 1 through 10 To add user song data up to 320 KB per song of data that is playable by this Digital Piano store it on a USB drive or smart device and then transfer the song data to D...

Page 53: ...s keyboard performance settings The procedure below can be used to import the settings below which are recorded at the beginning of a selected song as keyboard performance settings Tempo hall simulator reverb settings On Off type depth surround settings MIDI recorder songs only chorus type brilliance setting MIDI recorder songs only scale setting MIDI recorder songs only 1 Perform steps 1 and 2 un...

Page 54: ...ION appears on the display This enters the FUNCTION Mode and displays its top menu The FUNCTION Mode top menu screen shows FUNCTION in the top line and the name of the currently selected directory in line 2 Directory names are all caps Configuring Function Settings FUNCTION Mode Directory A directory is a group of multiple parameters Parameter A parameter is an actual configurable setting After yo...

Page 55: ...etting editing screen with the parameter s current setting shown in line 3 5 Use the bk and bl buttons or cm K1 knob to change the setting To return to the initial default setting touch bk and bl at the same time 6 After the setting is the way you want exit the parameter editing screen by touching bp EXIT 7 To exit the FUNCTION Mode hold down bp EXIT until FUNCTION disappears from the display The ...

Page 56: ...us Type See page EN 25 10 Brilliance Brilliance 3 3 11 Keyboard DIR KEYBOARD 12 Touch Response Touch Response See page EN 19 13 Keyboard Volume KeyboardVolume 0 127 14 Part Volume DIR PART VOLUME 15 Upper1 Part Upper1 Part 0 127 16 Upper2 Part Upper2 Part 0 127 17 Lower Part Lower Part 0 127 18 Part Octave Shift DIR PART OCT SHIFT 19 Upper1 Part Upper1 Part 2 1 0 1 2 20 Upper2 Part Upper2 Part 2 1...

Page 57: ...er Part Lower Part On Off 51 Pitch Bend Wheel DIR WHEEL 52 Pitch Bend Range P Bend Range 0 24 53 Upper1 Part Upper1 Part On Off 54 Upper2 Part Upper2 Part On Off 55 Lower Part Lower Part On Off 56 Registration DIR REGISTRATION 57 Freeze Target DIR FREEZE 58 Pedal Wheel Pedal Wheel On Off 59 Knob Knob On Off 60 Scale Tuning Scale Tuning On Off 61 Touch Response Touch Response On Off 62 Sound Mode S...

Page 58: ...ume 0 127 85 Audio Song Volume Audio Volume 0 127 86 Audio Song Center Cancel Audio C Cancel On Off 87 Media DIR MEDIA See page EN 62 88 MIDI DIR MIDI 89 Keyboard Channel Keyboard Chan 1 16 90 Local Control Local Control On Off 91 Hi Reso Velocity MIDI Out Hi Reso MIDI Out On Off 92 Accomp MIDI Out Accomp MIDI Out On Off 93 Audio Input DIR AUDIO IN 94 Bluetooth DIR BLUETOOTH 95 Bluetooth Audio Blu...

Page 59: ...ight Setting Panel Light Off 5 30 60 120 Seconds 103 Operation Lock Operation Lock On Off 104 Speaker Out Speaker Out On Off 105 Auto Resume Auto Resume On Off 106 Auto Power Off Auto Power Off On Off 107 Power On Alert Power On Alert On Off 108 Tempo Indicator Tempo Indicator Letter Icon 2 109 LCD Contrast LCD Contrast 1 17 110 Touch Button Sensitivity Touch Btn Sense 1 0 1 111 Setting Reset Sett...

Page 60: ...until FUNCTION disappears from the display Use the FUNCTION parameters below to change the Digital Piano s MIDI settings For information about FUNCTION parameters see Configuring Function Settings FUNCTION Mode page EN 53 Using Operation Lock F UNC T I ON O n Op e r a t i o n L o c k Configuring MIDI Settings Setting FUNCTION Parameter Keyboard Channel This setting specifies a channel from 1 throu...

Page 61: ...g Data from a USB Flash Drive Standard song data MIDI files that has been stored on a USB flash drive with a computer can be played on your Digital Piano For information about how to store song data on a USB flash drive see Using a Computer to Copy General Song Data to a USB Flash Drive page EN 65 For information about the song data playback operation see Listening to Songs MIDI Player page EN 51 ...

Page 62: ... drive to be mounted Do not attempt to perform any operation on the Digital Piano while a mounting sequence is in progress A USB flash drive needs to be mounted each time it is connected to the Digital Piano Mounting a USB flash drive on the Digital Piano will create a folder named MUSICDAT in the drive s root directory if a MUSICDAT folder does not already exist there Use this folder when exchang...

Page 63: ...ormation about the operations below Saving Digital Piano Data to a USB Flash Drive Importing Data Files from a USB Flash Drive to Digital Piano Memory Renaming Digital Piano Importable Data Files on a USB Flash Drive Deleting Digital Piano Importable Data Files on a USB Flash Drive Data Types Data types supported by your Digital Piano are those shown in the table below The text in the Displayed Ty...

Page 64: ...DAT folder on the USB flash drive If this happens touching bl in step 10 below will overwrite the existing data with the new data 10 Touch bl to save To cancel the operation touch bk Touching bl displays Wait operation in progress Do not perform any operation while this message is displayed Complete is displayed after the operation is complete 11 To exit the MEDIA mode hold down bp EXIT until MEDI...

Page 65: ... Rename and then touch bm ENTER 3 Use the bk U and bl I buttons to display a sub menu item that correspond to the type of data being renamed and then touch bm ENTER See the Displayed Type Name column in the table under USB Flash Drive 3 Digital Piano page EN 62 4 Use the bk and bl buttons to select the data to be renamed and then touch bm ENTER 5 Rename the file For information about text editing ...

Page 66: ...o XX 01 to 99 Supported WAV format Linear PCM 16bit 44 1 kHz stereo You can use the APP Function to connect the Digital Piano with a phone tablet or other smart device and perform the operations described below Control the Digital Piano from a smart device Piano Remote Controller Transfer music data from a smart device Put the mobile device you will connect with into its Airplane Mode or otherwise...

Page 67: ...ose setting of the keyboard is something other than the default setting b The Digital Piano s tuning setting is something other than 440 0Hz c Octave shift is enabled d The current scale setting is something other than Equal Temperament Action a Return transpose page EN 19 to its initial default setting b Change the tuning setting to 440 0Hz page EN 20 c Change the octave shift setting to 0 page E...

Page 68: ...original musical instrument Because of this there may be very slight differences in tonal quality and volume between sample ranges Cause This happens when the sounds of multiple parts are sounding at the same time while using layer using the Duet Mode playing back a built in song recording etc Pressing a button when one of these conditions exists will cause the effect setting that is built into th...

Page 69: ...ed on USB flash drive Change the name and then save the new data Remove the read only attribute from the existing USB flash drive file and overwrite it with the new data Use a different USB flash drive Media Full There is not enough space available on the USB flash drive Delete some of the files on the USB flash drive to make room for new data or use a different USB flash drive Too Many Files You ...

Page 70: ...imately 320KB per song Based on 1KB 1024 bytes 1MB 10242 bytes MIDI recorder song playback USB flash drive song data SMF playback Part mute L R L R In the Audio Mode Audio recorder recording and playback Center cancel Song Volume Adjustable for both MIDI Mode Audio Mode MIDI Recorder Real time recording and playback as MIDI data Number of Songs 5 Number of Tracks 3 Capacity Approximately 30 000 no...

Page 71: ...MHz Maximum Wireless Output 4 dBm MIDI 16 channel multi timbre receive Pitch Bend Wheel Pitch bend range 0 to 24 semitones Knobs 2 Knob sets knob function presets 14 Inputs Outputs PHONES jacks Stereo mini jacks 3 5mm 2 Power 12V DC AUDIO IN jack Stereo mini jack 3 5mm Input impedance 10kΩ Input voltage 200mV LINE OUT R L MONO jacks Standard jacks 6 3mm 2 Output impedance 2 3kΩ Output voltage 1 3V...

Page 72: ...e not suitable for normal keyboard play 5 Chord consisting of root and 5th only 6 Not a standard chord but used when you want Auto Accompaniment with the root note only or the root with an octave added Fingering Guide C Cm Cdim Caug 3 C 5 Csus4 3 Csus2 3 C7 CmM7 Cdim7 3 C6 1 3 Cm6 2 3 CaugM7 CdimM7 Caug7 Cm7 3 CM7 Cm7 5 3 CM7 5 C7sus4 C7 5 3 4 4 4 4 4 4 Cmadd9 C69 3 Cm69 3 Cadd9 Cm7 9 C7 9 C7 9 C7...

Page 73: ...D when the lowest note fingered is a certain distance from the neighboring note the chord is interpreted as a fraction chord Unlike FINGERED 1 2 and FINGERED ON BASS FULL RANGE CHORD requires pressing of at least three keys to form a chord C C D C F C F C G C A C A C Gm C Am C B m C Ddim C Fdim C FM7 C A M7 C F m7 5 C Gdim C Adim C Bdim C A 7 C F7 C Fm7 C B C C m C Dm C Fm C z z z z z z z z z z Bm...

Page 74: ...can use the split point to change the size of the accompaniment keyboard range page EN 16 1 Root 2 Chord Type Chord Example List 2 1 M m dim aug sus4 sus2 7 m7 M7 m7 5 7 5 7sus4 add9 madd9 mM7 dim7 69 6 m6 F C C D D D E E ...

Page 75: ...ence You can use the split point to change the size of the accompaniment keyboard range page EN 16 1 Root 2 Chord Type 2 1 M m dim aug sus4 sus2 7 m7 M7 m7 5 7 5 7sus4 add9 madd9 mM7 dim7 69 6 m6 A B B F G G G A A ...

Page 76: ...8 1 127 Body 8 C9 1 127 Fret Noise1 C 9 1 127 Fret Noise2 D9 1 127 Fret Noise3 E 9 1 127 Fret Noise4 E9 1 127 Fret Noise5 F9 1 127 Head String1 F 9 1 127 Head String2 G9 1 127 Head String3 Key Velocity Sound C 1 B6 1 30 Normal mp 31 60 Normal mf 61 75 Ghost Note 76 90 Mute 91 105 Hammering 106 120 Glissando 121 127 Open Harmonics C7 1 127 Strum 1 C 7 1 127 Strum 2 D7 1 127 Strum 3 E 7 1 127 Strum ...

Page 77: ... Set displayed K1 knob K2 knob Applicable Part Parameter Freeze 1 Parameter Freeze 1 1 Filter Cut Off Frequency Knob Resonance Knob Upper1 2 Brilliance Rev Brilliance Effect Reverb Send Knob Upper1 3 Up1 Cho Rev Chorus Send Effect Reverb Send Sound Mode Upper1 4 Amp Envelope Attack Time Knob Release Time Knob Upper1 5 Vibrato Vibrato Rate Knob Vibrato Depth Knob Upper1 6 Delay Vibrato Delay Vibrat...

Page 78: ...p Cab Mono 2 Band EQ 30 Re Amp 4 Compressor Limiter Amp Cab Delay 31 Re Amp 5 Distortion Delay 32 Drive Amp 1 Mono 3 Band EQ Drive Tone Control Amp Cab 33 Drive Amp 2 Drive Tone Control Amp Cab Tremolo 34 Drive Amp 3 Drive Tone Control Amp Cab AutoPan 35 Drive Amp 4 Drive Tone Control Amp Cab Phaser 36 Drive Amp 5 Drive Tone Control Amp Cab Flanger 37 Drive Amp 6 Drive Tone Control Amp Cab Pitch S...

Page 79: ...ay 75 EQ Mod 3 Tone Control Chorus Tone Control Delay 76 EQ Mod 4 Tone Control Tremolo Chorus Delay 77 Double Phase Amp Cab Phaser Phaser Enhancer 78 DoubleFlang1 Amp Cab Flanger Flanger Tone Control 79 DoubleFlang2 Amp Cab Flanger Flanger Phaser 80 Tremolo Spin Tremolo Drive Rotary Tone Control 81 AmbientEnh 1 Enhancer Reflection Delay Tone Control 82 AmbientEnh 2 Tone Control Enhancer Reflection...

Page 80: ...l input signal Chorus Chorus Gives notes depth and breadth Flanger Flanger Applies wildly pulsating and metallic reverberation to notes Selects the LFO waveform Rotary Rotary This effect is a rotary speaker simulator Drive Rotary DriveRot This is a rotary speaker simulator that makes overdrive possible Pitch Shifter Pitch This effect transforms the pitch of the input signal Ring Modulator Ring Mod...

Page 81: ...000 to 127 DryLevel Dry Level Adjusts the level of the direct sound 000 to 127 Mono 3 Band EQ This is a three band monaural equalizer EQ1 Freq EQ1 Frequency Adjusts the center frequency of Equalizer 1 1 EQ1 Gain EQ1 Gain Adjusts the gain of Equalizer 1 12 to 00 to 12 EQ2 Freq EQ2 Frequency Adjusts the center frequency of Equalizer 2 1 EQ2 Gain EQ2 Gain Adjusts the gain of Equalizer 2 12 to 00 to 1...

Page 82: ...Freq EQ3 Frequency Adjusts the center frequency of Equalizer 3 1 EQ3 Gain EQ3 Gain Adjusts the gain of Equalizer 3 12 to 00 to 12 In Level Input Level Adjusts the input level 000 to 127 WetLevel Wet Level Adjusts the level of the effect sound 000 to 127 DryLevel Dry Level Adjusts the level of the direct sound 000 to 127 Tone Control Provides monaural tone control for adjusting low range mid range ...

Page 83: ...mpressor Compresses the input signal which can have the effect of suppressing level variation Attack Attack Adjusts the time until compression goes into effect A smaller value causes prompt compressor operation which suppresses the attack of the input signal A larger values delays compressor operation which causes the attack of the input signal to be output as is 000 to 127 Release Release Adjusts...

Page 84: ...Low Frequency Adjusts the low range enhancer frequency 000 to 127 Low Gain Low Gain Adjusts the low range enhancer gain 000 to 127 HighFreq High Frequency Adjusts the high range enhancer frequency 000 to 127 HighGain High Gain Adjusts the high range enhancer gain 000 to 127 In Level Input Level Adjusts the input level 000 to 127 WetLevel Wet Level Adjusts the level of the effect sound 000 to 127 D...

Page 85: ...Adjusts the level of the effect sound 000 to 127 In Level Input Level Adjusts the input level 000 to 127 DryLevel Dry Level Adjusts the level of the direct sound 000 to 127 Rotary This effect is a rotary speaker simulator Type Type Selects the rotary speaker type 0 to 3 Speed Speed Switches the speed mode between fast and slow Slow Fast Brake Brake Stops speaker rotation Rotate Stop FallAcel Fall ...

Page 86: ... the direct sound 000 to 127 Pitch Shifter This effect transforms the pitch of the input signal Pitch Pitch Adjusts the pitch shift amount in quarter tone steps 24 to 00 to 24 HighDamp High Damp Adjusts the high range damp A smaller number increases damping 000 to 127 Feedback Feedback Adjusts the feedback amount 000 to 127 In Level Input Level Adjusts the input level 000 to 127 WetLevel Wet Level...

Page 87: ... Feedback Type Selects the feedback type Stereo Stereo feedback Cross Cross feedback Stereo Cross Fdbk Lvl Feedback Adjusts the feedback amount 000 to 127 Hi Damp High Damp Adjusts the high range damp A smaller number increases damping 000 to 127 TmpoSync Delay Tempo Sync Specifies how the actual total delay time is synced with tempo Off Uses Delay Time value 1 4 to 1 Uses value in accordance with...

Page 88: ...omatically shift the frequency in accordance with the level of the input signal In Level Input Level Adjusts the input level The input signal can become distorted when the level of the sound being input the number of chords or the Resonance value is large Adjust this parameter to eliminate such distortion 000 to 127 Resonanc Resonance Adjusts the strength of feedback 000 to 127 Manual Manual Adjus...

Page 89: ...ect DistGain Dist Gain Adjusts the distortion input signal gain 000 to 127 Dist Lvl Dist Level Adjusts the distortion output level 000 to 127 Dist Low Dist Low Adjusts the distortion low range gain 000 to 127 DistHigh Dist High Adjusts the distortion high range gain 000 to 127 Wah Type Wah Type Specifies the wah type 1 to 6 WahDepth Wah Depth Adjusts the depth of the wah in accordance with the lev...

Page 90: ...t drive and distortion Type Type Selects the amp cabinet type 5 1 to 92 Vari Variation Selects a variation that changes the setup of the currently selected amp The number of variations 5 depends on the amp type 1 to 4 WetLevel Wet Level Adjusts the level of the effect sound 000 to 127 DryLevel Dry Level Adjusts the level of the direct sound 000 to 127 Settings Drive Type Display Description 1 to 4...

Page 91: ... TM18 40 3 HK SBL 41 2 KH STDT 42 3 KR RV 43 4 LY IRST 44 3 MB MK3 45 3 MB F3 DI 46 1 MB D5 47 4 MB DRCT 48 1 MB TX 5 Settings V Display 49 4 MB TX DI 50 4 MS VS80 51 4 MS J800 52 2 MS J2401 53 3 MS J2000 54 2 MS J2 MB 55 3 MS PLX 56 2 MS J1 DI 57 4 MT CFT 58 4 OR O15 59 2 PN P7 60 3 PR SE3 61 4 PV 51II 62 4 PV 65MH 63 3 RA NBK 64 2 RL J20 65 2 RL J120 66 2 RV 30 67 4 SA PS1 68 2 SL X8 69 2 SL X9 ...

Page 92: ...nH v 1 127 O 8nH v 0 127 Note ON Note OFF Mode Mode 3 X Mode 3 X Default Messages Altered 0 1 5 6 38 7 10 11 64 65 66 67 71 72 73 Bank select Modulation Portamento time Data entry LSB MSB Volume Pan Expression Hold 1 Portamento switch Sostenuto Soft pedal Filter resonance Release time Attack time Model PX S3000 Version 1 0 O O O O O X O O O O O O O O 2 3 2 3 4 6 2 3 3 2 3 3 3 2 3 2 3 2 3 O O O O O...

Page 93: ...delay Portamento control High resolution velocity prefix Reverb send level Chorus send level Delay send level RPN LSB MSB Mode 1 OMNI ON POLY Mode 3 OMNI OFF POLY Mode 2 OMNI ON MONO Mode 4 OMNI OFF MONO O Yes X No O O O O X O O O X O 2 3 2 3 2 3 2 3 5 2 2 6 2 4 O O O O O O O O O O 4 4 O 4 1 Depends on tone 2 Output in accordance with knob set setting 3 Output in accordance with pedal effect setti...

Page 94: ...MA1903 A PXS3000 E 3A ...

Reviews: