background image

EN-31

Digital Piano Operations

To record a keyboard performance onto a USB 
flash drive

1.

Perform the procedure under “

Prepare to use 

the Audio Recorder

” (page 

EN-30

).

2.

Touch 

7

0

 (REC) so its LED lights white.

This enters record standby, which is indicated by flashing 
of the 

7

0

 (REC) (red) and 

6

a

 (white) LEDs.

• To cancel recording, touch 

7

0

 (REC) again.

3.

To start recording, play something on the 
keyboard or touch 

6

a

.

This causes the 

7

0

 (REC) LED to change from 

flashing red to lit red, indicating that recording is in 
progress.

• The maximum allowable recording time with the audio 

recorder is approximately 25 minutes, after which recording 
will stop automatically. 

7

0

 (REC) will start to flash to let 

you know when you are running out of recording time, so 
end your recording as soon as possible after flashing starts.

• If you make a mistake and want to stop restart overdubbing 

from the beginning, hold down 

7

0

 (REC) during step 3 of 

the above procedure until its LED flashes. This discards 
everything you have recorded to the right-hand track during 
the current overdubbing operation and returns to record 
standby. Perform the operation from step 3 of the above 
procedure to restart overdubbing.

4.

To stop recording, touch 

7

0

 (REC) or 

6

a

.

This causes the 

7

0

 (REC) LED to light white again.

• This will store the recording as a WAV file to the USB 

flash drive. Files are automatically assigned names in 
sequence from “TAKE01.WAV” through 
“TAKE99.WAV”.

• The saved file is selected automatically.

5.

To play back the song you just recorded, touch 

6

a

.

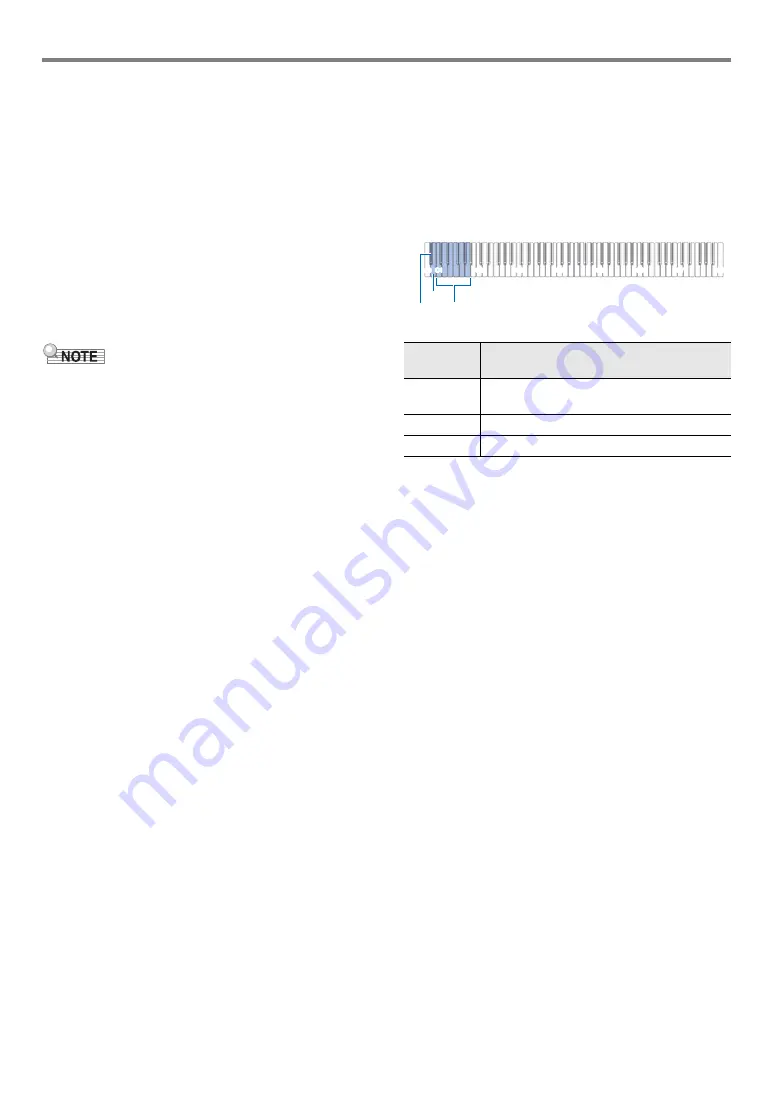
To select and playback a file recorded with the 
audio recorder

1.

Perform the procedure under “

Prepare to use 

the Audio Recorder

” (page 

EN-30

).

2.

While holding down 

6

a

, press one of the 

keyboard keys below to select the song you 
want to listen to.

• For information about how to input numbers and the 

keyboard keys you should use for input, see “

Inputting 

Song Numbers Using the Song Selection Keyboard 
Keys (10-key)

” (page 

EN-10

).

3.

Release 

6

a

.

4.

To start playback, touch 

6

a

.

• Playback stops automatically when the end of the file 

is reached. To stop playback part way through, touch 

6

a

.

Pressing 
this key:

Does this:

C1 to A1

Use the keyboard keys to enter the TAKE 

**

WAV (

**

 = 01 to 99) number.

B0

Selects the next song number.

B

}

0

Selects the previous song number.

B

}

0

B0

C1

A0

C2

C3

C4

C5

C6

C7

C8

C1 - A1

Summary of Contents for Privia PX-S1100

Page 1: ...g Performances in Real Time Using the Sound Mode Effects Hall Simulator and Surround Listening to Songs Music Library Using the MIDI Recorder to Record or Playback Performances Using the Audio Recorder to Record Performances Connecting with a Smart Device Linking with a Smart Device APP Function When the Digital Piano is being operated on battery power only notes may sound distorted when performin...

Page 2: ...nts of this manual either in part or its entirety is prohibited Except for your own personal use any other use of the contents of this manual without the consent of CASIO is prohibited under copyright laws IN NO EVENT SHALL CASIO BE LIABLE FOR ANY DAMAGES WHATSOEVER INCLUDING WITHOUT LIMITATION DAMAGES FOR LOSS OF PROFITS BUSINESS INTERRUPTION LOSS OF INFORMATION ARISING OUT OF THE USE OF OR INABI...

Page 3: ... the Scale Tuning Temperament of the Keyboard EN 24 Listening to Songs Music Library EN 25 Using the MIDI Recorder to Record or Playback Performances EN 27 Creating a Recording EN 28 Playing Back Recorded Content EN 30 Using the Audio Recorder to Record Performances EN 30 Listening to Songs MIDI Player EN 32 USB Flash Drive EN 34 Supported USB Flash Drives EN 34 USB Flash Drive and USB Type A Port...

Page 4: ... blink momentarily to inform you that the Wireless MIDI audio adaptor is not attached 2 Touch buttons Buttons 3 through 8 are touch buttons whose lights light when power is turned on 3 Keyboard note names and pitches The keyboard note names and pitches used in this manual follow the international standard Middle C is C4 the lowest C is C1 and the highest C is C8 The illustration below shows keyboa...

Page 5: ...4 Overview and Setup Back Preparing the Music Stand bk USB Type B port bl USB Type A port bm DAMPER PEDAL jack bn PEDAL UNIT jack bo LINE OUT R L MONO jacks bp DC 12V terminal bk bv bm bn bp bo Music stand ...

Page 6: ...g the AC adaptor from the power outlet During Storage Loop and bundle the power cord but never wind it around the AC adaptor Never insert metal pencils or any other objects into the product s DC12V terminal Doing so creates the risk of accident Do not try to use the power cord that comes with the product with another device Plug the AC adaptor into a power outlet that is close to the Digital Piano...

Page 7: ...e turning on power rotate the 2 volume knob as far as it will go in the direction shown in the illustration below 2 Press the 1P Power button to turn on power Turning on power will cause the lights of the front panel touch button to light in sequence from left to right 3 FUNCTION to 8 GRAND PIANO The Digital Piano is ready to play when all touch button lights are lit After pressing 1P Power to tur...

Page 8: ...rform the procedure below To enable or disable Auto Power Off 1 While holding down 3 FUNCTION press the B 0 keyboard key Each press of the B 0 keyboard key sounds a notification tone and toggles Auto Power off between enabled and disabled For more information see Notification Tones page EN 10 2 After the setting is the way you want release 3 FUNCTION Connect the supplied pedal SP 3 to the bm DAMPE...

Page 9: ...akers when you play To output from the speakers while headphones are connected Enable the Speaker Out setting under Other Settings page EN 45 to output sound from the speakers even if a plug is plugged into either of the 9 PHONES jacks To pair this product with a Bluetooth wireless technology capable external device you need to plug the Wireless MIDI audio adaptor into the Digital Piano s bl USB T...

Page 10: ...t how to configure these settings see To change the panel light setting page EN 46 To turn the touch button lights back on touch the 3 FUNCTION Turning on the Digital Piano under battery power only without AC adaptor power will cause the Panel Light Setting to change automatically to 60 seconds to conserve power You can change the Panel Light Setting if you want Turning off the Digital Piano conne...

Page 11: ...y that toggles the setting between enabled and disabled Invalid tone You press the wrong keyboard key This tone lets you know the operation is invalid Upper limit lower limit tone You press a keyboard key that would cause the setting to become greater than the upper limit or less than the lower limit Initialization tone Settings were returned to the initial defaults This tone sounds when you press...

Page 12: ...one using keyboard keys 1 While holding down 8 GRAND PIANO press a keyboard key from A0 through C 2 For example pressing the F 1 keyboard key will select the HARPSICHORD tone and will sound the confirmation tone using the HARPSICHORD tone For information about the tone assigned to each keyboard key see Tone List page EN 56 2 Release 8 GRAND PIANO To select a tone with the touch buttons Touching 8 ...

Page 13: ...ing the STRINGS 1 tone For information about the tone assigned to each keyboard key see GRAND PIANO Button Keyboard Key in the separate Keyboard Function List 5 Release 8 GRAND PIANO Now when you press a keyboard key to play the two tones Upper1 and Upper2 you selected will sound at the same time To go back to playing with the Upper1 tone only disable the layer function You can adjust the volume o...

Page 14: ...8 GRAND PIANO press the D2 keyboard key This assigns the bass tone to the lower range 3 Release 8 GRAND PIANO You can adjust the volume of the Lower part and configure other Lower part settings For more information see Configuring Upper2 Part and Lower Part Settings page EN 40 To unsplit the keyboard Touch 8 GRAND PIANO This unsplits the keyboard and selects the GRAND PIANO CONCERT tone Touch Resp...

Page 15: ... keyboard key You can change the pitch of the keyboard within the range of 12 to 12 semitones 2 After the setting is the way you want release 8 GRAND PIANO Pressing this key Selects this setting Which does this F 3 Off Disables Touch Response Sound volume is fixed regardless of key press speed G3 1 Light Makes production of a louder sound easier so touch feels lighter than Normal A 3 2 Medium ligh...

Page 16: ... the D3 or E 3 keyboard key You can shift the octave within the range of 2 to 2 2 After the setting is the way you want release 8 GRAND PIANO To change the Upper2 part pitch in octave units 1 While holding down 8 GRAND PIANO press the E 4 or E4 keyboard key You can shift the octave within the range of 2 to 2 2 After the setting is the way you want release 8 GRAND PIANO Fine Tuning a Pitch Tuning P...

Page 17: ...the Digital Piano s 9 PHONES jacks or bo LINE OUT R L MONO jacks To enable or disable the Hall Simulator and Surround effects 1 Touch 4 SOUND MODE Each touch will cycle between the settings and the current setting is indicated by the LED lights as shown below To specify the Hall Simulator type 1 While holding down 4 SOUND MODE press a keyboard key from A0 through C1 2 Release 4 SOUND MODE Using th...

Page 18: ...l sound any time the value becomes a multiple of 10 10 20 etc 3 After the setting is the way you want release 4 SOUND MODE To specify the Surround type 1 While holding down 4 SOUND MODE press the F1 Surround Type 1 or F 1 Surround Type 2 keyboard key 2 Release 4 SOUND MODE Pressing this key Does this C 1 Lowers the effect depth applied to the Digital Piano sound source one level D1 Raises the effe...

Page 19: ... of 1 or greater gives notes a brighter feel while 1 or less makes notes sound more mellow 2 After the setting is the way you want release 4 SOUND MODE Using Chorus Pressing this key Selects this setting Which does this G1 Tone Specifies the initial setting of each tone A 1 1 Applies light chorus A1 2 Applies medium chorus B 1 3 Applies deep chorus B1 4 Applies a sweeping flanger effect C1 A0 C2 C...

Page 20: ...want For example to select the 4 setting for String Resonance press the F3 keyboard key For more information about setting items and their settings see the List of Acoustic Piano Sound Setting Items page EN 20 3 After all the settings are the way you want release 4 SOUND MODE Adjusting Acoustic Piano Sound Characteristics Acoustic Simulator Setting Item Setting Tone Off 1 2 3 4 String Resonance C3...

Page 21: ...g sound that is generated as the damper of an acoustic piano separates from the wires pedal when the damper pedal is pressed You can use the settings in the column to the right to adjust the volume of the damper noise Tone Specifies the initial setting of each tone Off Mutes Damper Noise 1 to 4 The greater the value the greater the noise volume Key On Action Noise When the keys of an acoustic pian...

Page 22: ...s shown in the table below 2 Release 5 METRONOME To adjust the metronome volume 1 While holding down 5 METRONOME press the B 1 or B1 keyboard key You can adjust the metronome volume within the range of 0 muted and 42 maximum As you use the B 1 and B1 keyboard keys to change the setting the reference tone page EN 10 will sound any time the value becomes a multiple of 10 10 20 etc 2 Release 5 METRON...

Page 23: ...r B 0 keyboard key to raise or lower the tempo by 1 with each press Pressing the A0 and B 0 keyboard keys at the same time will return the tempo setting to the initial default value for the currently selected Music Library song page EN 25 3 After the setting is the way you want release 5 METRONOME To raise or lower the tempo setting value by one 1 While holding down 5 METRONOME press the A0 or B 0...

Page 24: ...it to the bm DAMPER PEDAL jack In the Duet Mode this pedal functions as a damper pedal regardless of the effect type assigned to it with the procedure under Changing Pedal Functions page EN 44 Half pedal operation is not supported in this case To use the Duet Mode 1 While holding down 3 FUNCTION press the C6 keyboard key Each time the C6 keyboard key is pressed to change this setting a notificatio...

Page 25: ...s to the applicable scale as shown in the table below 2 Release 3 FUNCTION Pressing this key Does this C 6 Lowers the left side keyboard one octave D6 Raises the left side keyboard one octave C 6 D6 Returns the range of the left side keyboard to its initial default setting E 6 Lowers the right side keyboard one octave E6 Raises the right side keyboard one octave E 6 E6 Returns the range of the rig...

Page 26: ... playback and practice songs user songs transferred from a smart device or a USB flash drive to Digital Piano memory as Music Library songs 61 through 70 You can add user songs from a smart device or USB flash drive connected with the Digital Piano You can delete user songs from a smart device that is connected with the Digital Piano For details see Linking with a Smart Device APP Function page EN...

Page 27: ...rary songs page EN 26 to select the song you want to practice 2 As required perform the procedure under Specifying the Tempo page EN 22 to specify the tempo of the song With some songs the tempo will change part way through for the sake of performance expression 3 Select the playback part left hand or right hand part 1 While holding down 6 a press keyboard key A0 leftmost white key Each press of t...

Page 28: ...strument Digital Interface It is a universal standard that makes it possible for musical instruments computers and other devices to exchange performance information keyboard key press release touch pressure etc regardless of manufacturer Performance data in this case is called MIDI data Recorded MIDI Data Recording with the MIDI recorder also records the operations and settings below in Digital Pi...

Page 29: ...ly when the number of remaining recordable notes becomes 0 Should power fail during recording all of the data in the track you are recording will be deleted You cannot use keyboard operations to configure settings while in record standby or while recording is in progress Read Preparing to Use the MIDI Recorder page EN 28 before performing the operation below Quick Guide Simplest performance record...

Page 30: ...recording To overdub a left hand part track recording with right hand part track recording 1 Perform steps 1 and 2 under To record the left hand part track page EN 29 2 Press 70 REC as many times as necessary until the R and L indicators are as described below R indicator flashing This indicates that the right hand part track will be recorded The L indicator stops flashing This indicates that the ...

Page 31: ...inear PCM 16bit 44 1kHz stereo to the USB flash drive in the Digital Piano s bl USB Type A port Never remove the USB flash drive while Audio Recorder recording or playback is in progress Doing so can corrupt the data on the USB flash drive and damage the USB flash drive port For precautions when handling a USB flash drive see USB Flash Drive page EN 34 For information about the USB flash drive for...

Page 32: ...rdubbing operation and returns to record standby Perform the operation from step 3 of the above procedure to restart overdubbing 4 To stop recording touch 70 REC or 6 a This causes the 70 REC LED to light white again This will store the recording as a WAV file to the USB flash drive Files are automatically assigned names in sequence from TAKE01 WAV through TAKE99 WAV The saved file is selected aut...

Page 33: ...eyboard keys to enter the TAKE WAV 01 to 99 number B0 Selects the next song number B 0 Selects the previous song number B 0 B0 C1 A0 C2 C3 C4 C5 C6 C7 C8 C1 A1 C1 A0 C2 C3 C4 C5 C6 C7 C8 B 1 C1 A0 C2 C3 C4 C5 C6 C7 C8 C1 Listening to Songs MIDI Player Song Type Description User songs You can add up to 10 songs to Digital Piano memory as user songs Song Number 61 through 70 To add user song data up...

Page 34: ... drive 1 Perform steps 1 through 4 under To select a song on a USB flash drive and play it page EN 33 to select the song you want to practices 2 If you want you could use the procedure under Specifying the Tempo page EN 22 to specify the tempo 3 Select the playback part left hand or right hand part 1 While holding down 6 a press keyboard key A0 leftmost white key Each press of the A0 keyboard key ...

Page 35: ... drive with an anti virus function and or security functions is not supported Be sure to observe the precautions provided in the documentation that comes with the USB flash drive Avoid using a USB flash drive under the conditions below Such conditions can corrupt data stored on the USB flash drive Areas subjected to high temperature high humidity or corrosive gas Areas subjected to strong electros...

Page 36: ...connect a USB flash drive 1 Check to confirm that there is no data exchange operation being performed and then pull the USB flash drive straight out Be sure to format a USB flash drive on the Digital Piano before using it for the first time Formatting a USB flash drive deletes all data currently stored on it Before formatting a USB flash drive make sure it does not have any valuable data stored on...

Page 37: ... your Digital Piano are those shown in the table below Digital Piano 3 USB flash drive The data below can be stored to a USB flash drive from Digital Piano memory USB Flash Drive 3 Digital Piano You can import the data below from a USB flash drive into Digital Piano memory rename it and delete it Audio data can be deleted but it cannot be imported to Digital Piano memory Even if a file name has on...

Page 38: ... to import to Digital Piano memory into one of the sub folders in the MUSICDAT folder of the USB flash drive Only one song in each sub folder can be imported If there are multiple files in a sub folder the first file in the list of file names is imported 2 Insert the USB flash drive into the Digital Piano s bl USB Type A port 3 Perform the steps below to enter the Digital Piano MIDI Mode See Prepa...

Page 39: ...ts the delete operation The LEDs above 4 SOUND MODE and 6 a will light sequentially from left to right during the delete operation 6 Release 3 FUNCTION when deleting starts The LEDs stop lighting sequentially when the delete operation is complete You can use the same operations as those for built in songs to play back files of the formats below which are stored in the MUSICDAT folder Standard MIDI...

Page 40: ...erence tone page EN 10 will sound any time the setting value becomes a multiple of 10 10 20 etc Configuring Settings Adjusting the Upper1 Part Volume Pressing this key Does this C3 Lowers the Upper1 part volume by 1 1 C 3 Raises the Upper1 part volume by 1 1 C3 C 3 Returns the volume of the Upper1 part to the initial default setting C1 A0 C2 C3 C4 C5 C6 C7 C8 C3 C 3 ...

Page 41: ...he Upper2 part one cent 2 F4 F 4 Makes the pitch of the Upper2 part identical to the pitch of the Upper1 part default Upper2 Damper Toggles application of the damper pedal effect to the Upper2 part between enabled and disabled G4 Toggles between enabled and disabled Lower Volume Specifies the Lower part volume A 4 Lowers the Lower part volume by 1 1 2 A4 Raises the Lower part volume by 1 1 2 A 4 A...

Page 42: ...volume level within the range of 0 muted to 42 maximum D5 Lowers the MIDI song volume by 1 1 E 5 Raises the MIDI song volume by 1 1 D5 E 5 Returns the MIDI song volume to its initial default setting Audio Song Playback Volume Adjusts the playback volume of audio songs 2 relative to the overall volume level within the range of 0 muted to 42 maximum E5 Lowers the audio song playback volume by 1 1 F5...

Page 43: ...pends on the sound being input To change the center cancel setting hold down 3 FUNCTION as you press the keyboard key shown below Using Center Cancel This setting Pressing this key Does this Audio Song Center Cancel Cancels the sound in the center position of an audio song F 5 Each press toggles between on and off Bluetooth Audio Center Cancel Cancels the sound in the center position of Bluetooth ...

Page 44: ...ce G6 Toggles between on and off Keyboard Channel This setting specifies a channel from 1 through 16 as the MIDI channel that can be used for sending data to an external device A 6 Lowers the Keyboard Channel by 1 A6 Raises the Keyboard Channel by 1 A 6 A6 Returns the Keyboard Channel to its initial default setting 1 Hi Reso Velocity MIDI Out This setting enables disables high resolution MIDI outp...

Page 45: ...3 FUNCTION Changing Pedal Functions Notification Tone Count With this setting The pedal does this 1 Damper Sustains notes played while the pedal is depressed even if the keyboard key is subsequently released Organ and other tones that are sustained as long as keyboard key are depressed continue to sound as long as the pedal is depressed 2 Sostenuto Only the notes of the keys that are depressed whe...

Page 46: ...wer you can configure a setting that will turn off all button lights except for 3 FUNCTION after a certain period of non operation You can specify a trigger time of 5 30 60 or 120 seconds You can also disable this setting which means that lights will remain on G7 See To change the panel light setting page EN 46 Auto Resume Enabling Auto Resume causes most settings to be saved while power is turned...

Page 47: ...erve power You can change the Panel Light Setting if you want Panel Lock While this setting is enabled the LEDs of all touch buttons except 3 FUNCTION are turned off and all operations are disabled at all times except for those below While Auto is selected for this setting operations are disabled during performances only 2 1P Power button power operations Turning off Digital Piano power cancels pa...

Page 48: ...ash Step 3 below will execute the initialization operation If you want to cancel initialization at this point release 3 FUNCTION 3 To execute initialization press the C1 keyboard key This starts initialization 4 Release 3 FUNCTION The initialization operations takes some time to complete Wait until initialization is complete All front panel touch button lights 3 FUNCTION to 8 GRAND PIANO light whe...

Page 49: ... audio adaptor for the Bluetooth function linking 1 Referring to To download the smart device app page EN 48 install the app on the smart device 2 Plug the Wireless MIDI audio adaptor into the Digital Piano s bl USB Type A port page EN 8 After connecting the smart device to the Digital Piano use the smart device app to perform operations For details about operations refer to the user documentation...

Page 50: ...l Piano bk USB Type B port After connecting the smart device to the Digital Piano use the smart device app to perform operations For details about operations refer to the user documentation of the app Put the mobile device you will connect with into its Airplane Mode or otherwise disable device communications When connecting a smart device to the Digital Piano do not connect both a USB cable and a...

Page 51: ...Action Replace the batteries with new ones or switch over to AC adaptor power page EN 5 Cause a The current transpose setting of the keyboard is something other than the default setting b The Digital Piano s tuning setting is something other than 440 0Hz c Octave shift is enabled d The current scale setting is something other than Equal Temperament Action a Return transpose page EN 14 to its initi...

Page 52: ... etc Pressing a button when one of these conditions exists will cause the effect setting that is built into the tone to change automatically which causes notes to cut out momentarily or causes a slight change in how effects are being applied Action You can add user songs from a smart device or USB flash drive connected with the Digital Piano You can delete user songs from a smart device that is co...

Page 53: ...ta with a name that is already used for another read only file on the USB flash drive Rename the file on the USB flash drive to something else and then save it Remove the read only attribute from the existing USB flash drive file and overwrite it with the new data Use a different USB flash drive There is not enough room available on the USB flash drive Delete some of the files on the USB flash dri...

Page 54: ...leted This Digital Piano does not support the USB flash drive file version Use a version that the Digital Piano supports The USB flash drive format is not compatible with this Digital Piano Use a computer or other device to change the USB flash drive format to something that is compatible with the Digital Piano page EN 35 Use a different USB flash drive The USB flash drive is corrupted Use a diffe...

Page 55: ...song approximately 900KB for 10 songs Based on 1KB 1024 bytes 1MB 10242 bytes Song volume Adjustable Setting also affects MIDI recorder song playback Part On Off L R MIDI Recorder Real time recording and playback as MIDI data Number of Song 1 Number of Tracks 2 Capacity Approximately 10 000 notes total Recorded Data Protection Built in flash memory MIDI recorder volume Adjustable Setting also affe...

Page 56: ... Speakers 16cm 8cm oval 2 Power Supply 2 way Batteries 6 AA size alkaline batteries Continuous Operation Approximately 4 hours Playback of built in demo tunes on alkaline batteries Actual continuous operation time may be shorter due to battery type and performance type AC Adaptor AD A12150LW Auto Power Off Approximately four hours under AC adaptor power or six minutes under battery power after las...

Page 57: ...ge Bank Select MSB GRAND PIANO CONCERT A0 0 0 GRAND PIANO BRIGHT B 0 1 0 GRAND PIANO MELLOW B0 2 0 ROCK PIANO C1 3 0 JAZZ PIANO C 1 4 0 ELEC PIANO D1 5 0 DIGITAL E PIANO 1 E 1 6 0 DIGITAL E PIANO 2 E1 7 0 60 S E PIANO F1 8 0 HARPSICHORD F 1 9 0 VIBRAPHONE G1 10 0 STRINGS 1 A 1 11 0 STRINGS 2 A1 12 0 PIPE ORGAN B 1 13 0 JAZZ ORGAN B1 14 0 ELEC ORGAN 1 C2 15 0 ELEC ORGAN 2 C 2 16 0 BASS D2 17 0 ...

Page 58: ...ina Op 36 1 1st Mov 26 C 4 Sonatine Op 20 1 1st Mov 27 D4 Sonate K 545 1st Mov 28 E 4 Sonate K 331 3rd Mov Turkish March 29 E4 Rondo K 485 30 F4 Für Elise 31 F 4 Marcia alla Turca 32 G4 Sonate Op 13 Pathétique 1st Mov 33 A 4 Sonate Op 13 Pathétique 2nd Mov 34 A4 Sonate Op 13 Pathétique 3rd Mov 35 B 4 Sonate Op 27 2 Moonlight 1st Mov 36 B4 Rhapsodie 2 37 C5 Waltz Op 39 15 Duet 38 C 5 Liebesträume 3...

Page 59: ... O 9nH v 1 127 X 8nH v 64 Note ON Note OFF Mode Mode 3 X Mode 3 X Default Messages Altered 0 32 1 5 6 38 7 10 11 64 65 66 67 71 72 73 Bank select LSB MSB Modulation Portamento time Data entry LSB MSB Volume Pan Expression Hold 1 Portamento switch Sostenuto Soft pedal Filter resonance Release time Attack time Model PX S1100 Version 1 0 O X X O O X X O X O O X X X 1 4 4 2 2 2 4 4 4 O O O O O O O O O...

Page 60: ...o rate Vibrato depth Vibrato delay Portamento control High resolution velocity prefix Reverb send level Chorus send level Delay send level RPN LSB MSB Mode 1 OMNI ON POLY Mode 3 OMNI OFF POLY Mode 2 OMNI ON MONO Mode 4 OMNI OFF MONO O Yes X No X X X X X O X X X X 4 3 4 4 4 1 O O O O O O O O O O 1 1 O 1 1 For details about RPN and system exclusive messages see MIDI Implementation at https world cas...

Page 61: ...MA2204 B PXS1100 E 2B ...

Reviews: