background image

21

4.

Correcting the hue, changing the size, printing an image
See “Adjusting the Hue” on page 14, “Changing the Size of an
Image” on page 17 or ”Printing Images” on page 22.

5.

Save the image after rotating or inverting. If not saved, the
changes will not be applied to the actual image data. See
“Saving Images” on page 21.

IMPORTANT
• Saving the image updates the Photo Loader library. If you do not wish to

overwrite the image in the Photo Loader library, save the image in another
location on the PC.

Saving Images

This section describes how to save an image.

IMPORTANT
• Always save the image after the image data has been edited. If not, the edited

content of the image data will not be displayed.

1.

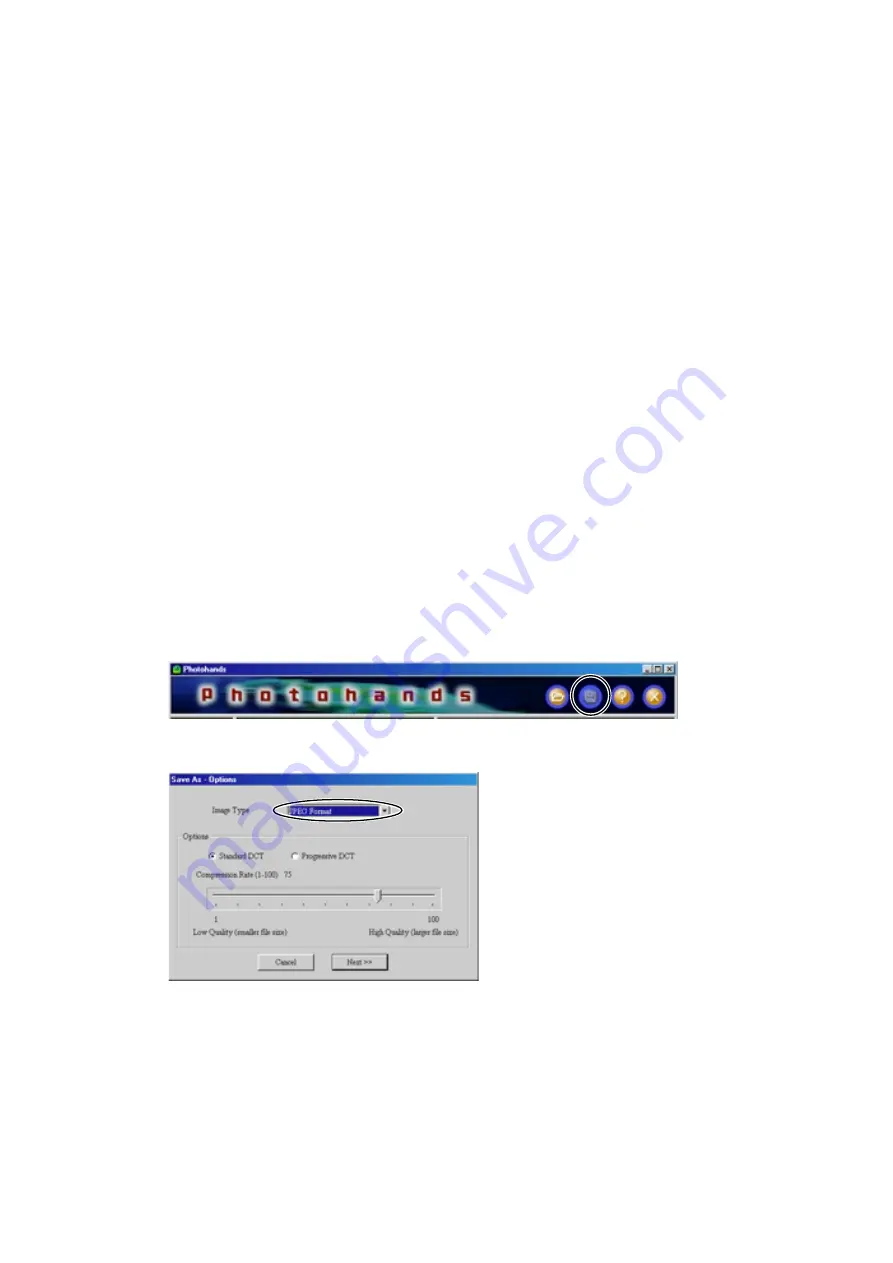
After editing the image, click the [Save] icon.

2.

Select the file saving format.

• The file formats that Photohands can save are the following:

JPEG, BMP, PNG.
* Images cannot be saved in TIFF format.

• The rate of compression can be adjusted by choosing JPEG. If

the compression rate is set high, the file size will be smaller,
however, the image quality will deteriorate. On the other hand, if
you want to keep image resolution, set the compression rate to
low (high image quality).

Summary of Contents for Photohands

Page 1: ...Instruction manual K862PSM8DMX Retouching Printing Software for Windows Photohands Version 1 0 E...

Page 2: ...prepared with our utmost effort However please contact us if there are any queries or errors Photohands is published by CASIO COMPUTER CO LTD and CASIO COMPUTER CO LTD retains all copyrights and other...

Page 3: ...m the Task tray 8 Starting Photohands from the Photo Loader menu screen 9 Starting Photohands from the Photo Loader Library screen 10 Starting Photohands from the Photo Loader image view screen 11 Usi...

Page 4: ...ese basic operations see the PC manual or the Windows User s Manual All operations in this book are described assuming the use of Windows 98 For first time users of Photohands Read the Read me file in...

Page 5: ...on page 17 7 Rotate icon Rotating Inverting an Image on page 19 8 Print icon Printing Images on page 22 9 Zoom In Preview button Click to magnify image view in the preview window 0 Zoom Out Preview bu...

Page 6: ...reen images illustrated in this document are for Windows 98 Views may differ if using other Windows versions Note that screen images in this document may differ slightly from the actual screens but th...

Page 7: ...een From the Photo Loader library index From the Photo Loader image viewing screen IMPORTANT Photohands must be installed on your PC before starting it Starting Photohands from the Start menu 1 Switch...

Page 8: ...sk tray 1 Right click the icon in the Task tray 2 Select and click Starting Photohands Photohands starts up and the starting window appears An image will be displayed in the window on opening the file...

Page 9: ...9 Starting Photohands from the Photo Loader menu screen 1 Click the Print button in the Photo Loader function buttons Photohands starts up and the starting window appears...

Page 10: ...Loader Library screen 1 Click the PRINT button in the Library screen Photohands starts up and the starting window appears The first image in the Photo Loader library is displayed The second image in...

Page 11: ...lick the PRINT button on the image view screen Photohands starts up and the starting window appears The image viewed in Photo Loader is displayed The image viewed in Photo Loader is displayed first Ot...

Page 12: ...splaying Images This section describes how to display images IMPORTANT The image file formats that can be handled with Photohands are JPEG BMP PNG and TIFF Readable TIFF files are non compressed RGB T...

Page 13: ...13 2 Select the image to be displayed 3 Click the Open button The selected image is displayed The file information is displayed...

Page 14: ...ight and dark areas of the image Brightness For adjusting the brightness of the entire image Saturation For darkening the entire image s hues when they are bright or lightening the entire image s hues...

Page 15: ...to set a value 2 Adjusting brightness Move in the right direction to lighten the image Move in the left direction to darken the image Enter a value in the range 100 to 100 or Drag the slider to set a...

Page 16: ...e ON button to remove noise Check the OFF button to not remove noise 6 Filter setting This function changes the image color Click the Sepia or Black White buttons to select the function Click the Sepi...

Page 17: ...omputer s hard disk Changing the Size of an Image This section describes how to change the size of an image TIP The size of an image can be changed in the Preview window Preview the image to be change...

Page 18: ...utomatically changed accordingly Click the Cancel button to go back to the previous screen before you click the OK button 3 Click the OK button to change the size The image is redrawn in the Preview w...

Page 19: ...omputer s hard disk Rotating Inverting an Image This section describes how to rotate invert an image TIP An image can be rotated or inverted the Preview window Preview the image to be edited first See...

Page 20: ...lick the OK button to save the rotated or inverted image The image is redrawn in the Preview window Click the Cancel button to go back to the previous screen before you click the OK button The image i...

Page 21: ...tion on the PC Saving Images This section describes how to save an image IMPORTANT Always save the image after the image data has been edited If not the edited content of the image data will not be di...

Page 22: ...editing the images overwrite them or save them under a different name After that re edit them in Photo Loader 5 Click the Save button The file is saved with the name specified in Step 4 Click the Can...

Page 23: ...rint the date when the image was taken with the camera Depending on the printer the date may be printed incorrectly Be sure to read the printer s manual and change the printer settings such as the pri...

Page 24: ...24 2 Click the Print button Printing starts Click the Print Preview button to show the print preview image Click the Cancel button to abandon the current action...

Page 25: ...25 Getting Help 1 Click the Help icon 2 Double click the item to be viewed The item double clicked is displayed Quitting Photohands 1 Click the Quit icon Photohands quits...

Reviews: