background image

General Guide

EN-4

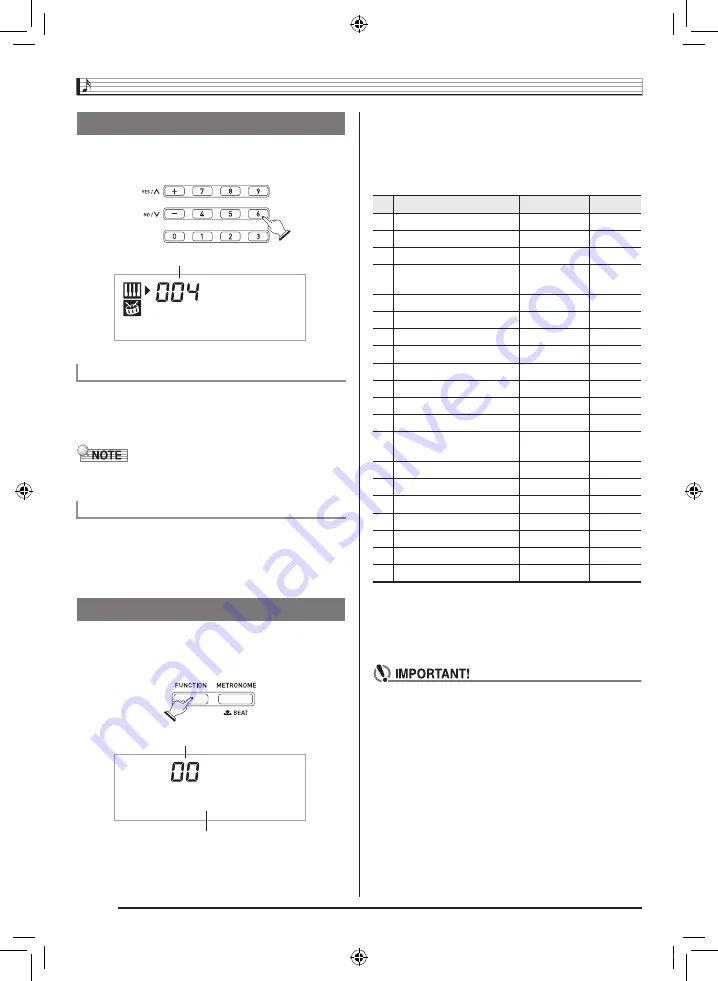
Use the number buttons and the [–] and [+] keys to change 
the settings of the parameters that appear in the upper left 
area of the display.

Use the number buttons to enter numbers and values.

• Enter the same number of digits as the currently displayed 

value.

Example:

To enter tone number 004, input 0 

3

 0 

3

 4.

• Negative values cannot be input using the number buttons. 

Use [+] (increase) and [–] (decrease) instead.

You can use the [+] (increase) and [–] (decrease) keys to 
change the displayed number or value.

• Holding down either key scrolls the displayed setting.
• Pressing both keys at the same time will revert to the initial 

default setting or the recommended setting.

Use the 

FUNCTION button (

3

) to access settings that let 

you select the reverb type, pedal effect, etc.

1.

Press 

3

 (FUNCTION).

2.

Next press 

3

 (FUNCTION) until the parameter 

whose setting you want to change is displayed.

• Each press of 

3

 (FUNCTION) cycles through the 

available parameters.

• To scroll backwards through parameters, hold down 

3


(FUNCTION) as you press 

4

 (METRONOME).

3.

When the parameter you want is displayed, use 

bp

 (10-key) to change its setting.

• The parameter setting will disappear from the upper left 

area of the screen if you do not perform any operation 
for some time.

• The tone and other parameters revert to their initial 

defaults whenever you turn on power (page EN-6).

Using the 10-key Pad (

bp

)

Number Buttons

[–] and [+] Keys

Using the FUNCTION Button (

3

)

M d e r n P n o

Setting

Parameter

Setting

T r a n s .

Parameter

Display

See Page

1

Transpose

Trans.

EN-11

2

Accompaniment Volume

AcompVol

EN-32

3

Song Volume

Song Vol

EN-20

4

Touch Response 
(LK-260 only)

Touch

EN-7

5

Tuning

Tune

EN-11

6

Reverb

Reverb

EN-10

7

Voice Fingering Guide

Speak

EN-25

8

Note Guide

NoteGuid

EN-26

9

Performance Evaluation

Scoring

EN-26

10 Phrase

PhraseLn

EN-26

11 Sampling Start

SampAuto

EN-16

12 Sampling Play Back

SampPB

EN-17

13

Auto Incrementing during 
Short Sampling

AutoIncr

EN-17

14 Keyboard Channel

Keybd Ch

EN-34

15 Navigate Channels

Navi. Ch

EN-34

16 Local Control

Local

EN-35

17 Accomp Out

AcompOut

EN-35

18 Pedal Effect

Jack

EN-10

19 Keyboard Lighting

Keylight

EN-7

20 Power On Alert

Demo2

EN-6

LK260_A5_x1a_EN_ES.indd   6

2014/02/21   15:06:59

Summary of Contents for LK-170

Page 1: ...for future reference Safety Precautions Before trying to use the Digital Keyboard be sure to read the separate Safety Precautions LK 170 LK 175 LK 260 English Espa ol This recycle mark indicates that...

Page 2: ...icular installation If this equipment does cause harmful interference to radio or television reception which can be determined by turning the equipment off and on the user is encouraged to try to corr...

Page 3: ...17 Playing Built in Songs EN 18 Playing the Demo Songs EN 18 Playing Back a Particular Song EN 18 Using Built in Songs to Master Keyboard Play EN 22 Phrases EN 22 Step Up Lesson Flow EN 22 Selecting...

Page 4: ...rd refers to the LK 170 LK 175 LK 260 In this manual buttons and other controllers are identified using the numbers shown below bm bp 5 bnbo cm cn cr cs cp co cq cm ct dk bq br bs bt ck cl 1 2 3 4 6 7...

Page 5: ...YTHM ONE TOUCH PRESET button EN 13 28 32 boSONG BANK button EN 12 18 bpNumber buttons keys EN 4 bqSAMPLED TONES EFFECTS 1 LISTEN button EN 15 24 brSAMPLED TONES EFFECTS 2 WATCH button EN 15 24 bsSAMPL...

Page 6: ...N as you press 4 METRONOME 3 When the parameter you want is displayed use bp 10 key to change its setting The parameter setting will disappear from the upper left area of the screen if you do not perf...

Page 7: ...5V DC terminal Doing so creates the risk of accident Be sure to turn off power before loading batteries It is up to you to prepare six commercially available AA size batteries Do not use oxyride batt...

Page 8: ...hile holding down bm TONE turn on power Auto Power Off will be disabled While you are using the AC adaptor for power the keyboard keys will light to remind you that power is on if you do not perform a...

Page 9: ...FUNCTION a number of times until Touch appears on the display page EN 4 2 Use bp 10 key and keys to select one of the three Touch Response sensitivity settings Keyboard Lighting causes keyboard keys...

Page 10: ...e the following procedure to change the tempo of the metronome 1 Press 5 Use w slower and q faster to change the tempo setting Holding down either button changes the setting at high speed Pressing w a...

Page 11: ...t of available tones When one of the drum sets is selected tone numbers 395 through 400 each keyboard key is assigned a different percussion sound 3 Try playing something on the keyboard The tone of t...

Page 12: ...eys to select the pedal effect you want The following shows the available pedal effects Using Reverb Off oFF Turns off reverb 1 to 10 The larger the number selected the longer the reverb duration R e...

Page 13: ...a CD The tuning feature specifies the frequency of the A4 note You can set a frequency within the range of 415 5 to 465 9 Hz The initial default setting is 440 0 Hz 1 Press 3 FUNCTION a number of tim...

Page 14: ...icrophone are not output through the speakers You cannot sample sounds input from through the AUDIO IN jack The built in microphone automatically becomes disabled whenever an external microphone is co...

Page 15: ...samples each with a length of up to approximately 0 4 seconds Short samples are assigned rhythm parts and can be sounded as voice percussion For details see Using a Sampled Sound in a Rhythm VOICE PER...

Page 16: ...ing the SAMPLING button This will perform short sampling and assign the result to the number that corresponds to the button you press 6 Repeat steps 2 through 5 as many times as necessary to perform t...

Page 17: ...from high to low at a decreasing rate 407 Pitch 3 Long Changes pitch from high to low at a decreasing rate and then raises the pitch when the key is released 4 408 Tremolo Long Alternates volume betwe...

Page 18: ...u release cq in step 2 under Long Sampling page EN 12 or step 2 under Short Sampling page EN 13 When the above setting is oFF sampling starts when you release cq not when you press it Sampling will no...

Page 19: ...e or disable auto incrementing of the short sampling number during short sampling 1 Keep pressing 3 FUNCTION until AutoIncr appears on the display 2 Press bp 10 key key to disable short sample number...

Page 20: ...s to enter the song number you want page EN 4 This will cause demo playback to jump to the song whose number you entered You cannot use bp 10 key number buttons to select a song 3 To stop demo playbac...

Page 21: ...stopped performs lesson function phrase skip forward page EN 23 Skip Back 1 Press 7 This skips song playback back to the previous measure Each press of 7 skips back one measure Holding down 7 skips b...

Page 22: ...Press 5 Use w slower and q faster to change the tempo setting Holding down either button changes the setting at high speed Pressing w and q at the same time will return the current song to its origin...

Page 23: ...right hand part tone is assigned to the keyboard You can turn off the right hand part or the left hand part of a song during playback and practice playing the along with the remaining part 1 Press bl...

Page 24: ...rt left hand part and both hand parts for each phrase of a song Master all of the phrases and you master the song bp bp bq bq br br bs bs bt bt ck ck cl cl 3 3 6 6 7 7 8 8 bk bk bl bl bo bo Phrases So...

Page 25: ...to the keyboard page EN 21 Messages that Appear during Lessons Message Description Phrase Appears when you select a phrase when a lesson starts etc Note that certain phrases will cause Wait to appear...

Page 26: ...ed on the display and by voice fingering guide During this lesson the display shows the key you need to press next Voice fingering guide uses a simulate voice to announce which finger you should use 3...

Page 27: ...epeat for Lessons 1 2 and 3 1 Press 6 This disables phrase repeat play Use the following procedure to turn off voice fingering guide which tells you which finger to use to play each note in Lesson 2 a...

Page 28: ...Auto Step Up Lesson the Digital Keyboard advances through each lesson automatically 1 Select the song and part you want to practice page EN 18 2 Press ck Listen to the first phrase in Lesson 1 In Les...

Page 29: ...tained Phrase 1 Lesson 1 4 Lesson 2 4 Lesson 3 4 Phrase 2 Lesson 1 4 Lesson 2 4 Lesson 3 4 Phrase 1 2 Lesson 3 4 Phrase 3 Lesson 1 4 Lesson 2 4 Lesson 3 4 Phrase 1 2 3 Lesson 3 4 Next phrase practice...

Page 30: ...t and waltz Use the following procedure to play the basic rhythm part 1 Press bn RHYTHM 2 Use bp 10 key to select the rhythm number you want See the separate Appendix for information about individual...

Page 31: ...ompaniment as soon as a chord is played see Using Synchro Start on page EN 32 You can select from among the following five chord input modes FINGERED 1 FINGERED 2 FINGERED 3 CASIO CHORD FULL RANGE CHO...

Page 32: ...ompaniment keyboard Accompaniment keyboard Chord Type Example Major Chords Letters above the accompaniment keyboard indicate the chord assigned to each key Pressing a single accompaniment area key in...

Page 33: ...ce A fill in is a short phrase played where you want to change the mood of a piece A fill in pattern can be used to create a link between two melodies or an accent Normal and variation patterns have t...

Page 34: ...can use bp 10 key to change it If you do not perform any operation for after the tempo setting screen appears the display will return to the screen displayed before you pressed 5 Use the following pro...

Page 35: ...yboard and then start up your computer Do not start up the music software on your computer yet 2 After starting up your computer use a commercially available USB cable to connect it to the Digital Key...

Page 36: ...a to a computer You can select the channel you want for sending Digital Keyboard data to a computer The keyboard channel setting range is 01 to 16 1 Press 3 FUNCTION a number of times until Keybd Ch a...

Page 37: ...xchanging data with a computer when you may not want the Digital Keyboard to sound notes you play on its keyboard The local control setting lets you do just that 1 Press 3 FUNCTION a number of times u...

Page 38: ...Keyboard s volume setting Connection requires commercially available connecting cords supplied by you The connecting cords should have a stereo mini plug on one end and a plug that matches the config...

Page 39: ...om straight ahead This is dues to production limitations It does not indicate malfunction Sound Nothing happens when I press any keyboard key Adjust the main volume setting page EN 6 Check if somethin...

Page 40: ...re deleted Be sure to press the power button to turn off power Unplugging or disconnecting the AC adaptor without first pressing the power button to turn off power will cause sampled sounds to be dele...

Page 41: ...t 440 0 Hz MIDI 16 multi timbre received GM Level 1 standard Musical Information Function Tone Rhythm Song Bank numbers and names staff notation fingering pedal operation tempo measure and beat number...

Page 42: ...nt Wring all excess moisture from the cloth before wiping Included and Optional Accessories Use only accessories that are specified for use with this product Use of unauthorized accessories creates th...

Page 43: ...CA FAREWELL EVENT 046 SILENT NIGHT 047 WE WISH YOU A MERRY CHRISTMAS 048 JINGLE BELLS 049 JOY TO THE WORLD 050 O CHRISTMAS TREE PIANO CLASSICS 051 MARY HAD A LITTLE LAMB 052 LE CYGNE FROM LE CARNAVAL...

Page 44: ...on chord Unlike Fingered 1 2 and 3 Full Range Chord requires pressing of at least three keys to form a chord Fingering Guide Fingered 1 Fingered 2 Chords 1 With Fingered 2 interpreted as Am7 2 With Fi...

Page 45: ...dim aug sus4 sus2 7 m7 M7 m7 b 5 7 b 5 7sus4 add9 madd9 mM7 dim7 69 6 m6 A B b B F G b G G A b A F C C D b D D E b E Since the chord input range is limited this model may not support some of the chor...

Page 46: ...city O 9nH v 1 127 X 9nH v 0 8nH v O 9nH v 100 LK 170 LK 175 1 127 LK 260 X 9nH v 0 Note ON Note OFF Mode Mode 3 X Mode 3 X Default Messages Altered 0 32 1 6 38 7 10 11 Bank select Modulation Data ent...

Page 47: ...icular installation If this equipment does cause harmful interference to radio or television reception which can be determined by turning the equipment off and on the user is encouraged to try to corr...

Page 48: ...for future reference Safety Precautions Before trying to use the Digital Keyboard be sure to read the separate Safety Precautions LK 170 LK 175 LK 260 English Espa ol This recycle mark indicates that...

Reviews: