


— 8 —
Y
ou can set the start time of the time in the range of 1 to 60
minutes, in units of one minute.
The watch beeps for 10 seconds
when the end of the countdown is reached.
■
T
o
set the timer time
1.
In the T
imer Mode, hold
down
AAAAA
for about two
seconds.
•
This will cause the minute
digits of the timer start time to
flash.
2.
Use the
DDDDD
(+) and
BBBBB
(
–
)
buttons to change the
start time.
•
Holding down either button
scrolls the start time setting at
high speed.
•
Y
ou can set a start time in the
range of 1 minute to 60
minutes.
3.
After start time is the way
you want, press the
AAAAA
button.
•
This exits the setting screen.
•
The watch will also exit the
setting screen automatically if
you do not perform any
operation for about two or
three minutes.
Minutes
(Forward)
(Back)
■
Using the Timer
In the T
imer Mode, press the
DDDDD
button.
•
Each press of the
D
button starts or stops the countdown.
•
The timer counts down in 1/10 second units.
•
During elapsed time measurements, segments in the graphic
dials appear and disappear to indicated the passage of time.
(Start/Stop)
(Reset)
Minutes
Seconds
1/10 second
•
Pressing the
B
button while the countdown is stopped
resets the display to the start time.
•
Pressing the
D
button again while the timer countdown is
stopped restarts the countdown.
■
End of Countdown
The watch beeps for 10 seconds when the end of the countdown
is reached.
■
T
o
stop the time up beeper
Press any button while the beeper is sounding to stop it.
Timer Mode
Home time settings include your Home City (the city where you will
normally use the watch), the current time and date in your Home
City
, and other settings.
•
Use the
T
imekeeping Mode to configure home time settings.
•
Also use the following procedure when you want to turn Power
Saving on or of
f.
■
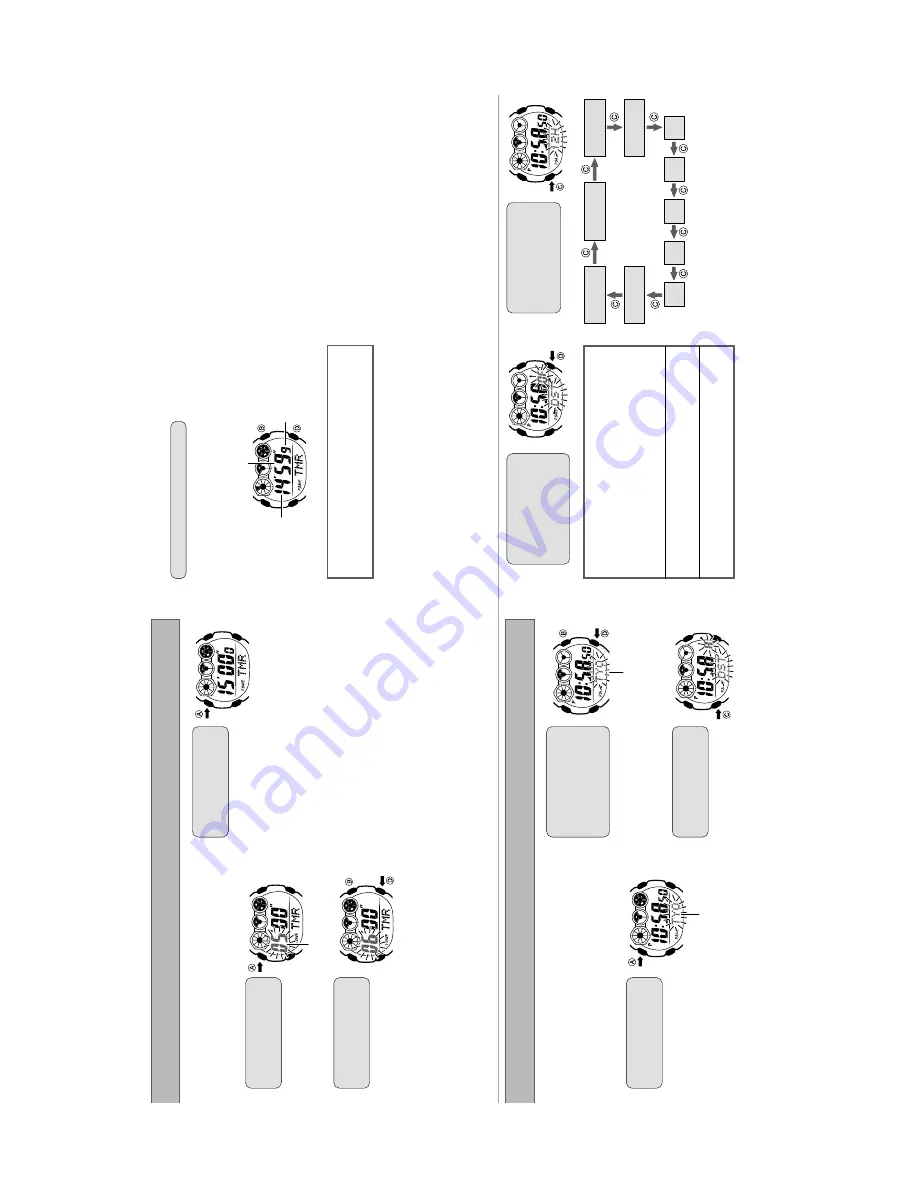
T
o
configure home time settings
1.
In the T
imekeeping Mode,
hold down the
AAAAA
button
for about two seconds.
•
This will cause the city code
currently selected as the
Home City to flash on the
display
.
2.
Use the
DDDDD
(westward)
button and the
BBBBB
(eastward) button to scroll
through the city codes
until the one you want to
select is displayed.
•
See the
“W
orld T
ime
City
Code List
” for information
about city codes.
•
Holding down either button
scrolls at high speed.
3.
When the city code you
want is displayed, press
the
CCCCC
button.
•
This will display the summer
time (DST) setting screen.
(W
estward)
(Eastward
)
TYO =
T
o
kyo
Home City Code
4.
Press the
DDDDD
button to
cycle through the
available summer time
(DST) settings until the
one you want to select is
displayed.
•
A
(AUTO)
This setting enables the auto summer time setting, which
turns summer time on or of
f in accordance with the received
time calibration signal.
•
This setting uses Japan summer time data when
TYO
is
selected as the Home City
, and U.S. summer time data
when
NYC
,
CHI
,
DEN
, or
LAX
is selected as the Home
City
.
•
OF (OFF)
This setting turns of
f summer time and returns to normal
timekeeping.
•
On (ON)
This setting turns on summer time and advances the current
time by one hour
.
•
Only OFF or ON can be selected if the current Home City code is
a setting other than
HKG
,
TYO
,
SEL
,
NYC
,
CHI
,
DEN
,
LAX
,
ANC
,
or
HNL
.
5.
When the summer time
setting is the way you
want, use the
CCCCC
button to
cycle the display through
the settings shown below
.
Summer T
ime
Home City
Code
Power Saving
12/24-hour
T
imekeeping
Hour
Minute
Month
Y
ear
Day
Seconds
Configuring Home Time Settings