Casio EXILIM EX-TR200 User Manual Download Page 59

59

Advanced Recording Settings

.

Pixels and image size

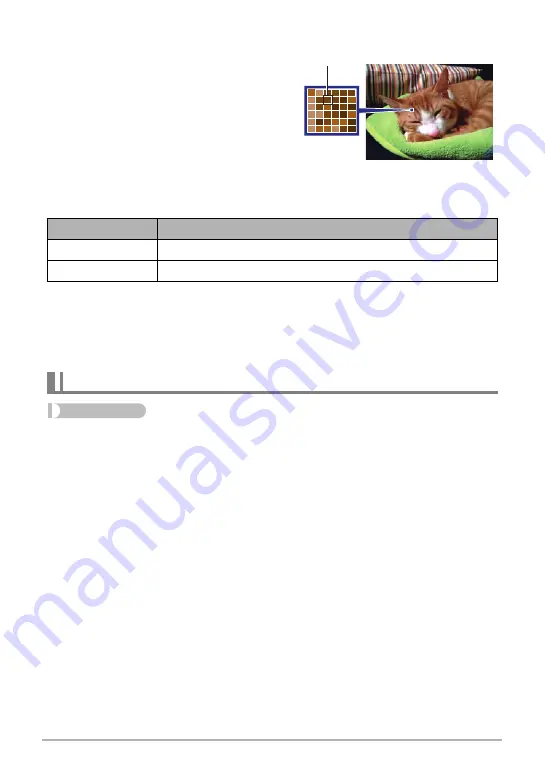
A digital camera image is a collection of small 
dots called “pixels”. The more pixels there are 
in an image, the more detail there will be. 
However, you generally can do with fewer 
pixels when printing an image (L size) 
through a print service, attaching an image to 
e-mail, when viewing the image on a 
computer, etc.
The size of an image indicates how many 
pixels it contains, and is expressed as horizontal pixels

x

vertical pixels.

Example:

• Note that larger images have more pixels, so they take up more memory space.
• For information about image size and number of images that can be stored, see 

page 123.

• For information about movie image size, see page 44.
• For information about resizing existing snapshots, see page 77.

Procedure

Enter the “REC Mode” 

*

 MENU 

*

 Movie Quality

This setting can be used to configure movie image quality settings and to select either 
normal movie recording or High Speed Movie recording. For information about movie 
image quality settings, see page 44.

Image size

pixels

12M

4000

x

3000 (Approximately 12 million pixels)

5M

2560

x

1920 (Approximately 5 million pixels)

Movie Image Quality Settings (Movie Quality)

Pixel

Summary of Contents for EXILIM EX-TR200

Page 1: ...SIO product Before using it be sure to read the precautions contained in this User s Guide Keep the User s Guide in a safe place for future reference For the most up to date information about this pro...

Page 2: ...t your original retailer Accessories USB AC adaptor AD C53U USB cable Power cord Stylus Used when performing screen operations and when extracting a subject Cut out subject page 74 Strap The shape of...

Page 3: ...ld liable for any damages lost profits or claims by third parties arising out of the use of Photo Transport CASIO COMPUTER CO LTD shall not be held liable for any damages or lost profits caused by los...

Page 4: ...card 27 Turning Power On and Off 28 To Shoot a Snapshot 29 Selecting an Auto Recording Mode 29 To shoot a snapshot 30 Viewing Snapshots 32 Deleting Snapshots and Movies 33 Snapshot Shooting Precaution...

Page 5: ...Snapshots and Movies 65 Viewing Snapshots 65 Viewing a Movie 65 Editing a Movie on the Camera Movie Editing 67 Viewing a Panorama Image 68 Playing a Slideshow on the Camera Slideshow 69 Viewing the Im...

Page 6: ...y Card Data 92 Other Settings Set Up 94 Adjusting Monitor Screen Brightness Screen 94 Turning off Eye Fi Card Communication Eye Fi 94 Configuring FlashAir Card Communication Settings FlashAir 94 Confi...

Page 7: ...tery Precautions 112 Battery Replacement 112 Using the Camera in another Country 112 Disposing of the Camera 113 Using a Memory Card 115 Reset Initial Default Settings 116 When things don t go right 1...

Page 8: ...6Monitor screen pages 9 7Back lamp pages 20 22 28 30 8Shutter button page 30 9Strap hole page 2 bk p Power page 28 blMemory card slot pages 26 27 bmReset button page 118 bnMemory card slot cover page...

Page 9: ...direction Movie Recording Monitor Screen Contents and How to Change Them 1Tab page 28 2Focus mode page 63 3Self timer mode page 56 4Digital zoom page 41 5Snapshot image size page 58 6Movie quality pag...

Page 10: ...4 97 9REC mode icon page 28 bkInformation icon page 11 blDelete icon page 33 bmSlideshow icon page 69 bnMenu icon page 73 1Tab page 28 2Protect indicator page 76 3Folder name file name page 92 4Movie...

Page 11: ...nformation You can configure separate settings for the REC mode and PLAY mode If DISP is not displayed on the screen touch the tab to display it Display information cannot be changed during movie reco...

Page 12: ...an be opened and the LCD monitor screen rotated into positions that make long term shooting more comfortable and simplify self shooting Simple touch panel operation The monitor screen is a touch panel...

Page 13: ...subjects become more novel and exciting ART SHOT provides the following effects HDR Art Toy Camera Soft Focus Light Tone Pop Sepia Monochrome Miniature Fisheye Extract a subject from one photo and in...

Page 14: ...lower or other means to keep the lens and flash window free of dirt and dust and wipe gently with a soft dry cloth The frame of the camera can be rotated 360 degrees 1 With the monitor screen facing t...

Page 15: ...ion you can rotate it 180 degrees clockwise and 90 degrees counterclockwise The monitor screen panel can also be rotated when the frame is closed 1 Hold the camera as shown in the illustration 2 Firml...

Page 16: ...t while you are operating the camera Never swing the camera around by its strap The supplied strap is intended for use with this camera only Never use it for any other purpose Camera Configurations No...

Page 17: ...finger Touch the screen to select an icon or menu item and to configure settings Touch and hold Holding your finger against the screen Touch and hold the screen to scroll images at high speed or to p...

Page 18: ...bject can damage the screen Also note that the stylus cannot be used to perform the two finger operations described above The touch panel is pressure sensitive Make sure you touch the panel with suffi...

Page 19: ...inate it automatically even if the battery is not fully charged This is indicated by the back lamp flashing red If the battery has not been used for a very long time charging may be terminated automat...

Page 20: ...be able to see the metal part of the connector as shown in the illustration Lamp Status Description Lit Red Charging Flashing Red Abnormal ambient temperature USB AC adaptor problem or battery proble...

Page 21: ...charging takes longer than about six hours a timer will terminate it automatically even if the battery is not fully charged This is indicated by the back lamp flashing red If the battery has not been...

Page 22: ...Lit Amber Charging Lit Red Charging in progress Data transfer with computer not supported Flashing Red Abnormal ambient temperature or battery problem page 111 or charging terminated by the timer Flas...

Page 23: ...C adaptor into an outlet that is further away from the TV or radio Actual charging time depends on the current battery level and charging conditions Do not use the USB AC adaptor with any other device...

Page 24: ...reas may not support display language selection 1 Press p Power to turn on the camera 2 Drag page 17 upwards and downwards until you find the language you want and then touch to select it 3 Touch the...

Page 25: ...SDXC Memory Card Use one of the above types of memory card The above are supported memory card types as of October 2012 This camera supports use of SD memory cards of the following types and capaciti...

Page 26: ...r screen side of the camera slide it into the card slot all the way in until you hear it click securely into place 4 Close the memory card slot cover and then return the frame to its original position...

Page 27: ...Be sure to use the camera to format a memory card Formatting a card on a computer will result in a non SD standard format which can greatly slow down processing time and cause compatibility performan...

Page 28: ...unction will turn off power automatically if you do not perform any operation for about five minutes Turning Power On and Off To enter the PLAY mode In the REC mode touch p PLAY If Auto BEST SHOT or A...

Page 29: ...scape display orientation Recording mode If the icon is not displayed on the screen touch the tab to display it 3 Touch Auto or Premium Auto to select the auto recording mode you want To Shoot a Snaps...

Page 30: ...n green When you half press the shutter button the camera automatically adjusts exposure and focuses on the subject it is currently pointed at Mastering how much pressure is required for a half press...

Page 31: ...SO sensitivity the camera automatically executes the following operation as required when shooting with Premium Auto Auto Focus is normally performed until you half press the shutter button The camera...

Page 32: ...he information to view only the snapshot page 11 You can zoom the screen image by touching the monitor screen page 70 If you are recording a snapshot that is very important to you it is recommended th...

Page 33: ...gle file 1 In the PLAY mode touch or to display the file you want to delete 2 Touch t If t is not displayed on the screen touch the tab to display it 3 Touch 1 File This will delete the selected image...

Page 34: ...onger to record images at lower shutter speeds The shutter speeds for which noise reduction is performed depend on the camera setup and shooting conditions A noise reduction process is performed when...

Page 35: ...f the screen touch the tab to display them 1 Press p Power to turn on the camera and enter the REC mode If the camera is in the PLAY mode touch r REC to enter the REC mode 1Tab page 28 2Menu page 55 3...

Page 36: ...cenery and other conditions Premium Auto recording delivers higher image quality than standard Auto recording mode page 29 BEST SHOT With BEST SHOT simply select the sample scene that resembles the ty...

Page 37: ...ic Range page 49 photography to transform snapshots into works of art that provide a greater degree of expression than conventional imaging Toy Camera Darkens the periphery and changes hues for a toy...

Page 38: ...ears Image shooting is disabled while the message is displayed NOTE This function works best when the camera is made stationary by placing it on a level surface etc With the HDR Art scene the settings...

Page 39: ...Touch the level you want to select You can select one of 12 different make up levels for the effect you want A larger number applies a stronger make up effect 6 Touch OK 7 Press the shutter button to...

Page 40: ...perform some other movement in the area of the icon you positioned in step 3 When the camera detects subject movement within the framed area it will automatically start a self timer countdown The came...

Page 41: ...g Perform the zoom operation before you touch b Movie to start recording Zoom operations are not supporting during Slide Panorama shooting The zoom setting is fixed at full wide angle is displayed on...

Page 42: ...oration point Auto Premium Auto Motion Shutter BEST SHOT Premium Zoom ART SHOT BEST SHOT excluding Premium Zoom Image Size Undeteriorated Zoom Limit Maximum Zoom Factor 12M 1 5X 4 0X 3 2 5M 2 3X 6 2X...

Page 43: ...n as the lens page 14 2 Select Auto or Premium Auto for the recording mode page 29 3 Drag r Self timer downwards to specify the self timer countdown duration The camera will shoot an image when the co...

Page 44: ...whose setting you want to change 4 To close the menu screen touch MENU or press the shutter button To record a movie Movie Quality REC Screen Icon Display Frame Rate Image Size Pixels Description Ful...

Page 45: ...to focus 6 Touch c Movie Stop to stop recording Each movie can be up to 29 minutes long Movie recording stops automatically after 29 minutes of recording Movie recording also will stop automatically i...

Page 46: ...peed Whenever possible use an Ultra High Speed Type memory card Note however that not all operations can be guaranteed even if an Ultra High Speed Type memory card is used Certain movie quality settin...

Page 47: ...upper right corner of the screen and then touching a BEST SHOT scene will display detailed information about the scene 4 Press the shutter button if you are shooting a snapshot or touch b Movie if you...

Page 48: ...indicate that recording is in progress Keep the camera still while this message is displayed The recording process takes some time to complete after the message appears Image shooting is disabled whil...

Page 49: ...l while this message is displayed The recording process takes some time to complete after the message appears Image shooting is disabled while the message is displayed NOTE This function works best wh...

Page 50: ...fter the message appears Image shooting is disabled while the message is displayed NOTE With this BEST SHOT scene the LED light setting automatically becomes off When holding the camera by hand while...

Page 51: ...he camera still while this message is displayed The recording process takes some time to complete after the message appears Image shooting is disabled while the message is displayed NOTE With this BES...

Page 52: ...tomatically becomes off Shooting with this BEST SHOT scene makes the shooting range narrower than normal If one or more of the faces are blurred in all of the images that are shot they will be blurred...

Page 53: ...1 In the REC mode touch b BEST SHOT 2 Touch s Slide Panorama scene 3 Touch the icon for the slide direction the direction the camera will move while shooting You can select one of four different slide...

Page 54: ...rough in the following cases Subject or camera movement Camera movement that is too fast or too slow Shooting a Slide Panorama image after half pressing the shutter button to perform Auto Focus may no...

Page 55: ...and downwards until you find the item whose setting you want to change 3 Touch the item 4 Configure the setting of the item in accordance with the screen contents To cancel and exit the menu touch ME...

Page 56: ...ed as the recording mode the camera will automatically determine the optimum focus point s and focus automatically Procedure Enter the REC Mode MENU Self timer With the Self timer pressing the shutter...

Page 57: ...is reduced the further you are from the subject IMPORTANT Do not turn on the LED light near a person s eyes and do not allow anyone to look directly into the light You should compose the image so the...

Page 58: ...uld regard the print paper sizes suggested here as guidelines only 200 dpi print resolution Changing the Image Size Image Size Image Size Pixels REC Screen Icon Display Suggested Print Size and Applic...

Page 59: ...ote that larger images have more pixels so they take up more memory space For information about image size and number of images that can be stored see page 123 For information about movie image size s...

Page 60: ...value The exposure compensation value you set remains in effect until you change it or turn off the camera which causes it to revert to 0 0 NOTE When shooting under very dark or very bright conditions...

Page 61: ...select the white balance setting that matches your shooting conditions Daylight Overcast etc 2 Touch OK Adjusting White Balance White Balance Setting Description Auto WB Configures the camera to adju...

Page 62: ...ely longer for the camera to finish recording an image after it is shot You will not be able to perform any operation while image recording is in progress Specifying ISO Sensitivity ISO Setting Descri...

Page 63: ...Icon Display Type of Shot Focus Mode Approximate Focus Range 1 Snapshot Movies Snapshot Movies AF Auto Focus None General recording Automatic Fixed focal point 8 cm to 9 infinity 3 1 to 9 46 cm to 9...

Page 64: ...s setting move the camera to compose the image 3 When you are ready to shoot the image press the shutter button the rest of the way down NOTE Focus lock also locks exposure AE The focus frame does not...

Page 65: ...ode 2 Touch or or drag left or right across the screen image to scroll through the movies until the one you want is displayed To scroll at high speed touch and hold or 3 Touch 6 Movie to start playbac...

Page 66: ...t reverse operation To return to normal playback speed touch 6 Stop playback During playback touch Volume adjustment During playback touch n and then drag the volume bar to the desired level Volume ca...

Page 67: ...n you edit a movie only the result is saved The original movie is not retained An editing operation cannot be undone NOTE A movie that is shorter than five seconds cannot be edited Editing of movies r...

Page 68: ...6 to play the panorama Panorama playback causes the image to scroll left right up or down Playback Controls NOTE The following functions cannot be performed on a panorama image Movie Editing Rotation...

Page 69: ...may be longer in the case of an image that was not recorded with this camera To return to normal single image display touch the screen The image menu shows multiple images on a single screen 1 In the...

Page 70: ...een image will change the part of the image that is displayed Squeezing your thumb and forefinger page 18 on the displayed image will reduce it in size When monitor screen contents are turned on a gra...

Page 71: ...commercially available HDMI cable to connect the camera to a TV Make sure that the camera is turned off before plugging in or unplugging the cable Check the user documentation that comes with the TV...

Page 72: ...her operations may not be possible with some devices Connecting the camera to the HDMI connector of another device can damage both the camera and the other device Never connect two HDMI output connect...

Page 73: ...Menu contents are different in the REC mode and PLAY mode 2 Touch the item whose setting you want to change 3 Configure the setting of the item in accordance with the screen contents To cancel and ex...

Page 74: ...tract The boundary line should be continuous which means it starts and ends at the same point 2 Touch OK This will cause the background of the subject you outlined to become gray 3 Touch to select the...

Page 75: ...napshot transferred to this camera s memory using Photo Transport page 82 It must be an image with an aspect ratio of 4 3 1 Touch or or drag left or right to scroll through images Select image you wan...

Page 76: ...n page 100 Protecting a File Against Deletion Protect All Files On Protects all files All Files Off Unprotects all files Select Protects and unprotects specific files 1Touch or or drag upwards or down...

Page 77: ...ed cannot be rotated Procedure Enter the PLAY Mode MENU Resize You can reduce the size of a snapshot and save the result as a separate snapshot The original snapshot is also retained You can select re...

Page 78: ...ge touch or touch the screen with your thumb and forefinger and then spread them apart To reduce the size of the image touch or touch the screen with your thumb and forefinger and then squeeze them to...

Page 79: ...then print Windows XP users Follow the instructions on the print wizard that appears configure settings and then print Windows 7 Windows Vista users Configure print settings and then click Print Prof...

Page 80: ...onnecting the Camera to Your Computer and Saving Files page 86 to store the image you want to print and then display the image on your Macintosh screen 2 Click File and then Print 3 Configure print se...

Page 81: ...ve images and view them manually USB connection pages 83 86 Transfer images to a computer automatically over a wireless LAN for viewing Eye Fi page 89 Play back and edit movies You can play back movie...

Page 82: ...System Version Install this software See page Save images to a computer and view them there manually Windows 7 Windows Vista Windows XP SP3 Installation not required 83 Play movies Windows 7 Windows...

Page 83: ...e case of certain computer models or connection conditions If this happens press p Power to turn on the camera For details about connecting to the camera and precautions when connecting see page 21 2...

Page 84: ...Paste Windows XP users On the My Documents Edit menu select Paste This will paste the DCIM folder and all the image files it contains into your Documents Windows 7 Windows Vista or My Documents Window...

Page 85: ...ended system environments Configuring one of these environments does not guarantee proper operation Certain settings and other installed software may interfere with proper playback of movies Movie Pla...

Page 86: ...mera with a Macintosh When you want to do this Operating System Version Install this software See page Save images to your Macintosh and view them there manually OS X Installation not required 86 Save...

Page 87: ...built in memory if it does not have a memory card loaded as a drive The appearance of the drive icon depends on the Mac OS version you are using 3 Drag the DCIM folder to the folder to which you want...

Page 88: ...ee proper operation Certain settings and other installed software may interfere with proper playback of movies Movie Playback Precautions Proper movie playback may not be possible on some Macintosh mo...

Page 89: ...of wireless communication is limited or prohibited Loading an Eye Fi card will cause the Eye Fi indicator to appear on the monitor screen A communication icon will appear on the monitor screen while...

Page 90: ...t come with the card If the FlashAir card s Start automatically at boot setting is selected a wireless LAN connection will be established automatically whenever the camera is turned on If you want to...

Page 91: ...er device icon displayed on the monitor screen The Auto Power Off function is disabled A confirmation message appears on the monitor screen if you try to turn it off If this happens follow the instruc...

Page 92: ...h the Design Rule for Camera File System DCF About DCF The following operations are supported for DCF compliant images Note however that CASIO makes no performance guarantees concerning these operatio...

Page 93: ...DCIM folder and all of its contents A good way to keep track of multiple DCIM folders it to change their names to dates or something similar after you copy them to your computer If you later decided...

Page 94: ...rd s Start automatically at boot setting is selected a wireless LAN connection will be established automatically whenever the camera is turned on For information about menu operations see page 55 Adju...

Page 95: ...sing some printing application Stamping is performed in accordance with the date and time settings page 97 and the display style settings page 98 Configuring Camera Sound Settings Sounds Startup Toggl...

Page 96: ...and then select the On setting Summer time is used in some geographical areas to advance the current time setting by one hour during the summer months 3 Drag upwards and downwards to display the area...

Page 97: ...Touch 8 or 2 to change the currently selected value You can specify a date from 2001 to 2049 Be sure to select your Home City page 96 before setting the time and date If you set the time and date whil...

Page 98: ...play language you want 1 On the menu screen touch Setup 2 Touch Language 3 Drag upwards and downwards until you find the language you want and then touch to select it Camera models sold in certain geo...

Page 99: ...ENU Setup HDMI Use this setting to select the digital signal format when connecting to a TV with an HDMI cable 1080i corresponds to 1080 60i but not 1080 50i Because of this the required output method...

Page 100: ...built in memory or a memory card will delete all protected images stored there Check the battery level before starting a format operation and make sure it is not too low Formatting may not be performe...

Page 101: ...are specifically prohibited The example at left indicates that disassembly is prohibited The black dot 0 means that the indicated action must be performed Indications within this symbol are actions t...

Page 102: ...on it etc and never apply solder to it Never place the battery into a microwave oven dehumidifier high pressure generating device etc Never remove the outer sticker from the battery Do not use or leav...

Page 103: ...vision and create the risk of accident USB AC Adapter The power cord that comes with the camera is designed for use in the country where the camera was purchased If you use the camera in another count...

Page 104: ...of the above symptoms are present Particular care is required when using the camera where it is raining or snowing near the ocean or other body of water or in a bathroom 1 Turn off the camera If the...

Page 105: ...ver cover the USB AC adapter or power cord with a quilt blanket or other cover while it is in use and do not use it near a heater Doing so can interfere with heat radiation and cause the area around t...

Page 106: ...or exploding Should fluid from a battery accidentally get onto clothing or your skin immediately rinse it off with clean tap water Prolonged contact with battery fluid can cause skin irritation Connec...

Page 107: ...lean water for at least 15 minutes and contact your physician Backing Up Important Data Always keep backup copies of important data in camera memory by transferring it to a computer or other storage d...

Page 108: ...In an area exposed to direct sunlight or large amounts of moisture dust or sand Near heating or cooling devices or in other areas subjected to extreme changes in temperature or humidity Inside of a mo...

Page 109: ...responsibility for the data on a memory card lies with you The following procedures are recommended whenever you discard a memory card or the camera or if you transfer ownership to another party When...

Page 110: ...product in any way that infringes on the copyrights of others or that violates copyright laws Note that trademark and registered trademark are not use within the text of this manual SDXC Logo is a tra...

Page 111: ...an about six hours a safety timer will terminate it automatically even if the battery is not fully charged If the battery has not been used for a very long time charging may terminate automatically af...

Page 112: ...months If the battery provides only very limited operation following a full charge it probably means it has reached the end of its service life Have the battery replaced with a new one Contact your re...

Page 113: ...arp Take care not to cut your fingers when removing it 1 Turn off the camera 2 Open the camera s frame until it and the monitor screen panel form a 90 degree angle 3 Use a precision Phillips tip screw...

Page 114: ...he direction indicated by the arrow lift the battery to remove it Old Rechargeable Battery Handling Precautions Insulate the positive and negative terminals with tape etc Do not peel the covering off...

Page 115: ...record data to and delete data from a memory card a number of times it loses its ability to retain data Because of this periodic re formatting of a memory card is recommended Electrostatic charge ele...

Page 116: ...reset setting IMPORTANT Some menu items may not be available depending on the recording mode being use REC Menu Default setting depends on country or geographic region PLAY Menu Reset Initial Default...

Page 117: ...nu Screen Auto Eye Fi On FlashAir On Sounds Startup On Half Shutter On Shutter On Operation On Operation Vol 3 Playback Vol 7 Timestamp Off World Time Adjust Date Style Language Calibrate TP HDMI Auto...

Page 118: ...nd then turn on the camera again Unlike the reset operation page 100 pressing the reset button near the memory card slot does not initialize camera settings Image Recording Image is not recorded when...

Page 119: ...efore the save operation was complete which will result in the image not being saved If the battery indicator shows charge the battery as soon as possible page 19 2 You may have removed the memory car...

Page 120: ...ubjects File Deletion A file cannot be deleted The file may be protected Unprotect the file page 76 Other The wrong date and time are displayed or the wrong date and time are being stored along with i...

Page 121: ...at the camera s memory management data has been restored If the same message appears after you turn power back on contact your retailer or a CASIO authorized service center There are various indicator...

Page 122: ...evice using a FlashAir card or an Eye Fi card pages 89 90 File could not be saved because battery is low Battery power is low so an image file could not be saved Folder cannot be created You are tryin...

Page 123: ...y card page 100 This file cannot be played The file you are trying to access is corrupted or is a type that cannot be displayed by this camera This function cannot be used This message will appear par...

Page 124: ...ifferent capacity calculate the number of images as a percentage of 16GB The time it takes to play back a high speed movie will be different from the time it takes to record it If you record a high sp...

Page 125: ...quivalent to 21 mm in 35 mm format Zoom Up to 4 0X when SR zoom and Digital zoom are used in combination Up to 15 9X when SR Zoom HD Zoom and Digital zoom are used in combination VGA size Focusing Con...

Page 126: ...to ISO 100 ISO 200 ISO 400 ISO 800 ISO 1600 ISO 3200 equivalent Movies Auto Monitor Screen 3 0 inch TFT color LCD Super Clear LCD 460 800 960x480 dots Touch Screen External connection terminal USB por...

Page 127: ...he camera is purchased Repeated charging shortens battery life Frequency of Auto Focus usage and the time the camera is on greatly affects recording time and number of shots values Number of snapshots...

Page 128: ...00 mA Output Power 5 0 V DC 650 mA Operating Temperature Requirements 5 to 35 C 41 to 95 F Dimensions 53 W x 21 H x 45 D mm 2 1 W x 0 83 H x 1 8 D excluding projections Weight Approximately 37 g 1 3 o...

Page 129: ...2012 CASIO COMPUTER CO LTD 6 2 Hon machi 1 chome Shibuya ku Tokyo 151 8543 Japan MA1211 A M29...

Reviews: