background image

E-23

Bluetooth

®

 Communication

Bluetooth

®

 interface can also be used to transmit data between two Handheld Terminals. 

With Bluetooth

®

 the two Handheld Terminals should be located within about 5 meters 

from each other, as long as there is nothing blocking the path between them.

Important!

Observe the following precautions to help ensure that Bluetooth communication is 

successful.

Make sure there is at least two meters between the Handheld Terminal and other 

equipment (electrical appliances, audio-visual equipment, OA equipment, and 

digital cordless telephones, facsimile machines, etc.). (Take special care with 

microwave ovens. Allow at least three meters between the Handheld Terminals in 

wireless operation and a microwave oven.) When approaching such a device when 

its power is turned on, proper communication may prove impossible while this 

may also cause interference with TV and radio reception (images produced by 

certain UHF and broadcast satellite channels may become blurry).
Normal communication may not be possible in an area near a broadcast trans-

mitter or wireless transmitter. If this happens, move the Handheld Terminal to a 

different location. Normal communication may not be possible in areas exposed 

to strong radio waves.
RF Wireless LAN Interference
Because Bluetooth

®

 and RF wireless LAN use the same frequency band 

(2.4GHz), radio interference can occur if there is a wireless LAN device nearby. 

This can result in lower communication speeds, or even make it impossible to 

establish a connection. If this happens, try the following countermeasures.

Move at least 10 meters away from the wireless LAN device.
If you cannot keep the distance at least 10 meters or more between the Handheld 

Terminal and a wireless LAN device, turn off the power of either the Handheld 

Terminal or the wireless LAN device.


Summary of Contents for DT-970 Series

Page 1: ...Handheld Terminal DT 970 E Series User s Guide Be sure to read Safety Precautions inside this guide before trying to use your Handheld Terminal ...

Page 2: ...ya belirli bir amaca uygunluk konusundaki açık ya da zımni her türlü garantiyi reddeder BLUETOOTH ist ein eingetragenes Warenzeichen der Bluetooth SIG Inc lizenziert für CASIO COMPUTER CO LTD eneloop ist eine eingetragene Handelsmarke der Panasonic Group Die Angaben in diesem Dokument können ohne vorherige Bekanntgabe geändert werden CASIO Computer Co Ltd gibt keine Zusicherungen und Garantien in ...

Page 3: ...Configuring the Main Battery Settings E 17 Loading the Main Batteries E 18 Loading the Backup Battery E 19 Removing the Backup Battery E 19 Handling microSD Cards E 20 Installing E 20 Removing E 21 Performing Communications E 22 IR Communication E 22 Bluetooth Communication E 23 Resetting the Handheld Terminal E 24 Warning Label E 25 DT 970 Specifications E 26 Connecting the USB Cradle HA N60IO Po...

Page 4: ...E 2 Connecting the USB Cradle HA E60IO Power Supply E 31 Connecting the Ethernet Cradle HA N62IO Power Supply E 33 Specifications E 35 Adjusting the Laser Beam Width E 36 ...

Page 5: ...pplied incorrectly creates the possibility of death or serious personal injury Caution This symbol indicates information that if ignored or applied incorrectly creates the possibility of personal injury or property damage A diagonal line indicates something you should not do The symbol shown here indicates you should not try to take the unit apart A black circle indicates something you should do T...

Page 6: ...y the Handheld Terminal can affect the operation of a pacemaker Before the use in aircraft be sure to consult with cabin crew for interference the Handheld Terminal emits Before the use in medical facility be sure to consult with the facility management or the manufacture of a specific medical equipment that the Handheld Terminal may interfere with Do not use the Handheld Terminal nearby gas pump ...

Page 7: ... to take remedial action could result in loss of eyesight Warning Incorrect use of the batteries could result in staining of the surroundings due to fluid leakage or could cause the batteries to burst resulting in fire or injury Ensure that you observe the following Never disassemble modify damage or short circuit the batteries Do not heat the batteries or throw them into a fire Do not use new and...

Page 8: ...at you observe the following Never disassemble modify damage or short circuit the battery Do not attempt to charge the coin type lithium battery Do not heat the battery or throw it into a fire Load the batteries ensuring that the polarity and ends of the battery is correct When storing or disposing of batteries insulate the battery terminals with tape etc and do not short circuit the batteries Do ...

Page 9: ... normal use At least once a year unplug the AC adaptor from the wall outlet and clean any dust that builds up between the prongs of the plug Dust built up between the prongs can lead to the danger of fire Backup of All Important Data Caution Note that CASIO Computer Co Ltd shall not be held liable to you or any third party for any damages or loss caused by deletion or corruption of data due to use...

Page 10: ...fter large amount of rain or water falls on the Handheld Terminal Pressing the screen or keys with excessive force when using in the rain Do not use volatile chemical substances such as thinners benzene or toiletries to clean the Handheld Terminal When the Handheld Terminal is dirty wipe it clean with a soft dry cloth Rubbing with excessive force could scratch the display The power supply terminal...

Page 11: ... sand or other foreign matter on the battery covers USB Port cover or on the respective contact surfaces If any soiling is found wipe it off with a clean soft dry cloth Even very small amounts of soiling trapped on the contact surfaces a single hair or grain of sand etc can cause water to leak into the device Check that the waterproof seals on the battery covers and USB Port cover are free from cr...

Page 12: ...the European Union CASIO EUROPE GmbH Casio Platz 1 22848 Norderstedt Germany The modification of the software for controlling RF radiation of Bluetooth is prohibited Important This guide does not include any information about programming and download procedures See the applicable separate documentation for information about the procedures After Service Should this product ever malfunction contact ...

Page 13: ... HA N50BN5 USB Cable Handheld terminal computer connection HA N81USBC USB Cable Cradle computer connection DT 380USB A AC Adaptor for Ethernet Cradle AD S42120C N5 USB Cradle HA E60IO AC Adaptor for HA E60IO AD S15050B N5 Attachment kit for HA E60IO HA N64AT Power Cord for Europe AC CORD EU Power Cord for Taiwan AC CORD TW Power Cord for Korea AC CORD KR Power Cord for Australia AC CORD AU Options...

Page 14: ...Key Cursor Keys Up Down Left Right Multi function L Key Power Key CLR Key Center Trigger Key Multi function R Key Numeric Keys Enter Key Function Keys microSD Card Slot Keys microSD Card Slot Battery Compartment Buzzer Battery Cover Lock Switches Strap Holes Data Communication Terminal Battery Cover Main Batteries L Trigger Key Battery Cover Backup Battery Barcode Reader Port ...

Page 15: ...put mode If S is not displayed when S display is set to ON the Handheld Terminal is in number input mode The S display can be enabled or disabled in the application settings Multi function L R keys Keys that can be assigned any function 10 key pad The function of these keys depends on whether the Handheld Terminal is in the character input mode or the number input mode Character input mode Input a...

Page 16: ...alled Battery Cover Lock Switches Used to lock the battery cover and to release Battery Cover Main Batteries Opens the cover to allow the main batteries to be installed Strap Holes Used to attach the hand strap Data Communication Terminal Used for communication with the cradle Power Contacts Used to receive power provided by the USB Cradle IR Port This port is for IR communication with another DT ...

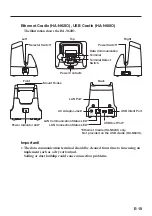
Page 17: ...er Switch Mount Hooks Power Indicator LED LAN Port AC Adaptor Jack LAN Communication Status LED LAN Connection Status LED USB Client Port USB Host Port Ethernet Cradle HA N62IO only Not provided on the USB cradle HA N60IO Important The data communication terminal should be cleaned from time to time using an implement such as a dry cotton bud Soiling or dust buildup could cause connection problems ...

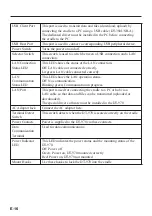
Page 18: ...tus LED This LED shows the LAN operation status Off No communication Blinking green Communication in progress LAN Port This port is used for connecting the cradle to a PC or hub via a LAN cable so that data and files can be transmitted uploaded or downloaded The special driver software must be installed in the DT 970 AC Adaptor Jack Connect the AC adaptor here Terminal Detect Switch This switch de...

Page 19: ...ring data to a computer using the optional cradle Always turn the Handheld Terminal off before replacing batteries Always use 2 new alkaline AA batteries or 2 fully charged rechargeable AA batteries eneloop when replacing the main batteries Using batteries other than those specified for this product or using old and new batteries together could significantly shorten the life of the batteries or ca...

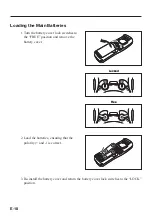
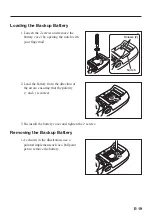
Page 20: ... cover lock switches to the FREE position and remove the battery cover 2 Load the batteries ensuring that the polarity and is correct 3 Re install the battery cover and return the battery cover lock switches to the LOCK position Locked Free Locked Free ...

Page 21: ...ingernail 2 Load the battery from the direction of the arrow ensuring that the polarity and is correct 3 Re install the battery cover and tighten the 2 screws Removing the Backup Battery 1 As shown in the illustration use a pointed implement such as a ballpoint pen to remove the battery Screws 2 Notch Screws 2 Notch ...

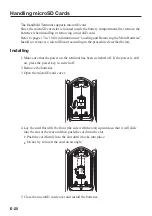
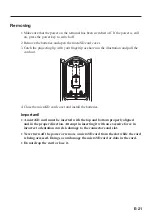
Page 22: ...ing to the procedure described below Installing 1 Make sure that the power on the terminal has been switched off If the power is still on press the power key to switch off 2 Remove the batteries 3 Open the microSD card cover 4 Lay the card flat with the front the side with the text upwards so that it will slide into the slot at the rear and then push the card into the slot Push the card firmly int...

Page 23: ...he card out 4 Close the microSD card cover and install the batteries Important A microSD card must be inserted with the top and bottom properly aligned and in the proper direction Attempt in inserting it with an excessive force in incorrect orientation can risk damage to the connectors and slot Never turn off the power or remove a microSD card from the slot while the card is being accessed Doing s...

Page 24: ...other or they can be separated by up to 30cm 1113 16 up to 20cm 7 7 8 for communication between units Important A high sensitivity communication element is used during IR communication In order to ensure successful communication avoid using cellular phones or other devices that emit radio wave in the area where you are performing IR communication If you need to use such a device move away from the...

Page 25: ...n may prove impossible while this may also cause interference with TV and radio reception images produced by certain UHF and broadcast satellite channels may become blurry Normal communication may not be possible in an area near a broadcast trans mitter or wireless transmitter If this happens move the Handheld Terminal to a different location Normal communication may not be possible in areas expos...

Page 26: ... as well as all settings should be unaffected Use reset to restore normal operation whenever the Handheld Terminal operates abnormally due to misoperation or some other reason Use a stylus to press the reset switch on the front of the DT 970 This starts the reset operation Do not use a toothpick or pencil or other object whose tip may break off when pressing the reset switch Otherwise there is a r...

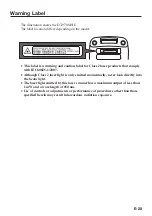
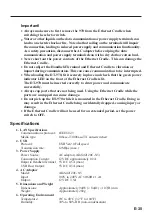
Page 27: ...that comply with IEC60825 1 2007 Although Class 2 laser light is only emitted momentarily never look directly into the beam light The laser light emitted by this laser scanner has a maximum output of less than 1 mW and a wavelength of 650 nm Use of controls or adjustments or performance of procedures other than those specified herein may result in hazardous radiation exposure ...

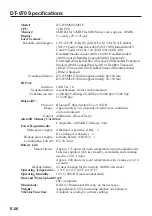
Page 28: ...ps 57 600 bps 115 200 bps Bluetooth Protocol Bluetooth Specification Ver 2 1 EDR Range Approximately 5 m depends on radio wave conditions and environment Output 4dBm max PowerClass2 microSD Memory Card Slot Compatible with SDHC Memory Card Power Requirements Main power supply Alkaline AA batteries LR6 2 Or eneloop AA batteries 2 Backup power supply Lithium battery CR2032 1 Consumption Current DC 3...

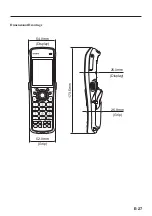
Page 29: ...E 27 Dimensional Drawings 54 0mm Display Display Grip Grip 52 0mm 173 5mm 25 0mm 26 9mm ...

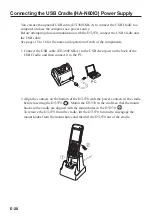
Page 30: ...of the components 1 Connect the USB cable DT 380USB A to the USB client port on the back of the USB Cradle and then connect it to the PC PC 2 Align the contacts on the bottom of the DT 970 with the power contacts in the cradle before inserting the DT 970 1 Mount the DT 970 in the cradle so that the mount hooks in the cradle are aligned with the mount holes in the DT 970 2 To remove the DT 970 from...

Page 31: ...DT 970 into the cradle ensure that it is securely slotted into place The DT 970 must be inserted correctly to draw power and communicate successfully Never short out the power contacts of the USB Cradle This can damage the USB Cradle Do not pick up the DT 970 while it is mounted in the USB Cradle Doing so may result in the USB Cradle being accidentally dropped causing injury or damage Do not subje...

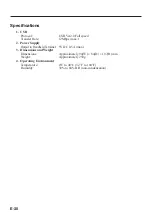
Page 32: ...Rate 12Mbps max 2 Power Supply Output to Handheld Terminal 5V DC 0 5A max 3 Dimensions and Weight Dimensions Approximately 94 W 84 D 107 H mm Weight Approximately 250g 4 Operating Environment Temperature 0 C to 40 C 32 F to 104 F Humidity 30 to 80 RH non condensation ...

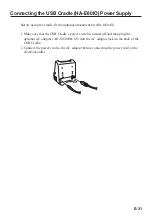
Page 33: ...l attachment kit HA N64AT 1 Make sure that the USB Cradle s power switch is turned off and then plug the optional AC adaptor AD S15050B N5 into the AC adaptor jack on the back of the USB Cradle 2 Connect the power cord to the AC adaptor before connecting the power cord to the electrical outlet ...

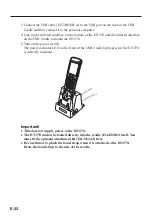
Page 34: ... mount the DT 970 5 Turn on the power switch The power indicator LED on the front of the USB Cradle lights green if the DT 970 is correctly mounted Important This does not supply power to the DT 970 The DT 970 cannot be loaded directly into the cradle HA E60IO itself You must fit the optional attachment kit HA N64AT first Be careful not to pinch the hand strap when it is attached to the DT 970 Dra...

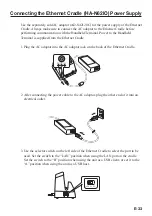
Page 35: ...ied from the Ethernet Cradle 1 Plug the AC adaptor into the AC adaptor jack on the back of the Ethernet Cradle 2 After connecting the power cable to the AC adaptor plug the other end of it into an electrical outlet 3 Use the selector switch on the left side of the Ethernet Cradle to select the port to be used Set the switch to the LAN position when using the LAN port on the cradle Set the switch t...

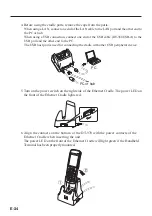
Page 36: ...d to the PC The USB host port is used for connecting the cradle with other USB peripheral device PC PC or hub 5 Turn on the power switch on the right side of the Ethernet Cradle The power LED on the front of the Ethernet Cradle lights red 6 Align the contacts on the bottom of the DT 970 with the power contacts of the Ethernet Cradle when inserting the unit The power LED on the front of the Etherne...

Page 37: ...it The DT 970 must be inserted correctly to draw power and communicate successfully Always cap ports that are not being used Using the Ethernet Cradle while the ports are uncapped can cause damage Do not pick up the DT 970 while it is mounted in the Ethernet Cradle Doing so may result in the Ethernet Cradle being accidentally dropped causing injury or damage If the Ethernet Cradle will not be used...

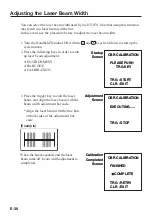
Page 38: ... laser beam and align the laser beam with the beam width adjustment bar code Align the laser beam with the fine bars on both sides of the adjustment bar code Example When the buzzer sounds and the laser beam turns off beam width adjustment is completed OBR CALIBRATION PLEASE PUSH TRG KEY TRG START CLR EXIT Startup Screen OBR CALIBRATION PLEASE PUSH TRG KEY TRG START CLR EXIT Startup Screen OBR CAL...

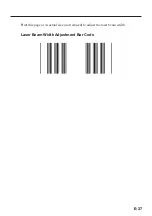
Page 39: ...E 37 Print this page at its actual size not reduced to adjust the laser beam width Laser Beam Width Adjustment Bar Code ...

Page 40: ...CASIO COMPUTER CO LTD 6 2 Hon machi 1 chome Shibuya ku Tokyo 151 8543 Japan 2013 CASIO COMPUTER CO LTD ...

Reviews: