background image

EN-7

English

Playing with Different Tones

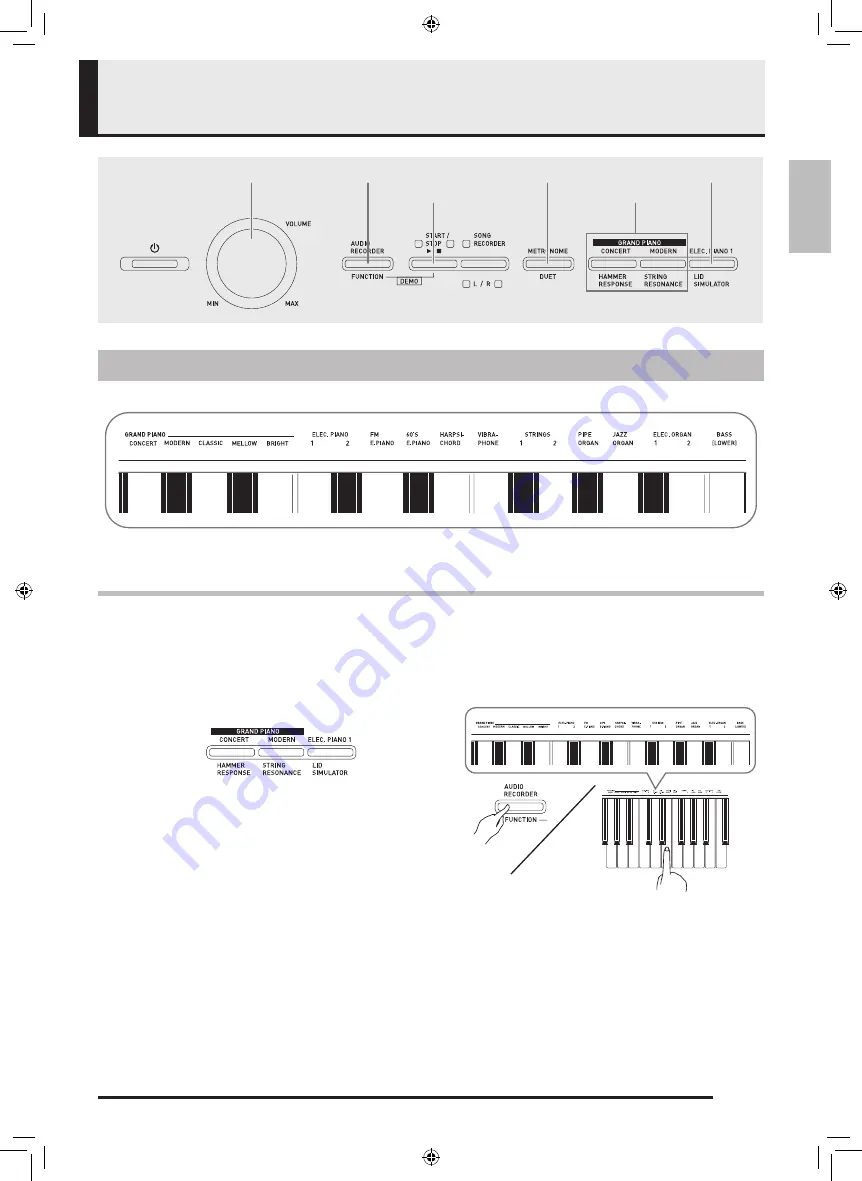
The Digital Piano comes with 18 built-in tones.

The names of the tones are marked above the keyboard keys to which they are assigned.

To select a tone

1.

Select the tone you want.

2.

Use the 

VOLUME

 controller to adjust the volume.

Selecting and Playing a Tone

START/STOP 

a

FUNCTION

METRONOME

ELEC. PIANO 1

GRAND PIANO

VOLUME

z

To select GRAND PIANO (CONCERT or 
MODERN) or ELEC. PIANO 1

Press one of the GRAND PIANO buttons 

(CONCERT or MODERN) or the ELEC. 

PIANO 1

 to select the one you want.

The button lamp of the selected tone will light.

z

To select one of the other tones

While holding down the FUNCTION button, 

press the keyboard key that corresponds to the 

tone you want to select.

AP460-ES-1A.indd   9

2014/07/04   17:12:56

Summary of Contents for Celviano AP-460

Page 1: ...Precautions Precauciones de seguridad Antes de intentar usar el piano aseg rese de leer las Precauciones de seguridad separadas English Espa ol AP 460 This recycle mark indicates that the packaging co...

Page 2: ...or has been dropped The apparatus shall not be exposed to dripping or splashing and that no objects filled with liquids such as vases shall be placed on the apparatus The power indicator being unlit d...

Page 3: ...selection EN 30 Chorus CHORUS EN 30 Brilliance BRILLIANCE EN 30 Layer balance EN 30 Duet pan EN 30 Bass damper effect EN 30 Damper noise EN 30 Music Library song select MUSIC LIBRARY SELECT EN 31 Tem...

Page 4: ...42 Simple Play Back of a Song on a USB Flash Drive EN 43 Error Indicators EN 44 Connecting to a Computer EN 46 Minimum Computer System Requirements EN 46 Connecting the Digital Piano to Your Computer...

Page 5: ...EN 4 General Guide 2 1 3 4 5 6 8 9 7 bq bp bk bl bm bn bo Front Bottom Rear AP460 ES 1A indd 6 2014 07 04 17 12 55...

Page 6: ...one on page EN 7 NOTE For details about operations and settings see Configuring Settings with the Keyboard on page EN 27 Your Digital Piano lets you save its current settings and lock its buttons to p...

Page 7: ...rocedure below to temporarily suspend Auto Power Off To disable Auto Power Off 1 While the Digital Piano is turned on press the P Power button to turn it off 2 While holding down the FUNCTION button p...

Page 8: ...and Playing a Tone START STOP a FUNCTION METRONOME ELEC PIANO 1 GRAND PIANO VOLUME z To select GRAND PIANO CONCERT or MODERN or ELEC PIANO 1 Press one of the GRAND PIANO buttons CONCERT or MODERN or...

Page 9: ...select BASS when recording to Track 2 You can configure settings to sustain reverberation of the BASS LOWER tone while the damper pedal or sostenuto pedal is pressed For more information see Bass damp...

Page 10: ...while the second tone will be the layered tone 1 While holding down the FUNCTION button press down the keyboard key for the first tone you want to layer and then the key for the second tone Example F...

Page 11: ...eyboard key that corresponds to the hall simulator name you want to select C1 C2 C3 C4 C5 C6 C7 C8 Initial default Center Volume of the main tone First tone you selected Volume of the layered tone Sec...

Page 12: ...ained continue to play longer When GRAND PIANO is selected as the tone using this pedal generates harmonic and other resonance just like the damper pedal on an acoustic grand piano z Soft Pedal Pressi...

Page 13: ...output enabled 1 Press the METRONOME button This starts the metronome The lamp above the START STOP a button flash in time with the metronome beat 2 While holding down the FUNCTION button press the M...

Page 14: ...le recording will return the tempo value to 120 To adjust the metronome volume You can perform the following procedure at any time regardless of whether or not the metronome is sounding 1 While holdin...

Page 15: ...example if the initial default range is not enough when one person is playing the left hand part and another person is playing the right hand part 1 While holding down the FUNCTION and METRONOME butto...

Page 16: ...stop 1 While holding down the FUNCTION button press the START STOP a button This will start Concert Play playback from song 1 Songs are played in their Concert Play number sequence You can play along...

Page 17: ...reath sounds and performance noises To listen to a Concert Play song LISTEN 1 While holding down the FUNCTION button use the CONCERT PLAY SELECT and keyboard keys to scroll song numbers in sequences f...

Page 18: ...g down the FUNCTION button press the CONCERT PLAY a keyboard key This starts playback without the part you turned off in step 1 4 Play the missing part on the keyboard 5 To stop playback hold down the...

Page 19: ...ressing the and keys at the same time will select song number 1 You also can adjust the playback tempo and volume of the song See Configuring Settings with the Keyboard on page EN 27 for more informat...

Page 20: ...ive port 1 Press the AUDIO RECORDER button Note that you should press the button and immediately release it Do not hold it down This causes the two START STOP a button indicator lamps to light 2 Press...

Page 21: ...omatically if the number of notes in memory exceeds the maximum Recorded Data Keyboard play Tone used Pedal operations Hall simulator and chorus settings Track 1 only Tempo setting Track 1 only Layer...

Page 22: ...p Track 2 R lamp Example Track 1 selected 3 Select the tone and effects Track 1 only you want to use in your recording Tone page EN 7 Effects page EN 10 NOTE If you want the metronome to sound while y...

Page 23: ...as you record to Track 2 5 Select the tone and effects Track 1 only you want to use for your recording 6 Press the START STOP a button or play something on the keyboard This will start both playback o...

Page 24: ...data stored in song memory the memory playback and your keyboard play are both recorded to USB flash drive Linear PCM 16bit 44 1 kHz Stereo Recording Capacity 99 files No 01 to No 99 Approximately 25...

Page 25: ...Playing Back Data Recorded on a USB Flash Drive page EN 25 To exit the audio record playback operation press the AUDIO RECORDER button Recording Digital Piano Play as Data Recorded in Song Memory Play...

Page 26: ...rolls forward You also can use the number keyboard keys 0 through 9 to inputting a file number 1 to 99 and directly select a file TAKE01 WAV TAKE02 WAV etc The keyboard will beep if there is no file o...

Page 27: ...erse chronological order Press the plus keyboard to key scrolls forward You also can use the number keyboard keys 0 through 9 to inputting a file number 1 to 99 and directly select a file TAKE01 WAV T...

Page 28: ...ind the location on the keyboard for configuring the setting you want 3 While holding down the FUNCTION button press the keyboard key for the setting you want to configure The Digital Piano will sound...

Page 29: ...Piano will beep to let you know which setting is selected A long beep indicates that the applicable setting is turned off Example While chorus is turned off pressing the CHORUS keyboard key twice will...

Page 30: ...dnUSB flash drive mode doFormat dpSave dqLoad drDelete 1USB device mode bnConcert Play song select bpHall simulator boConcert Play volume 7Metronome tempo 8Metronome beat bqTone selection bmPlay blLe...

Page 31: ...t the same time cn Layer balance 24 to 0 to 24 Default 10 B Specifies the volume balance between the main tone and the layered tone page EN 9 To return the setting to its initial default 10 press and...

Page 32: ...NCERT PLAY a Play Stop D Toggles a Concert Play song between play and stop page EN 16 This setting cannot be changed while recording bk Listen LISTEN A Enters the Concert Play Listen Mode page EN 16 T...

Page 33: ...r 3 5 Werckmeister 6 Mean Tone 7 Rast 8 Bayati 9 Hijaz 10 Saba 11 Dashti 12 Chahargah 13 Segah 14 Gurjari Todi 15 Chandrakauns 16 Charukeshi Base notes C C 0 D 1 Eb 2 E 3 F 4 F 5 G 6 Ab 7 A 8 Bb 9 B T...

Page 34: ...me level cannot be adjusted while recording dk Operation tone Off On Default On D Selecting Off disables sounding of the operation tone whenever a keyboard key is pressed while the FUNCTION is depress...

Page 35: ...Formats a USB flash drive dp Save Off On Default Off Stores data to a USB flash drive dq Load Off On Default Off Loads data from a USB flash drive to Digital Piano song memory dr Delete Off On Default...

Page 36: ...ash drive See Storing Standard Audio Data WAV Files to a USB Flash Drive page EN 36 and Playing Back Audio Data Stored on a USB Flash Drive page EN 19 z Using the Song Recorder to save recorded song M...

Page 37: ...nd change the names of audio data WAV files to the format TAKEXX WAV and move them to the AUDIO folder Then you will be able to play them back on the Digital Piano XX 01 to 99 For information about pl...

Page 38: ...g sequence is being performed The Digital Piano s L R lamps flash while the mounting process is in progress It may take up to 10 or 20 seconds or even longer for a USB flash drive to be mounted Do not...

Page 39: ...ash Driver Folder Structure Diagram Formatting a USB flash drive on the Digital Piano will automatically create the folders shown in the diagram below 1 Insert the USB flash drive you want to format i...

Page 40: ...board key that corresponds to the USB flash drive mode This will cause the L R lamps to flash 3 While holding down the FUNCTION button press the save keyboard key This will cause the GRAND PIANO CONCE...

Page 41: ...tal Piano s Music Library song numbers 61 to 70 After that you can play back the user song or use it for lesson play NOTE Loading song data from a USB flash drive assigns it to the corresponding user...

Page 42: ...button as you use the MUSIC LIBRARY SELECT keyboard keys to select a song number 61 to 70 The Digital Piano will emit a short beep if you specify a correct song number and a long beep if the song num...

Page 43: ...ight To exit the data delete operation hold down the FUNCTION button as you press the USB flash drive mode key 4 Hold down the FUNCTION button as you use the MUSIC LIBRARY SELECT keyboard keys to sele...

Page 44: ...e FUNCTION button press the keyboard key that corresponds to the USB flash drive mode This will cause the L R lamps to flash 4 Press the START STOP a button This will start playback of the song data P...

Page 45: ...something before performing a save operation Read Only A read only file with the same name you are trying to use is already stored on USB flash drive Change the name and then save the new data Remove...

Page 46: ...data Example Delete any tracks that are not required Format 1 The USB flash drive format is not compatible with this Digital Piano 1 Format the USB flash drive on the Digital Piano 2 The USB flash dr...

Page 47: ...If this is the first time you are connecting the Digital Piano to your computer the driver software required to send and receive data will be installed on your computer automatically 4 Start up commer...

Page 48: ...normal for the Digital Piano to power up the next time you turn it on page EN 6 1 Perform steps 1 through 3 of the procedure under Connecting the Digital Piano to Your Computer on page EN 46 2 Change...

Page 49: ...show file name extensions under Windows Vista or Windows 7 To show file name extensions under Windows 8 or Windows 8 1 To load a song into user song memory Music Library 61 to 70 Data Type Folder Name...

Page 50: ...SICLIB into user song memory and the contents of RECORDER into Recorder memory IMPORTANT A data conversion error is indicated when both of the START STOP a button lamps and the GRAND PIANO CONCERT MOD...

Page 51: ...g the risk of personal injury to your hands and fingers Take care that you do not pinch your fingers between parts when assembling them Be sure to insert felt or other material between the rubber feet...

Page 52: ...re the top left and right edges of the back panel C to the brackets 5 of side panels A and B At location 6 slip the clip G onto to the screw H before installing the screw 5 Next secure the bottom of t...

Page 53: ...T The screws J keep the piano from slipping off the stand Never use the piano without the screws J installed 9 Affix the adaptor cord clip M next to the power terminal DC 24V 1 Insert the plug of the...

Page 54: ...ttom of the piano Secure the pedal cord with the clip G 3 Plug the power cord of the AC adaptor that comes with the Digital Piano into a household power outlet as shown in the illustration below 1 Ins...

Page 55: ...k to make sure that the support bracket is standing up fully To close the lid 1 Carefully lift up slightly on the lid 2 Use the fingers of your left hand to press back on the support bracket as you sl...

Page 56: ...iano is turned off before plugging in or unplugging the AC adaptor The AC adaptor will become warm to the touch after very long use This is normal and does not indicate malfunction Use the AC adaptor...

Page 57: ...terminal such as AUX IN to which the piano is connected Use the Digital Piano s VOLUME controller to adjust the volume level Connecting to a Musical Instrument Amplifier 2 Use commercially available...

Page 58: ...d strange Turning power off and then back on again does not eliminate the problem Example Note intensity does not change even though I alter key pressure The Back up feature is turned on Turn off Back...

Page 59: ...ame time while using layer using the Duet Mode playing back a built in tune recording etc Pressing a button when one of these conditions exists will cause the effect setting that is built into the ton...

Page 60: ...sh memory Audio Recorder Real time recording and playback to USB flash drive Linear PCM 16bit 44 1 kHz stereo WAV format Songs 99 files Approximately 25 minutes maximum recording per file Audio Record...

Page 61: ...this product Be especially careful when playing late at night to keep the volume at levels that do not disturb others Other steps you can take when playing late at night are closing the window and us...

Page 62: ...he electrical load output to exceed the label rating 12 Make sure the surrounding area is dry before plugging into a power source 13 Make sure the product is oriented correctly 14 Unplug the product d...

Page 63: ...itaire 1 Duet 13 Fr hlingslied Lieder Ohne Worte Heft 5 14 Fr hlicher Landmann Album f r die Jugend 15 Von fremden L ndern und Menschen Kinderszenen 16 Tr umerei Kinderszenen 17 Tambourin 18 Menuet BW...

Page 64: ...OFF Mode Mode 3 X Mode 3 X Default Messages Altered 0 32 1 5 6 38 7 10 11 16 17 18 19 64 65 66 67 Bank select Modulation Portamento Time Data entry LSB MSB 2 Volume Pan Expression DSP Parameter0 2 DS...

Page 65: ...sion DSP Parameter0 2 DSP Parameter1 2 DSP Parameter2 2 DSP Parameter3 2 Damper Portamento Switch Sostenuto Soft pedal Vibrato rate Vibrato depth Vibrato delay DSP Parameter4 2 DSP Parameter5 2 DSP Pa...

Page 66: ...Precautions Precauciones de seguridad Antes de intentar usar el piano aseg rese de leer las Precauciones de seguridad separadas English Espa ol AP 460 This recycle mark indicates that the packaging co...

Reviews: