Cascadia HDH16 User Manual Download Page 24

24 | 

P a g e          

www.cascadiadvrt.com

              ( 8 8 8 ) 4 2 1 - 0 0 5 0
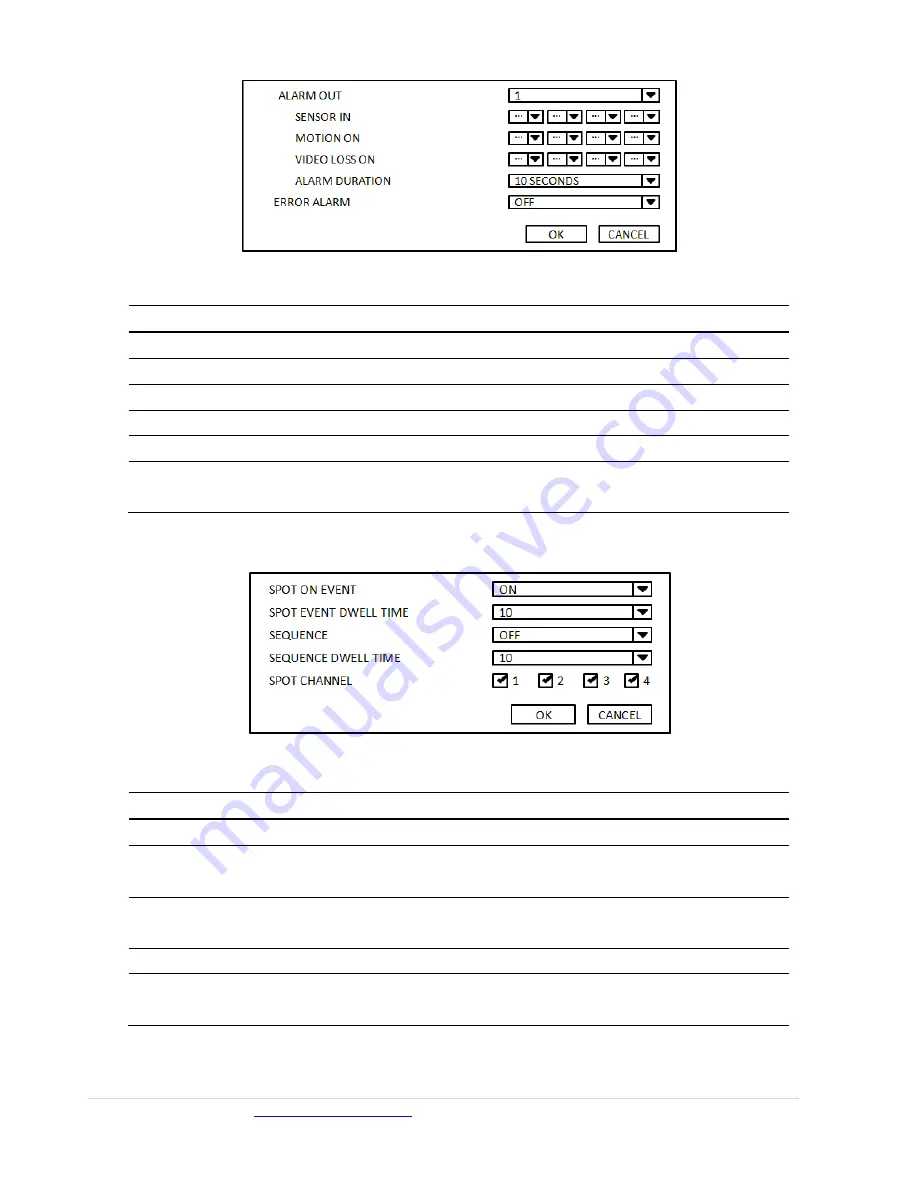
 

2.4.1


ALARM

OUT


Figure


2.4.2


ALARM

OUT


Setup


Screen


Table


2.4.2


Menu


Item


in


ALARM

OUT


Setup


Screen


Item


Description


ALARM


OUT


Select


an


Alarm

out


number.


SENSOR


IN


Enable


Alarm


Out


by


Sensor


up


to


4


Inputs.


MOTION


ON


Enable


Alarm


Out


by


Camera


Motion


up


to


4


cameras.


VIDEO


LOSS


ON


Enable


Alarm


Out


by


Video


Loss


up


to


4


cameras.


ALARM


DURATION


Set


the


alarm


dwell


time


from


5


to


60


seconds.


ERROR


ALARM


Set


the


error


type


for


the


alarm


activation.


The


options


are


OFF,


ALL,


HDD


ERROR,


and


VIDEO


LOSS.


2.4.2


SPOT

OUT


Setup


Figure


2.4.3


SPOT

OUT


Setup


Screen


Table


2.4.3


Menu


item


in


SPOT

OUT


Setup


Screen


Item


Description


SPOT


ON


EVENT


Enable/Disable


display


of


the


channel


when


an


event


is


active.


SPOT


EVENT


DWELL


TIME


Set


the


dwell


time


for


the


display


of


the


event

activated


channel.


(1

10


sec)


SEQUENCE


Enable/disable


sequential


display


of


spot


channel


in


full


screen.


If


select


ON,


spot


channel


selection


screen


is


displayed.


SEQ

DWEL


TIME


Set


the


dwell


time


for


the


spot


channel


display.


(1

10


sec)


SPOT


CHANNEL


Select


a


channel


for


spot


monitoring


using


the


mouse


or


the


control


buttons


on


the


remote


control


and


press


OK


button.


Summary of Contents for HDH16

Page 1: ...r s Guide Ver 3 2 HD SDI DVR Models HDH4 HDH8 HDH16 HDR4 HDR8 HDR16 Analog 960H DVR Models HR4 HR8 HR16 About This User s Guide Before operating the unit please read this user s guide thoroughly and r...

Page 2: ...increase the risk of fire or explosion Replace only with the same or equivalent type battery recommended by the manufacture Discard used batteries according to manufacturer s instructions This symbol...

Page 3: ...w of the unit doing so can damage the unit Installation and servicing should be performed only by qualified and experienced personnel Turn off the power of the DVR when connecting cameras audio or sen...

Page 4: ...etup 25 2 4 4 Motion Zone Setup 25 2 5 Setup Storage Mode 26 2 6 Setup System Mode 27 2 7 Setup Security Mode 30 2 8 Setup Network Mode 32 2 8 1 DDNS 33 2 8 2 Network Ports 33 2 8 3 Network Stream 34...

Page 5: ...2 Event 55 6 6 3 Record 56 6 6 4 OSD 57 6 6 5 Language 57 6 7 Remote Setup 58 6 7 1 Setting the Display 59 6 7 2 Record 59 6 7 3 Storage 59 6 7 4 Device 60 6 7 5 Upgrade 60 6 7 6 System 60 6 7 7 Netwo...

Page 6: ...0 8 3 3 Playback 76 APPENDIX How to Connect the Network 77 A How to set the IP address of the DVR and open TCP port of the router 77 B How to access DVR from a Remote PC 80 LAN Connection Using a Swi...

Page 7: ...ure the following components are included as specified below DVR Client Software DVD Remote Control Battery1 5V AAA x 2EA User Guide as PDF on Client Software DVD Mounting Bracket Screws x2 EA HDH8 HD...

Page 8: ...HDH8 HDH16 HDR4 HDR8 HDR16 Models Only HDMI 1080P Video Output Reliable File System 4 Channel Audio Recording Perfect audio synchronization for court evidence Two way Audio over network via Network Cl...

Page 9: ...0050 9 P a g e Easy to use Graphical User Interface Quick Setup for Recording Schedule Upgrade Software via USB Flash Drive or Network Software Instant and Convenient Backup via USB Flash Drive Exter...

Page 10: ...S M A R T Self Monitoring Analysis and Reporting Technology for HDD Automatic Video Input and Video Loss Detection Covert Camera Operation provides enhanced security Built in PTZ Camera Control Varie...

Page 11: ...M Indicates that sensor s is are triggered or motion is detected D NETWORK Indicates that a network client is connected E BACKUP Indicates that a USB or DVD RW device contains stored data F POWER Indi...

Page 12: ...video in JPEG format in Live or Playback mode 15 LEFT Press to move left or to change the values in Setup mode It is also used as the number 4 when entering password 16 UP Press to move up in the Set...

Page 13: ...rewind the footage at 1x 2x or 4x speed during playback PLAY PAUSE To play or pause the footage in playback mode FF To fast forward the footage at 1x 2x or 4x speed during playback Control buttons Pr...

Page 14: ...creen and select setup from the submenu or press the setup button on the front panel or the remote control Figure 2 1 1 Setup Menu Tree When the DVR prompts the LOG IN window enter password using the...

Page 15: ...g e DISPLAY OSD OSD CONTRAST SEQUENCE SEQUENCE DWELL TIME CHANNEL NAME COVERT BRIGHTNESS CONTRAST HUE SATURATION VIDEO OUTPUT RECORD CHANNEL RESOLUTION FRAME RATE QUALITY RECORDING SENSOR RECORDING PR...

Page 16: ...NTROLLER PTZ CHANNEL NAME SPEED ID SPOT OUT SPOT OUT 1 SPOT OUT 2 CHANNEL MOTION ZONE MOTION SENSITIVITY KEY TONE REMOTE CONTROLLER ID SENSOR TYPE STORAGE OVERWRITE DISK FORMAT DISK INFO RECORDING LIM...

Page 17: ...LAYBACK AUTHORITY NETWORK PORT NETWORK AUDIO PORT WEB PORT NETWORK TYPE DHCP LAN DDNS NETWORK STREAM CONFIG SAVE SETUP TO A USB LOAD SETUP FROM A USB LOAD DEFAULT LOAD FACTORY DEFAULT SOFTWARE UPGRADE...

Page 18: ...the On Screen Display OSD 0 100 SEQUENCE Enable disable sequential display of video in full screen mode SEQ DWELL TIME Set the time interval for channels in sequential display mode 3 60 seconds CHANN...

Page 19: ...isplay of the specified video channel in live display mode BRIGHTNESS Change the brightness value of the specified channel 0 100 CONTRAST Change the contrast value of the specified channel 0 100 HUE C...

Page 20: ...n CHANNEL Use the mouse or control buttons on the remote control to select a channel for applying the following settings Press the right square button to change the setting value of all channels at on...

Page 21: ...4 120 IPS 120 IPS HDR8 240 IPS 240 IPS HDR16 480 IPS 480 IPS QUALITY Select the recording quality for the specified channel LEVEL 1 LEVEL 5 RECORDING Assign the recording mode for each channel Continu...

Page 22: ...ntinuous green Motion yellow and Sensor red 3 Setup Left click and drag the mouse to change the schedule for more than one timeslot Click the respective boxes for times and days to select the entire t...

Page 23: ...Set the details for spot monitoring It supports 2 spot outs CHANNEL Select specified channel for motion zone setup MOTION ZONE Select either Full Zone or Partial Zone for motion sensitivity MOTION SEN...

Page 24: ...activation The options are OFF ALL HDD ERROR and VIDEO LOSS 2 4 2 SPOT OUT Setup Figure 2 4 3 SPOT OUT Setup Screen Table 2 4 3 Menu item in SPOT OUT Setup Screen Item Description SPOT ON EVENT Enable...

Page 25: ...screen you can select or set the protocol type of the camera that is the same as the one installed on the site If the camera has a specific camera ID select the camera ID using the mouse or the contro...

Page 26: ...t click and drag the mouse pointer to select or deselect the area The highlighted area indicates the partial motion detection zone Press the ESC button or right click to return to the previous menu Fi...

Page 27: ...archive any data you may need before you format the hard drive which will delete everything on the drive DISK INFO Hard drive information RECORDING LIMIT Enable disable recording limit RECORDING LIMIT...

Page 28: ...anguage using the mouse or the control buttons on the remote control Once a language is selected the display language changes DATE FORMAT Select the date display format using the mouse or the control...

Page 29: ...start time to 23 00 for Day Light Savings Time Daylight Savings Time cannot be applied if the BEGIN and END dates are the same CLIENT ACCESS Enable Disable remote access for network client software N...

Page 30: ...E SSL or TLS MAIL TO Enter the appropriate email address to enable sending e mail reports using a virtual keyboard MAIL SERVER Enter the appropriate mail server information to enable sending daily e m...

Page 31: ...d when the given function is selected ADMIN NETWORK USER1 USER2 USER3 Selected Checkbox The user can access the function Blank Checkbox The user cannot access the function USER PASSWORD Options are AD...

Page 32: ...O PORT Port for audio streaming the value will be that of the Network Port 1 WEB PORT Web Sever Port number Default 80 NETWORK TYPE Select a type of network connection Options are STATIC or DHCP DHCP...

Page 33: ...r 2 The user then has to input the server name ID and password using a virtual keyboard Figure 2 8 3 Network Setup Screen DDNS Server 2 2 8 2 Network Ports When you connect one or more DVRs to a netwo...

Page 34: ...e The network streaming maximum is the recording frame rate of the channel Figure 2 8 4 Network Setup Screen Network Stream 2 9 Setup CONFIG Mode In the SETUP menu select the CONFIG tab The configurat...

Page 35: ...front panel and press the button to start the loading process LOAD DEFAULT Press the button to reset the system to the default settings The following settings such as Language DVR ID Security User Aut...

Page 36: ...ve Viewing Screen The status bar hides automatically and appears again when moving the mouse cursor to the bottom of the screen Table 3 1 1 Status Indicator Icons in Live Viewing Screen Icon Descripti...

Page 37: ...nuous recording in progress Manual recording in progress To set the Manual recording mode press the Record button on the front panel Motion alarm recording in progress Sensor recording in progress Ind...

Page 38: ...n on the live screen Figure 3 2 1 Search Screen There are 7 ways to search TIMELINE EVENT GO TO FIRST TIME GO TO LAST TIME GO TO SPECIFIC TIME ARCHIVE and LOG How to Search Data from the Time Line Usi...

Page 39: ...timeline bar When the Timeline menu is selected the user can see a calendar containing the recorded data Select a specific date and time The slider bar can be dragged and dropped on the timeline to se...

Page 40: ...to play back the data or the SAVE button to save the data as specified User can find a recording of the specific channel and event Press the PREV to return to the Search window 3 2 3 Go to First Time...

Page 41: ...n after making changes If there is no video recorded at the set date and time the message No Data Exist displays 3 2 6 Archive Search The ARCHIVE Search window is used to find previously stored video...

Page 42: ...by selecting LOG on the SEARCH window Figure 3 2 5 Log Search Screen When the Log menu is selected the user can see a calendar containing recording data Select a specific date and press the NEXT butto...

Page 43: ...e Button Description Return to the previous menu screen search window or exit from the Menu Press to rewind the footage at 1x 2x and 4x speeds Reverse playback speed is shown as 1x normal 2x 2 times n...

Page 44: ...Control keys are Right Left Up Down Select Far REW KEY and Near FF KEY Press the ESC button to return to the main menu Press the PTZ button to escape from the OSD menu AUTOSCAN Press the right key on...

Page 45: ...B flash drive the file format of the flash drive has to be FAT32 5 2 Video Backup onto USB Flash Drive Video can be captured and archived onto the USB flash drive or an External Hard Drive while playi...

Page 46: ...n the remote control 2 Once you have selected the date press the NEXT button to open the list of stored data 3 Use the mouse or the control buttons on the remote control to scroll through the archive...

Page 47: ...format NSF format Video in the H 264 format can be played back using the HD player utilized exclusively by the DVR which will be copied on USB flash drives alongside video This format is only availabl...

Page 48: ...er system the Multi Client PC and DVR the user may use two way audio to communicate over the network 6 2 Minimum PC Requirements Before installing the program check the PC specifications The DVR remot...

Page 49: ...www cascadiadvrt com 888 421 0050 49 P a g e 3 Select the program folder and click Next 4 The installation status screen is displayed...

Page 50: ...Client icon on your desktop to start the Multi Client program 6 4 1 Main User Interface 6 4 2 Control buttons Buttons Description LOCAL PLAYBACK Left click this icon to open a playback window to sear...

Page 51: ...guration for the Multi Client CAPTURE Left click this icon to capture a still image EVENT LIST Opens list of events logged by the Multi Client PAUSE Left click this icon to play pause live video ALARM...

Page 52: ...arch window Local Playback Remote Playback 6 5 2 Main Control Panel Buttons Description LOCAL PLAYBACK Left click this icon to open a playback window to search and play videos that are recorded on the...

Page 53: ...AVI format BACKUP Left click this icon to back up the recorded video in the AVI format AUDIO Set the audio volume level with the control bar Select the number of DVR s 1 DVR 4 DVRs 9 DVRs or 16 DVRs...

Page 54: ...ired whenever a user attempts to access any of the selected functions 6 6 1 2 Save Path Specify a location to save captured still images for data Capture and Backup 6 6 1 3 Miscellaneous Automatic rec...

Page 55: ...g e 6 6 2 Event Event logs can be archived and searched 6 6 2 1 Archiving Event Log Determine the location and size of the event logs and the events to archive 6 6 2 2 Archiving Event Log Event logs...

Page 56: ...up for specific DVRs and or channels When the Multi Client Software is set for Event Recording it will record motion or alarm events with a preset duration 6 6 3 2 Local Storage Setup Recording Selec...

Page 57: ...ww cascadiadvrt com 888 421 0050 57 P a g e 6 6 4 On Screen Display OSD Select the On Screen Display OSD to display network usage date and time and events 6 6 5 Language Select the appropriate languag...

Page 58: ...e Setup The DVR Remote Setup can be accessed from a Remote PC via the Multi Client Software Connect to a site hover over a channel with the mouse and right click When the following window is displayed...

Page 59: ...7 1 Display Settings Select Display to set the live video display conditions 6 7 2 Record Select Record to set the recording conditions 6 7 3 Storage Select Storage to configure the recording settings...

Page 60: ...vice Select Device to set the motion zone sensor input alarm output PTZ control and spot setting conditions 6 7 5 Upgrade Select Upgrade to upgrade the firmware remotely from the Multi Client Software...

Page 61: ...then a window will be displayed as below o Site Name Input a name that properly describes the site o Site Address Input IP Address public IP address of a router that DVR is connected or Domain name re...

Page 62: ...red site is added on the directory window 6 8 1 2 Deletion of Sites 1 Select the site sites to delete from the directory window 2 Left click SITE DELETE button to delete the selected site sites 6 8 1...

Page 63: ...ave the changes 6 8 2 Connect and Disconnect 6 8 2 1 Connect 1 Select site sites to connect from the directory window 2 Left click CONNECT button to connect to the selected sites 6 8 2 2 Disconnect 1...

Page 64: ...capture from the display screen otherwise all channels will be captured 2 Left click CAPTURE button to open the Capture window 3 Select the Save Path create a File name and select a File Format BMP or...

Page 65: ...P button A setup window will be displayed as below 2 Select Record and set the values 3 Select Disk and set the values 4 Left click RECORD ON button The button color will change 5 Live video data is r...

Page 66: ...e Playback window will be displayed over the Live window 2 Select site sites to connect from the directory window 3 Left click CONNECT button The blue bar displays in the Search calendar and the timel...

Page 67: ...will be displayed over the Live window 2 Select the site to connect from the directory window 3 Left click CONNECT button In the Search calendar and on the timeline colors indicate video data 4 Move t...

Page 68: ...click MARK IN button on the timeline scale to select the backup start point 4 Left click MARK OUT button on the timeline scale to select the backup end point The period between the selected start and...

Page 69: ...layed back in Window Media Player or other media players compatible with video in the AVI format Notice When the video is backed up in the NSF format the user can play it back with the DVR Player whic...

Page 70: ...te Web Brower is only available for Internet Explorer 1 Check the IP address of the DVR from SETUP SYSTEM DESCRIPTION IP ADDRESS 2 Input the IP address or Domain name address that you pre registered o...

Page 71: ...r the Domain name address that you pre registered on www ddnscenter com port number and password and then left click Connect IP Address Input IP address Public IP address of a router that DVR is conne...

Page 72: ...2 1 0 0 5 0 7 The cameras connected to the DVR are displayed on the screen 8 SETUP The menu settings for the DVR unit can be set from a PC via the network Refer to section 6 7 Remote Setup of the Mul...

Page 73: ...iUMS in the App Store or the Google Play Store 3 Install the iUMS app The iUMS icon will be then display on the phone 8 2 Mobile Application for Android Live Monitoring Search and PTZ Control 8 2 1 L...

Page 74: ...ally press SELECT button 3 The app will display the selected channel s Double tap the channel screen to switch between 1 channel display and 4 channel split display 8 2 2 PTZ Control To control the PT...

Page 75: ...hen select the channels Up to 4 channels can monitored at a time Set Mode to Live and then click Connect 3 The app will display the selected channel s Double tap the channel screen to switch between 1...

Page 76: ...layed back at a time Select Mode as Playback and then click Connect The search window will display 2 Select the date hour minute AM PM and then click Connect Play 3 The app will display the selected c...

Page 77: ...the DVR remotely NOTE Please check router s User s Manual for detailed instructions on Port Forwarding Connect network cable between DVR and Router or ADSL modem 1 Default network setting on DVR are P...

Page 78: ...TYPE is set to DHCP If the DVR s NETWORK TYPE is set the LAN input the following information in the DVR IP Address Subnet Mask and Default Gateway Open your web browser Enter the router IP address in...

Page 79: ...ple store1 ii Start Enter the first number of the port you need to port forward Example 2100 or 2200 iii End Enter the last number of the port you need to port forward Example 2100 or 2200 iv Protocol...

Page 80: ...he DVR from SETUP SYSTEM DESCRIPTION 3 Run network client software and click button 4 Input Site Name Site Address IP address Port Number and Password on the connect window o Site Name Input a name th...

Page 81: ...advrt com 888 421 0050 81 P a g e o Password Input network password of DVR Default Password is 1111 5 Click the OK button and then click the button after checking the box to the left of the site in th...

Page 82: ...Web Port 80 in the router Refer to APPENDIX A How to set IP address of the DVR and open TCP port of the router 3 Confirm the MAC address and Serial Number from the DVR Note The MAC Address and the Se...

Page 83: ...N button to add the DVR o Site Name Input a name that properly describes the site o IP Address Input IP address public IP address of router to which DVR is connected or Domain name that is registered...

Reviews: