CAS ScanMaster M1 Quick Use Manual Download Page 17

Measurement method 2 (M1)

The green prompt light indicates that the 
measurement is completed.

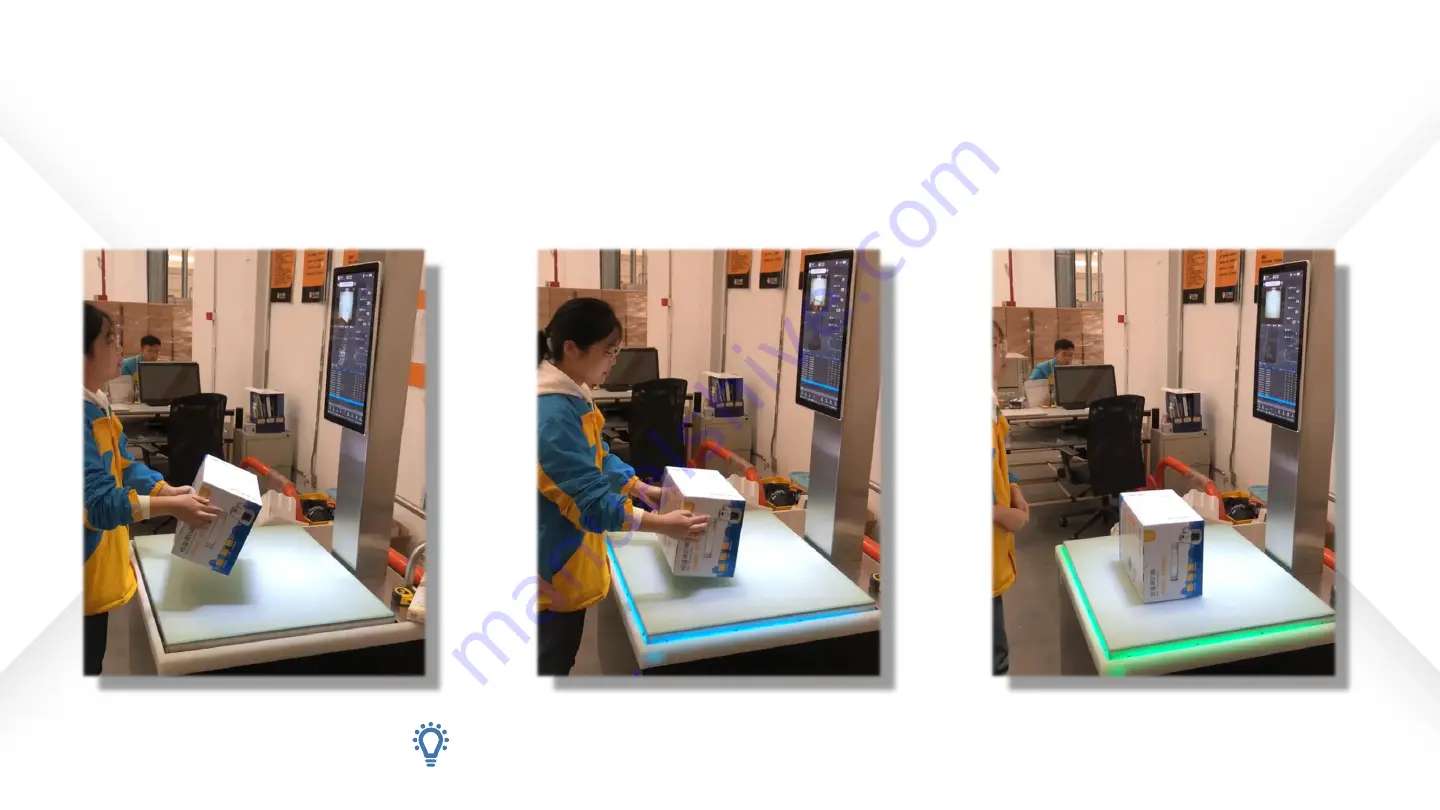
Step1: Hold the item in your hand 
with the barcode facing up.

Step2: After the barcode identification is successful, 
the blue prompt light will be on, and then the goods 
will be placed on the test table.

Step3: Take the package away when 
the green ambient light is on.

Summary of Contents for ScanMaster M1

Page 1: ...ScanMaster M1 M2 Static Parcel DWS System Quick use manual ...

Page 2: ...ScanMaster M1 M2 Introduction of Main Components ...

Page 3: ...Visual measurement module Automatic bar code and Dimensioning Touch screen Scale Tempered glass countertop Ambient light prompt Shock absorber caster ...

Page 4: ...PAD Wireless control of ScanMaster M2 Scale Multi section roller table for different sizes Double visual measurement module Automatic bar code and Dimensioning 32 screen ...

Page 5: ...Quick Operations Wizard Open device Use equipment for measurement Shut down equipment Query historical data SOP ...

Page 6: ...r switch Back of equipment Open device M1 Step1 Rotate the power switch on the back of the equipment and the switch knob shows red Step2 Click the boot button on the front of the device and the blue button shows that the device is on ...

Page 7: ... the main power switch the red light is on Step2 Rotate the power switch on the left side of the device the switch knob lights up red Step3 Click the boot button on the left side of the device and the button displays blue to indicate that the device is turned on Main switch Left side of device ...

Page 8: ...Open the application The first time the machine is turned off after a period of time please wait 5 minutes for the machine to warm up ...

Page 9: ...User login Step1 Enter username and password M2 is input on the PAD Step2 After logging in you can view the user information interface ...

Page 10: ...isplay Measurement live display Barcode label photo Data communication record Device module status Item size and weight data display Live efficiency information User information or package identification display ...

Page 11: ...ote technical support Light dark theme replacement Simplified Chinese Traditional Chinese English Language Switching Real time monitoring interface nearly 20 acquisition data interface switching Recent data list Homepage button ...

Page 12: ...Homepage button The weight is forced to zero System settings button ...

Page 13: ...System shutdown Step 1 Click System settings button Step 2 Click shut down tab Step 3 Click Turn off tab Wait for the main swich to turn off after the display is completely turned off ...

Page 14: ... button function introduction Recollection Print again Shut down Reboot Statistical interface Recent detailed record collection The weight is forced to zero Manually enter bar code and measure Return to the login screen ...

Page 15: ...ble and nothing around it touches the measuring table 2 Make sure your glass countertops are clean 3 The status prompt lights at the bottom of the software are all green When the no load weight is not zero you can click the zero button Equipment self test status display ...

Page 16: ...ient light around the table indicates that the measurement is over The barcode of the package is placed face up on the measuring table Quickly move your hands away from the measuring table Measurement delay is optional The barcode position ...

Page 17: ...nt is completed Step1 Hold the item in your hand with the barcode facing up Step2 After the barcode identification is successful the blue prompt light will be on and then the goods will be placed on the test table Step3 Take the package away when the green ambient light is on ...

Page 18: ...ient light around the table indicates that the measurement is over The barcode of the package is placed face up on the measuring table Quickly move your hands away from the measuring table Measurement delay is optional The barcode position ...

Page 19: ...nt is completed Step1 Hold the item in your hand with the barcode facing up Step2 After the barcode identification is successful the blue prompt light will be on and then the goods will be placed on the test table Step3 Take the package away when the green ambient light is on ...

Page 20: ...p1 Click the gear shape icon in the bottom right corner of the homepage Step2 Select History Step3 Enter the history list perform range query and export Step 1 Step 2 Step 3 Step 3 Label photo Item photo Item measurement video ...

Page 21: ...Item measurement video interface You can click the video play button after selecting the record and the UI will display the video when the package was measured ...

Page 22: ...Pay attention to the prominent part of the package SOP Measurement help guide ...

Page 23: ...Try to remove the outer transparent packaging bag if you can not remove as far as possible to fold measurable If you can do it horizontally don t do it vertically SOP ...

Page 24: ...Bottled products should be placed horizontally first It is best to use measurement method 2 in order to avoid goods rolling and unable to scan the bar code Such goods can be turned upside down SOP ...

Page 25: ...le way to put it Avoid direct sunlight The overall size of the object to be measured shall not exceed 600 600 600 mm Scan Barcode The area with bar code should not be close to the edge of the test table the edge of the table is easy to lead to incomplete identification Avoid direct sunlight which may cause the surface of some materials to reflect light Barcodes below 8mils cannot be automatically ...

Page 26: ...SHANGHAI CAS ELECTRONICS CO LTD ...

Reviews: